This guide will show you how to get fast traffic from Instagram and TikTok — even without building large accounts.
You’ll learn how to use the SocialAppFarm Scraper and Content Editor add-ons to automatically collect, edit, and repost viral content safely and effectively.
⚠️ Disclaimer: Please always credit or respect original creators when reposting content.
This guide is for educational and fair-use purposes only.
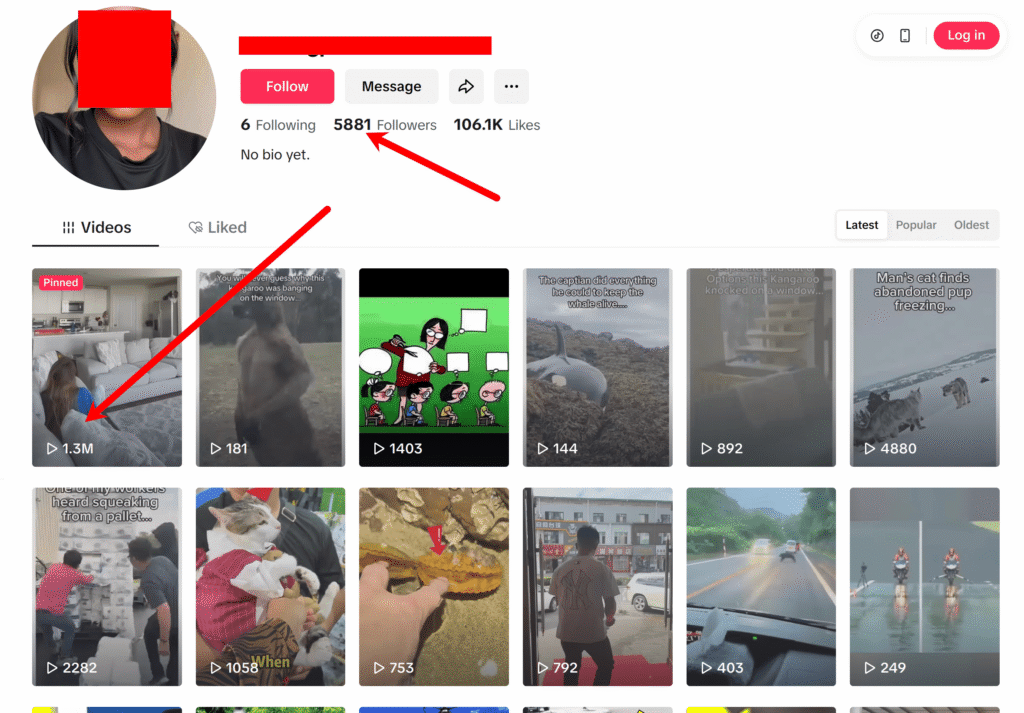
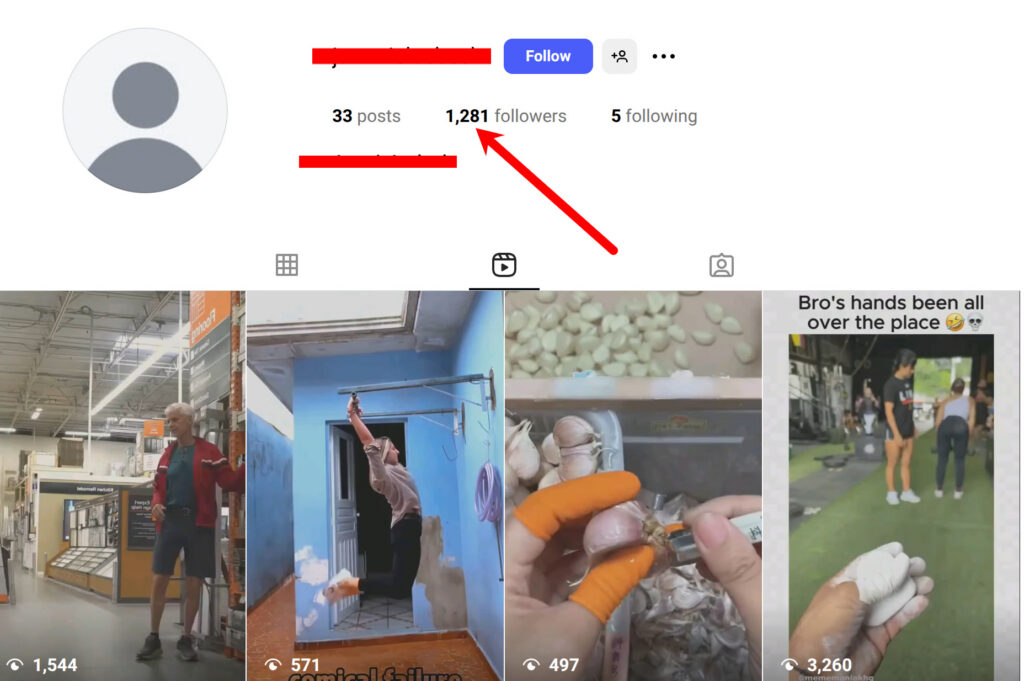
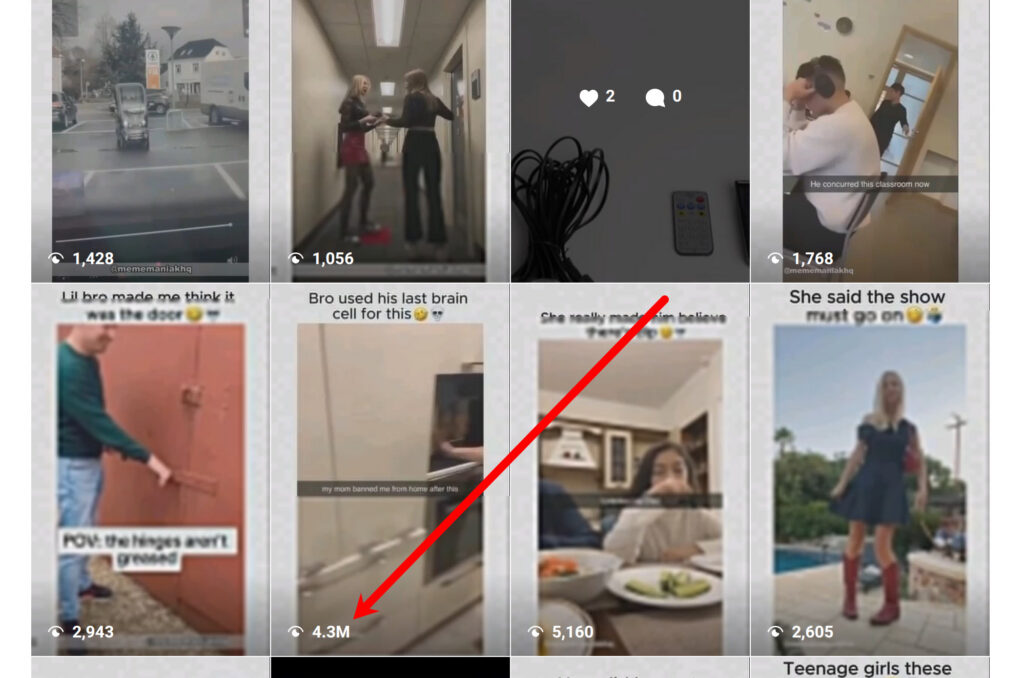
📈 Real Results
Using this method, you can easily get thousands of views, within days or few weeks — entirely through automated reuploads and smart editing filters.
🔥 Recommended Niches
Pick a content niche that goes viral easily:
- Memes
- Comedy skits
- Movie narrations
- Sports highlights
- Pets
- Children humor
- Educational / “cool fact” videos
Once you pick a niche, find 5–10 large accounts in that niche with lots of active posts.
We’ll use those accounts later as scraping sources.
⚙️ Recommended Setup
You can start small or scale big depending on your device setup:
| Accounts | Platforms | Devices Needed |
|---|---|---|
| 25–50 | TikTok or Instagram | 1–2 devices |
| 100 (50 TikTok + 50 Instagram) | Both platforms | 4 devices |
Ensure you have:
- The Scraper Add-on
- The Content Editor Add-on
Create a project and activate it. Then create an automation campaign either for instagram or tiktok. Then import your accounts into it.
Click here to learn how https://socialappfarm.com/blog/how-to-setup-and-create-your-social-media-automation-project-campaign-first-st/
Step 1: Create Unique Video Editing Pipelines
We’ll use Content Editor Pipelines to make scraped videos look unique before reuploading them to TikTok or Instagram.
To get started:
- Review the pipeline options below and choose one that best fits your content style.
- You can also create multiple pipelines for different content queues to compare results and find which edits perform best.
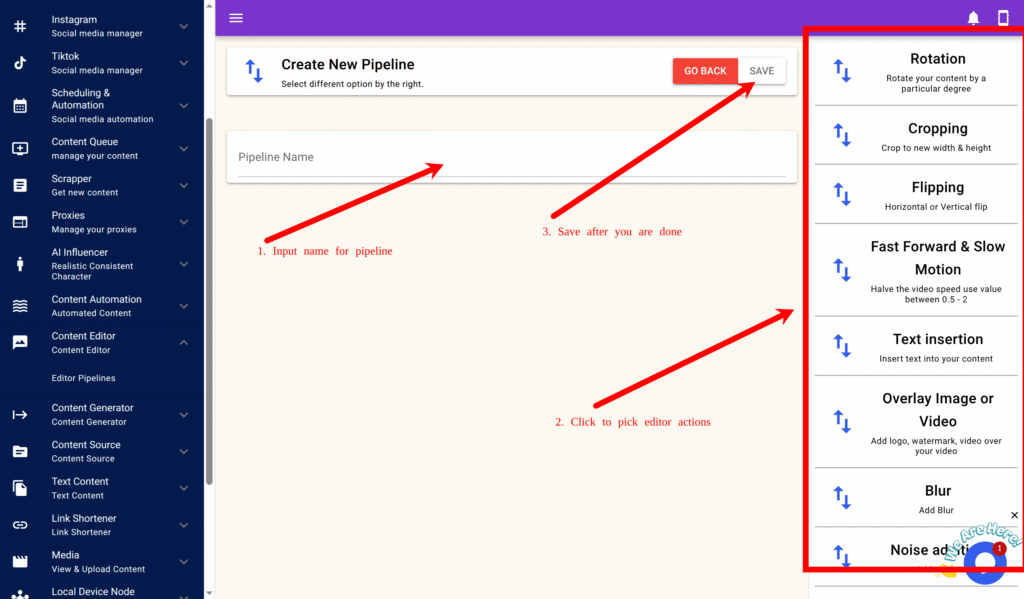
- If you’d like to build your own unique pipeline, click on your preferred filters in the right-hand pane and fill in the required input fields.
- Each filter includes a hint to help guide you on the recommended input range and purpose.
This setup ensures every video is slightly different, helping your uploads stay unique and perform better across platforms.
Creating a New Pipeline
- Go to Content Editor → Editor Pipelines.
- Click New.
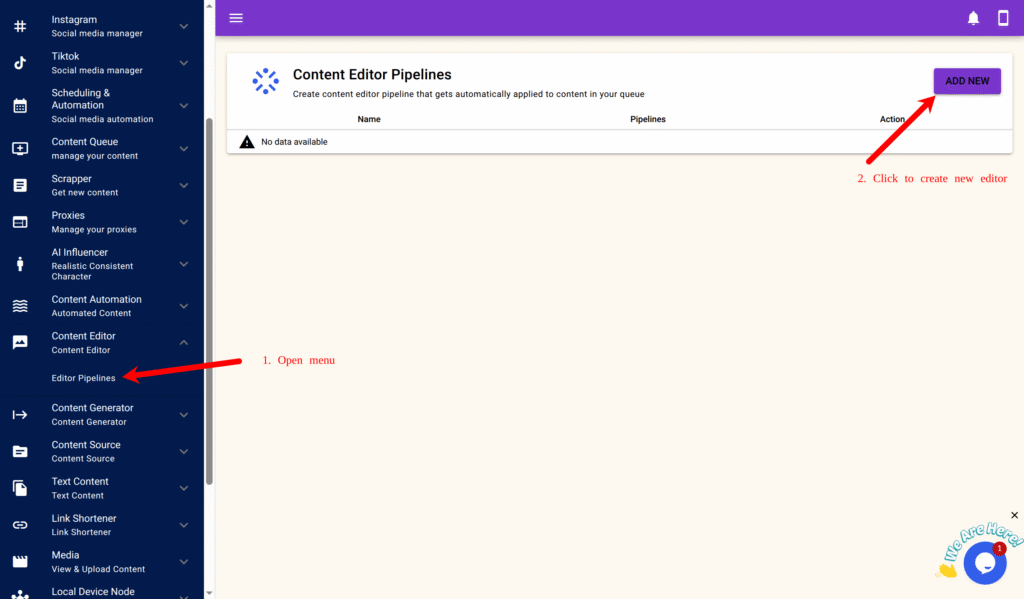
- Enter a name for your pipeline.
- On the right-side panel, add the following filters and parameters.
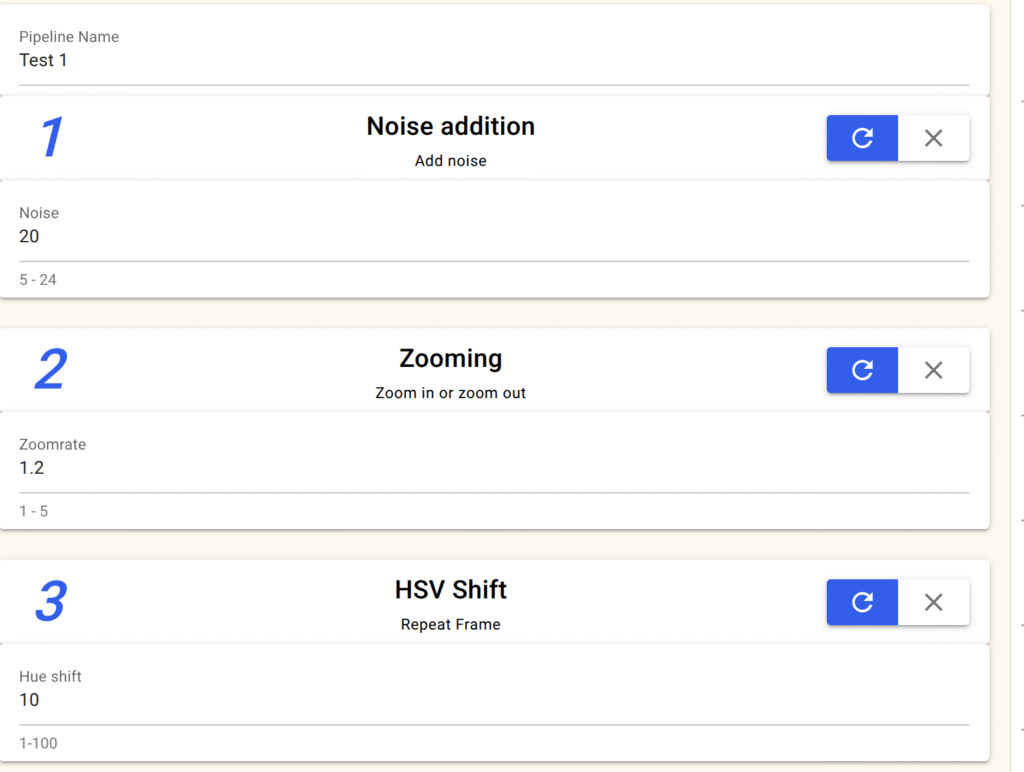
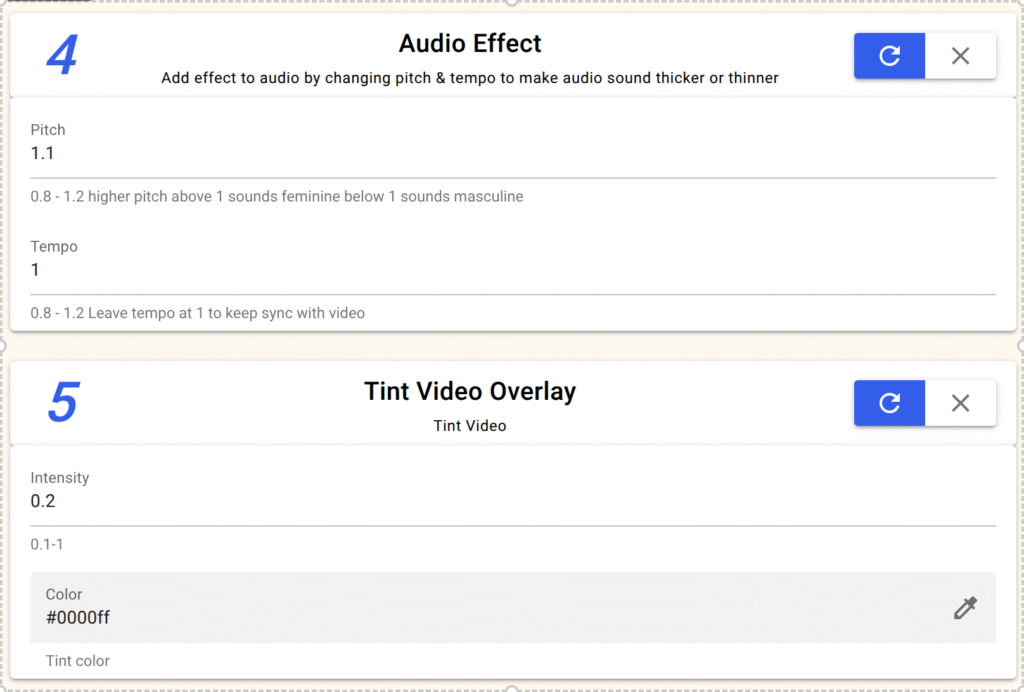
🎥 Pipeline Option 1: Basic Anti-Detection Filter
| Effect | Setting |
|---|---|
| Noise Addition | 20 |
| Zooming | 1.2 |
| Color Tint | color: blueIntensity: 0.2 |
| HSV Shift | Hue shift: 10 |
| Audio Effect | Pitch: 1.1Tempo: 1.0 |
✅ Click Save.
🎞️ Pipeline Option 2: Rotation & Overlay Effect
| Effect | Setting |
|---|---|
| Rotation | Degree: 2 |
| Colored Thin-Lined Overlay | Blur strength: 5Height: 10Padding: 10Opacity: 0.7Position: MiddleColor: #000000 (black) |
| HSV Shift | Hue shift: 10 |
| Audio Effect | Pitch: 1.1 Tempo: 1 |
| Force YUV Format | ✅ Tick this if re-uploading from YouTube |
✅ Click Save.
✨ Pipeline Option 3: Glow & Highlight Filter
| Effect | Setting |
|---|---|
| Sweep Glow/Blurred Thin Lined Overlay /Lens Flare/Colored Thin Lined Overlay | Glow size: 50Speed: 100Color: #ffffff (white)Direction: Diagonal |
| HSV Shift | Hue shift: 10 |
| Audio Effect | Pitch: 1.1/Tempo: 1 |
| Force YUV Format | ✅ Tick this if scraping from YouTube |
✅ Click Save.
✨ Pipeline Option 4: Edge Pertubation
| Effect | Setting |
|---|---|
| Edge Pertubation | Luma msize x: 9luma amount: 1 intensity: 2Correct lense: True |
| Blur | Blur strenght: 0.8 |
| Noise addition | Noise: 15 |
| Audio Effect | Pitch: 1.1/Tempo: 1 |
✨ Pipeline Option 5: Stack Video
| Effect | Setting |
|---|---|
| Stack video | File: Select reaction video Stack Type: Vertical Size: 100 |
| Vintage | |
| Noise addition | Noise: 15 |
| Audio Effect | Pitch: 1.1/Tempo: 1 |
✨ Pipeline Option 6: Overlay Video
| Effect | Setting |
|---|---|
| Overlay Image or Video | File: Select file to overlay on video Content Width: 0 COntent Hieght: 0 Transparent: Top Left Padding: 0 Transparent: True Transparency: 0.2 |
| Vintage | |
| Noise addition | Noise: 15 |
| Audio Effect | Pitch: 1.1/Tempo: 1 |
Step 2: Add CTA (Call-to-Action) or Brand Overlay
Once your content starts gaining views (after ~2–3 weeks), you can embed your own link or CTA.
Option A – Text Overlay
Go to your editor pipeline → click Overlay Text.
Set:
Text: Check my bio 👇
Color: #000000 (black)
Font Size: 13
Position: Bottom Center
Padding: 10
Background: True
Background Size: 20
Background Color: #ffffff (White)
Bg Transparent: 0.4
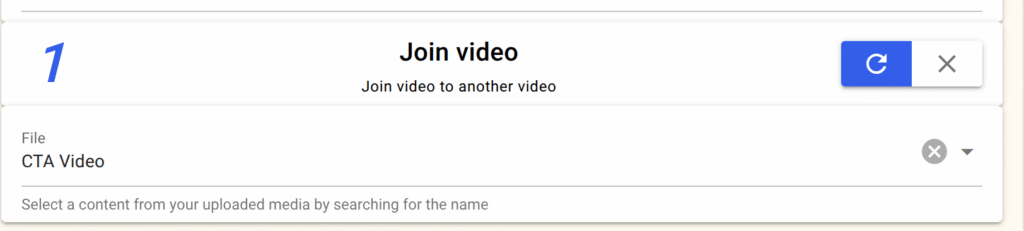
Option B – Join with CTA Video
Use Join Video → select a short promotional clip (e.g., A video that says check out bio for link).
It will be attached automatically at the end of each edited video.
✅ Finally, click Save.
Option C – Use Content Source to include links or shortened links direclty from your shopify store products, woocommerce products, or wordpress post
Step 3: Create a Content Queue
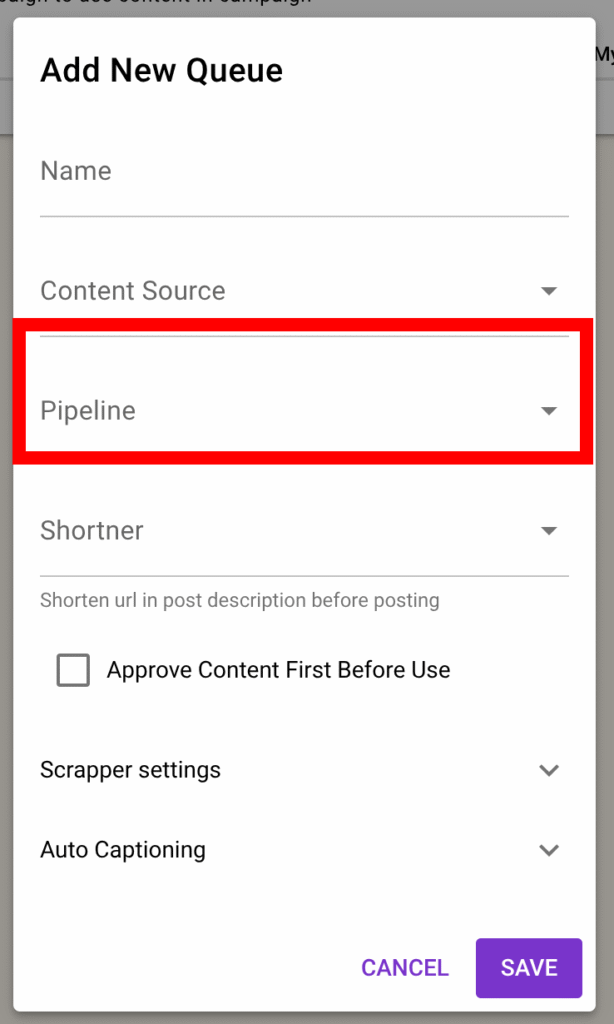
- Go to Content Queue → Add New.
- Name it based on your niche (e.g.,
Viral Meme Queue). - Select this content queue on the automation campaign you created previously in the beginning
- In the Editor Pipeline field, select one of the pipelines you just created.
- Click Save
Step 4: Set Up the Scraper (Headless Mode)
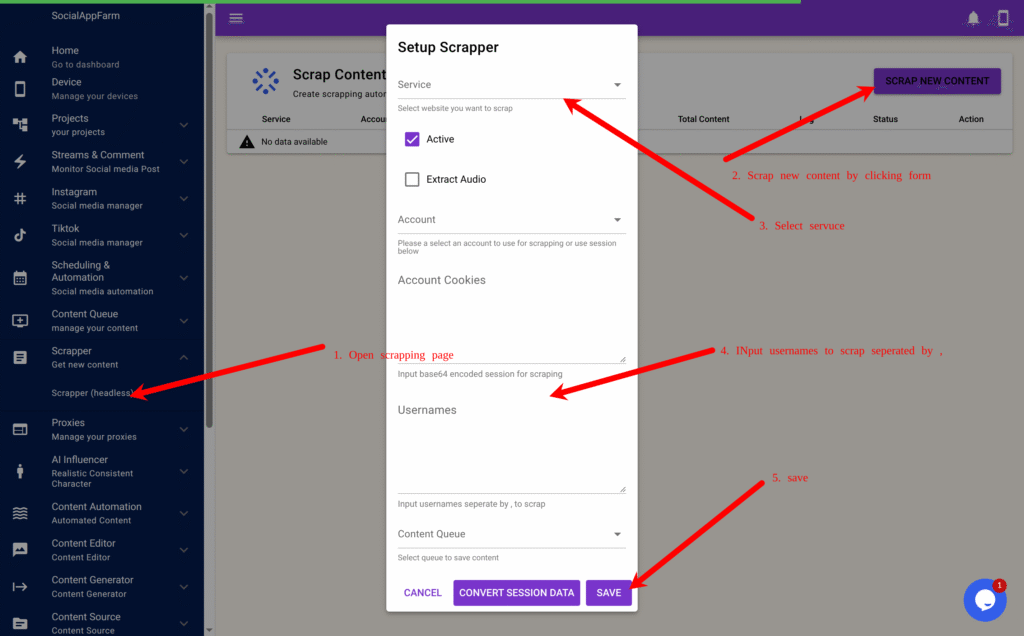
- Go to Scraper → Scraper (Headless).
- Click Scrape Content to create a new scraper task.
- Choose your scraping service (TikTok, Instagram, or YouTube).
- Enter the usernames of the large accounts you found earlier, separated by commas.
exampleuser1,exampleuser2,exampleuser3 - In the Content Queue field, select the queue you created earlier.
- Click Convert Session Data (For Youtube)→ Save.
Step 5: Automate Uploads and Tracking
SocialAppFarm will now automatically:
- Scrape content from the usernames you provided
- Edit them using your selected Editor Pipeline
- Save to your Content Queue
- Auto-post to your accounts through your active campaigns
📊 Tracking Performance
Use these built-in tools to optimize your results:
- Content Queue A/B Graph Report: Identify which content format or filter or niche performs best. Scrap different niche into different queue and compare.
- Projects Dashboard: Monitor overall account engagement, follower growth, and total content left in the queue.
✅ Summary Workflow
| Step | Module | Description |
|---|---|---|
| 1 | Editor Pipelines | Create filters to make scraped videos unique |
| 2 | Content Queue | Link queue to your chosen pipeline |
| 3 | Scraper | Fetch videos from top-performing accounts |
| 4 | Campaign | Auto-upload videos to TikTok/Instagram |
| 5 | Reporting | Track engagement and reupload performance |
🚀 Result
Your SocialAppFarm setup will now:
- Continuously scrape viral content
- Edit it automatically to make it unique
- Reupload it to your TikTok and Instagram accounts
- Drive organic traffic to your e-commerce store, CPA, or affiliate offers — on complete autopilot.