Home

  • Tiktok & Instsgram Marketing Automation Playbook For OnlyFans Agencies Using Managed Device Farm

    CHAPTER 1: INTRODUCTION

    Lead Generation for OnlyFans Agencies

    This playbook explains how OnlyFans agencies use SocialAppFarm to generate consistent, high‑intent leads through managed automation + strategy.

    It is a scalable infrastructure and automation growth framework used by agencies.


    The Expensive Way (Where Most New Agencies Struggle)

    Traditional farm setups are expensive, fragile, and hard to scale:

    • Buying and managing multiple iPhones
    • Purchasing US SIM cards and replacing them constantly
    • Resetting devices, Apple IDs, and apps manually
    • Paying high mobile data and maintenance costs
    • Difficulty targeting multiple countries
    • Hiring developers or in‑house engineers just to automate basics
    • One mistake can burn an entire farm

    This approach breaks easily and does not scale reliably.


    The SocialAppFarm Advantage

    SocialAppFarm removes infrastructure complexity so agencies can focus on models content, branding, and conversion.

    What we remove:

    • No physical devices
    • No SIM cards
    • No Apple ID resets
    • No manual phone management
    • No in‑house automation team

    What you gain:

    • Cloud‑based account farms with unique fingerprints
    • One‑click country targeting via eSIM (US, UK, Europe, etc.)
    • Fast device replacement with our unlimited fingerprint generation when accounts fail
    • Managed setup and support
    • Automation used safely and gradually
    • More features compared to tools used by top OF agencies. Level up with large agencies
    • Support

    Features Socialappfarm offers 

    • Dedicated Account Farm with Minimal Upfront Investment
      Launch and scale without heavy hardware or infrastructure costs.
    • Mass Account Management with Unique Device Fingerprints
      Each account operates independently to maximize safety and longevity.
    • Automated Engagement
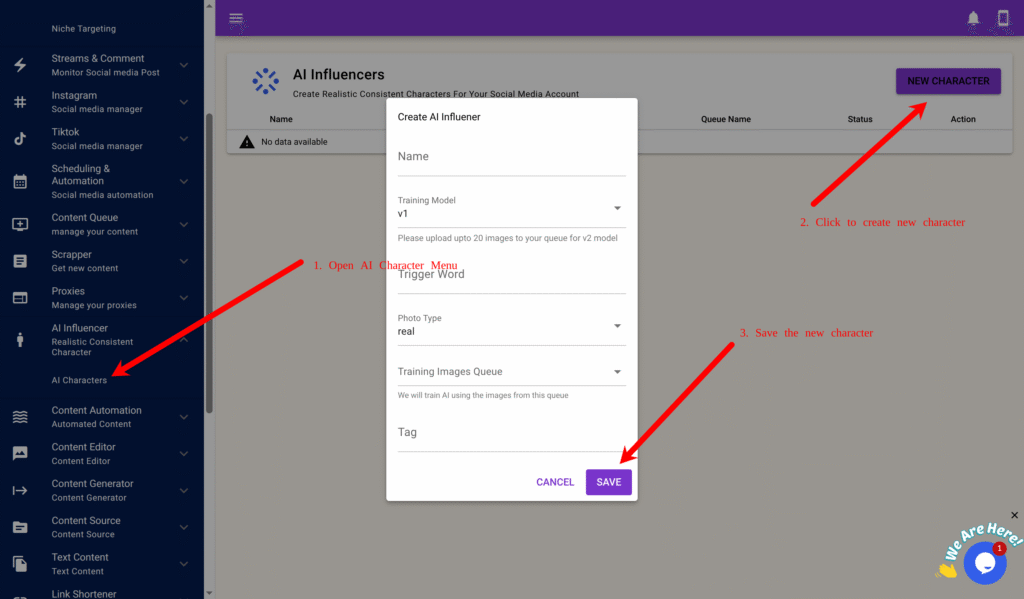
      Smart automation for likes, comments, follows, and DMs
    • AI Influencer Training & Image Generation
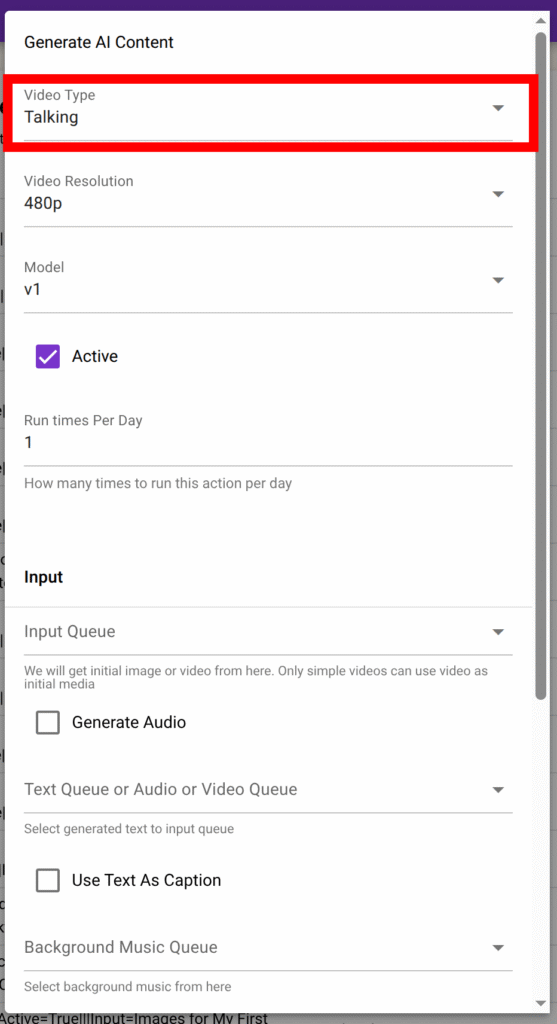
      Create realistic AI personas and visuals for content amplification.
    • AI Talking Videos
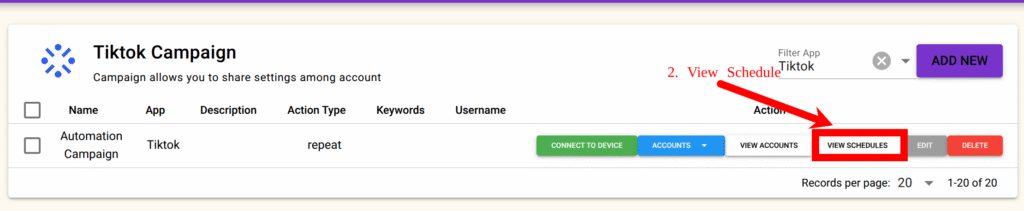
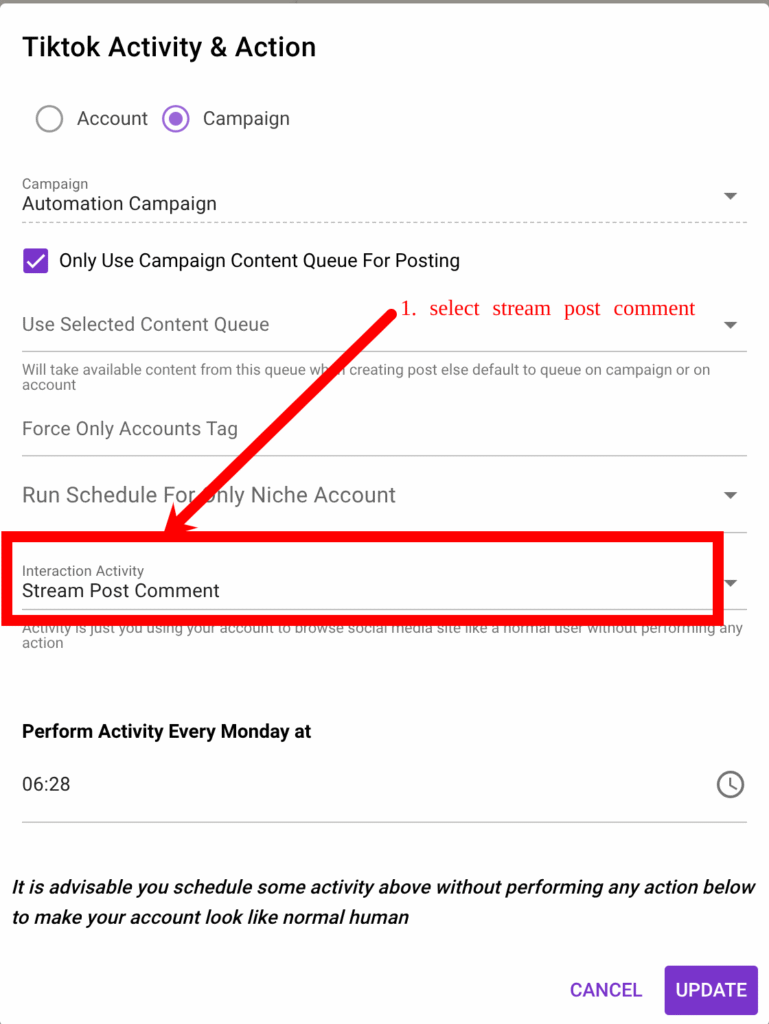
      High-quality realistic talking videos available
    • Post Scheduling
      Plan and publish content consistently across multiple accounts without manual posting.
    • Slide Post Creation
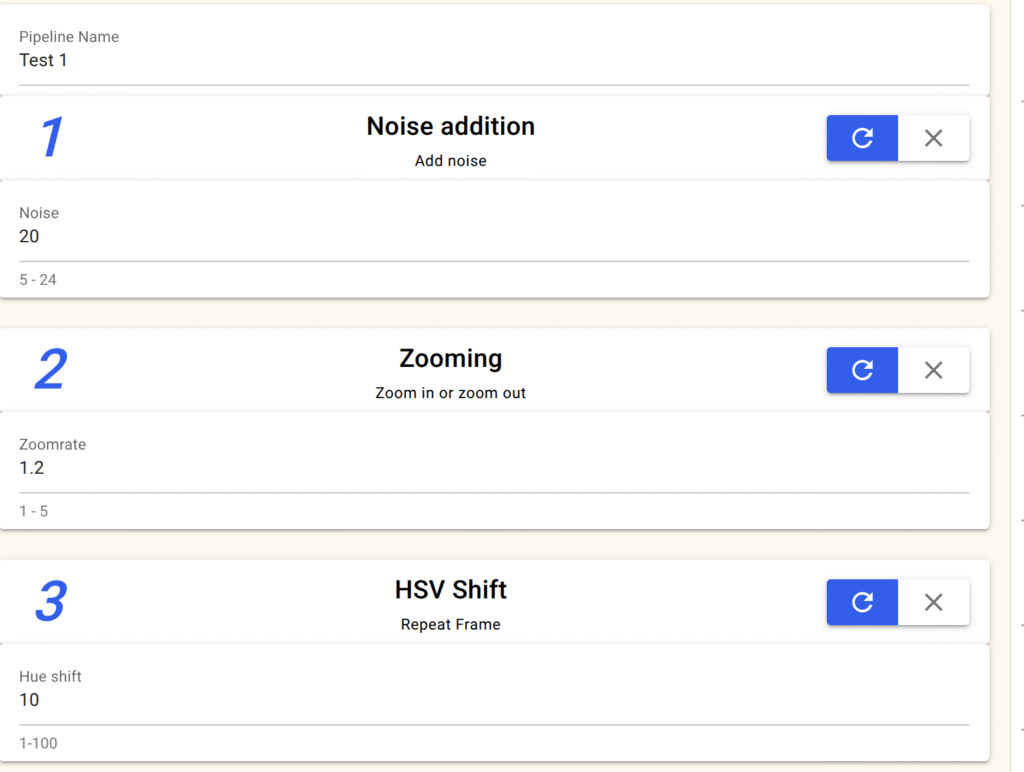
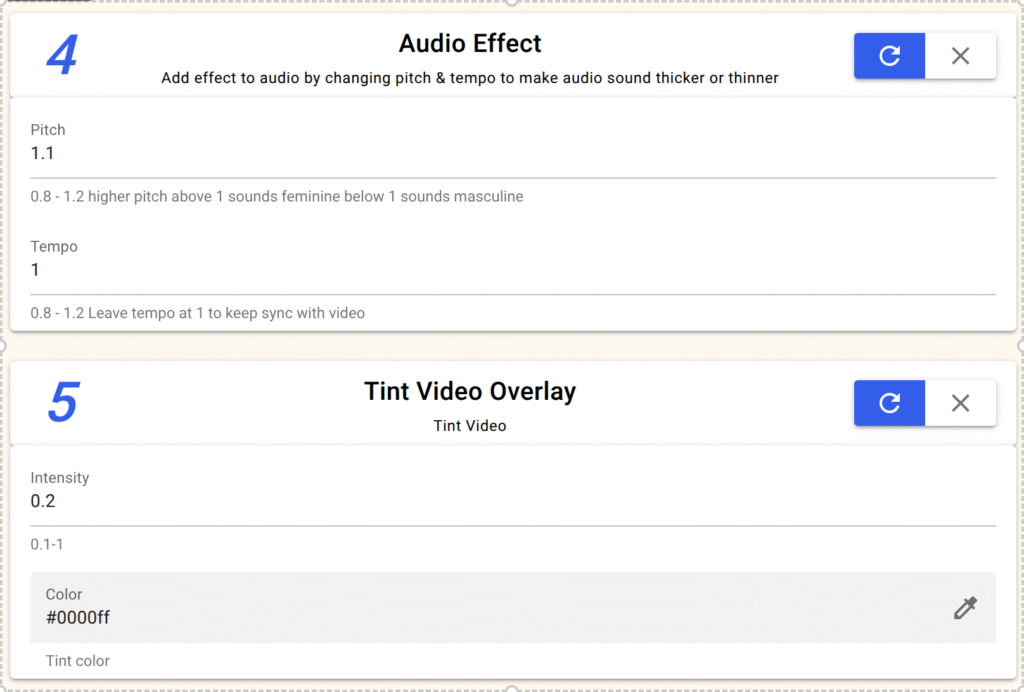
      Text-and-image slide formats optimized for high retention and safe scaling.
    • Automated Content Repurposing 

    Automatically scrap content, clean up, rehash and spoof and repost

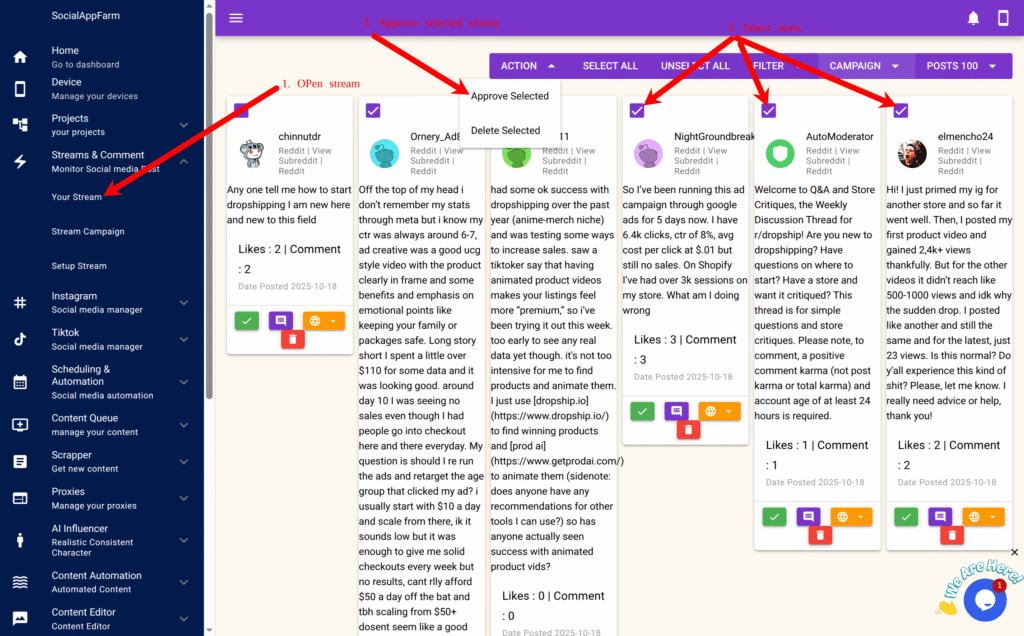
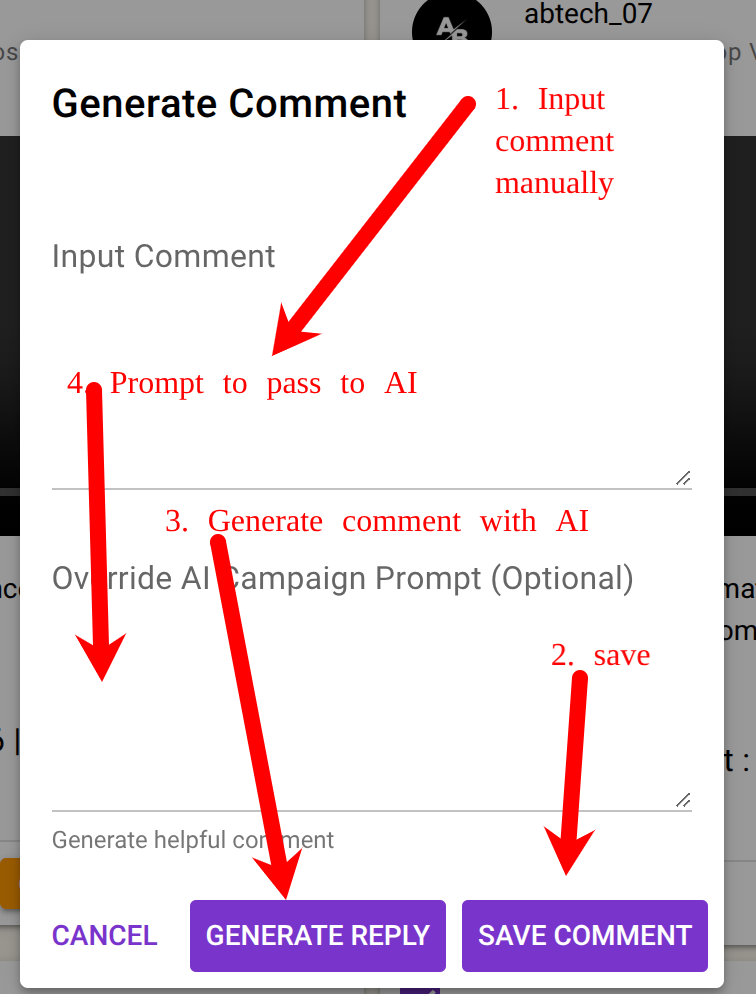
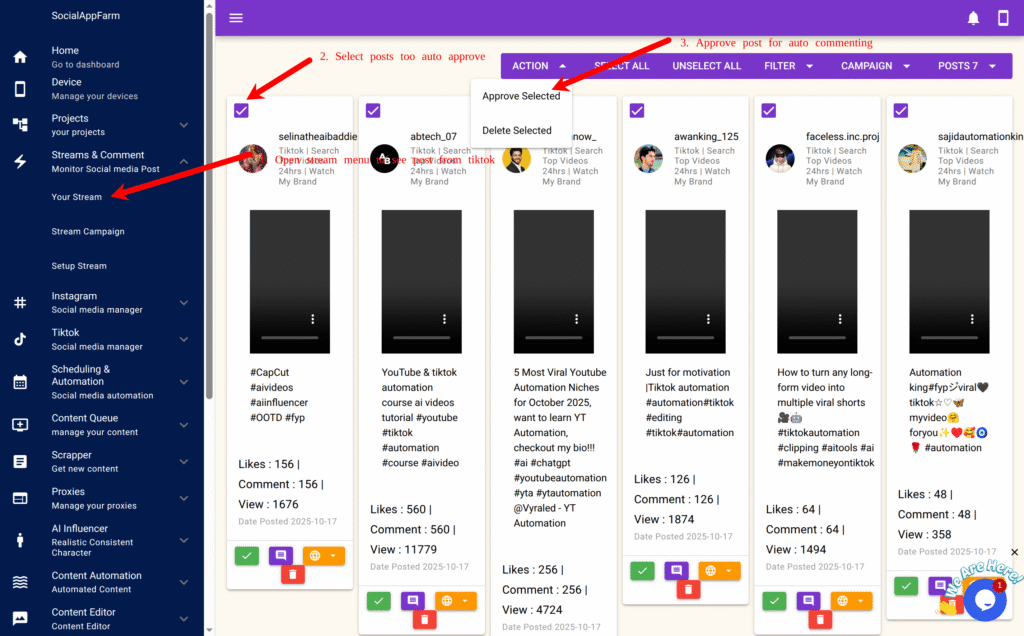
    • Post-Aware AI Commenting (optional)
      AI-generated comments that understand and reference the actual post content.  (helpful and funny comments on male dominated niche drives fast growth )

    .

    • Performance Reporting & Insights
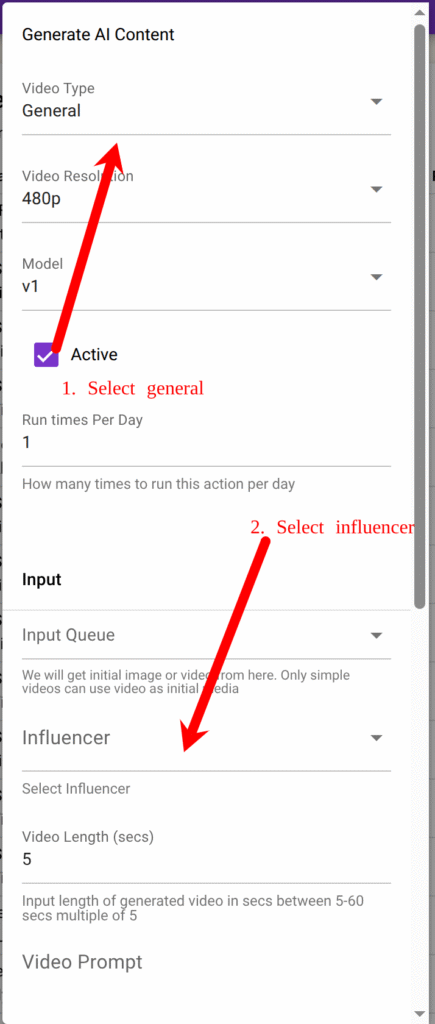
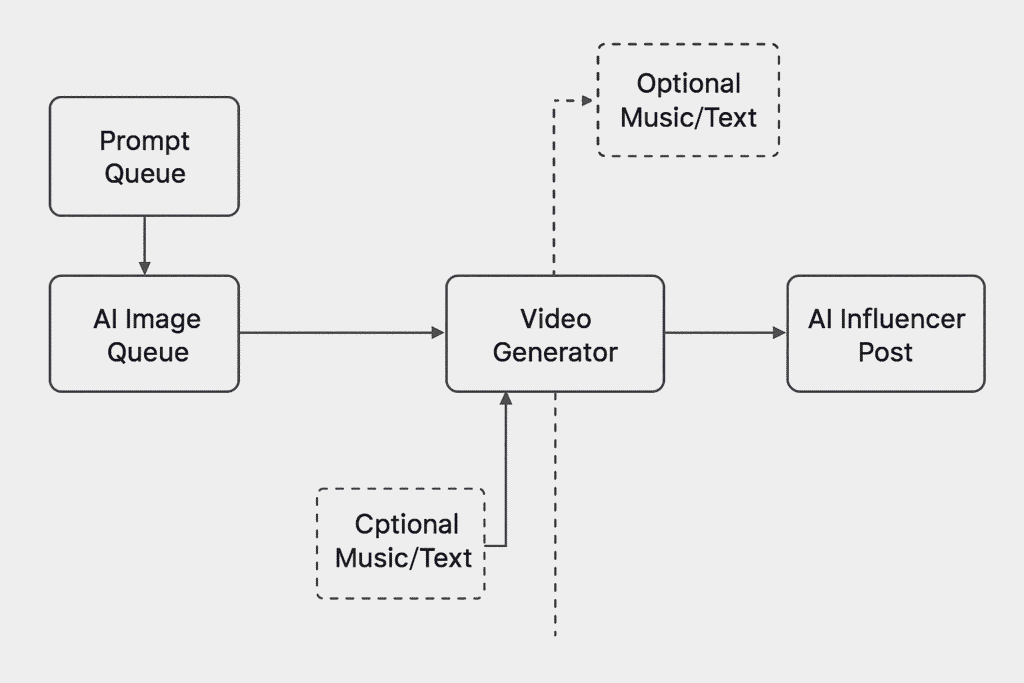
      Clear visibility into account health, engagement, and growth signals.
    • General AI Video Generation (Basic Quality)
      Suitable for volume testing and early-stage experimentation.
    • Live Streaming Support Using Pre-recorded Videos
      Enable live sessions, saves models time and drive engagement and direct traffic once accounts are stable. 
    • Engagement and A/B content report 

    CHAPTER 2: Objectives & Goal

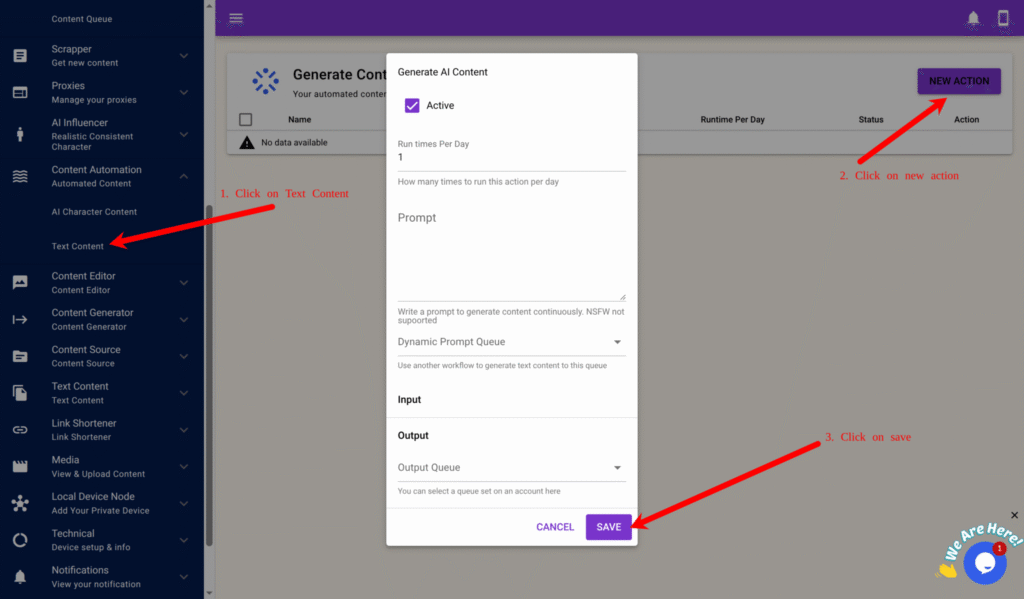
    The primary objective is to generate qualified leads for OnlyFans management agencies through structured automation and reduced manual effort.

    This is a collaborative growth model:

    • Agencies provide content and creative direction and verify processes done by the automation system to guarantee quality.
    • SocialAppFarm provides the automation framework, infrastructure, and growth strategy.

    Performance is managed through:

    • Continuous measurement
    • Clear reporting
    • Identification of what works
    • Iteration and optimization based on real data

    One thing to note is, it is not a one day system. It is a scalable, repeatable growth process designed for agencies focused on long-term performance and predictable lead generation.

    The Recommended Core Philosophy For Models:

     Influencer‑First Branding

    The goal is not random traffic.

    The goal is to build recognizable influencer brands that:

    • Feel authentic
    • Build trust over time
    • Create curiosity
    • Convert consistently

    People subscribe to personalities they connect to not random faceless pages.


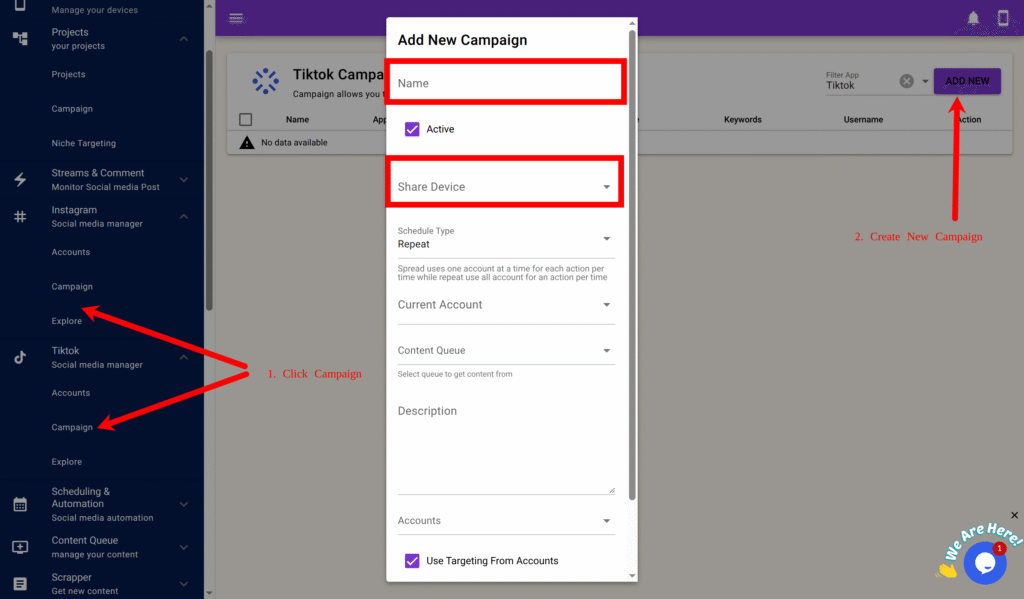
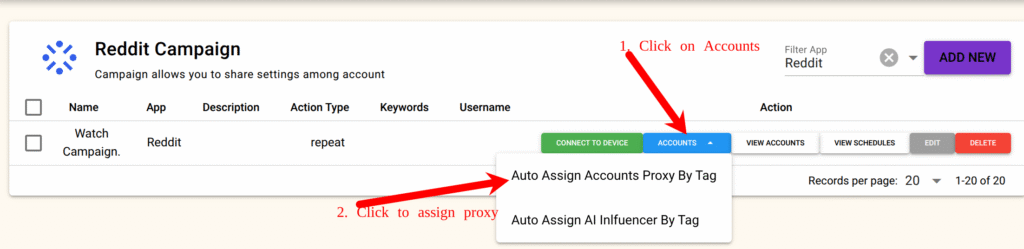
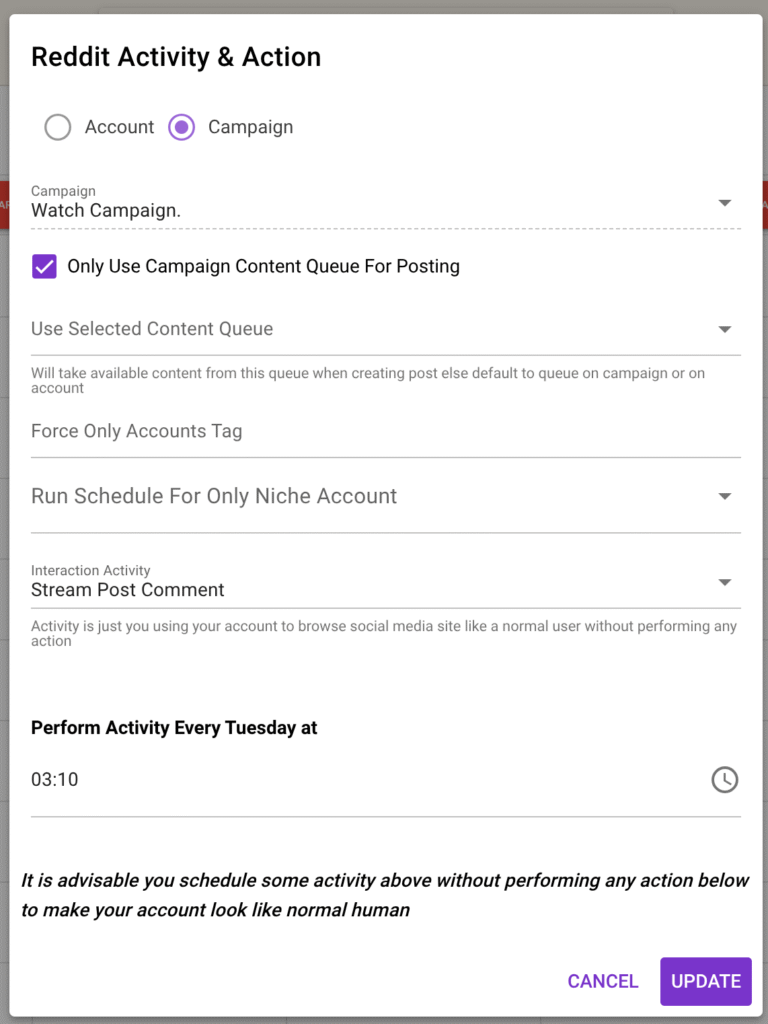
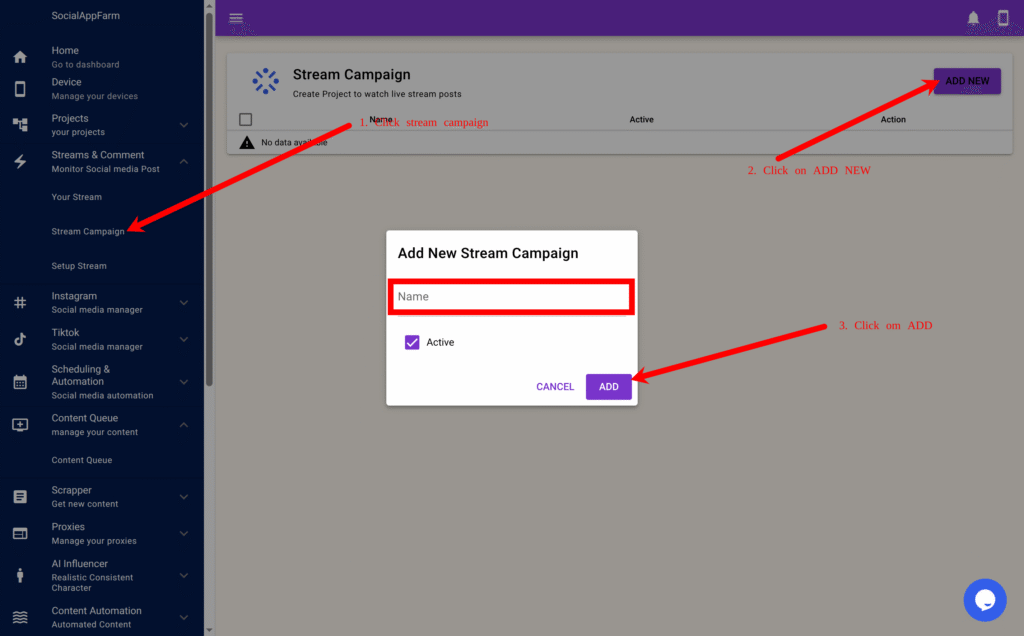
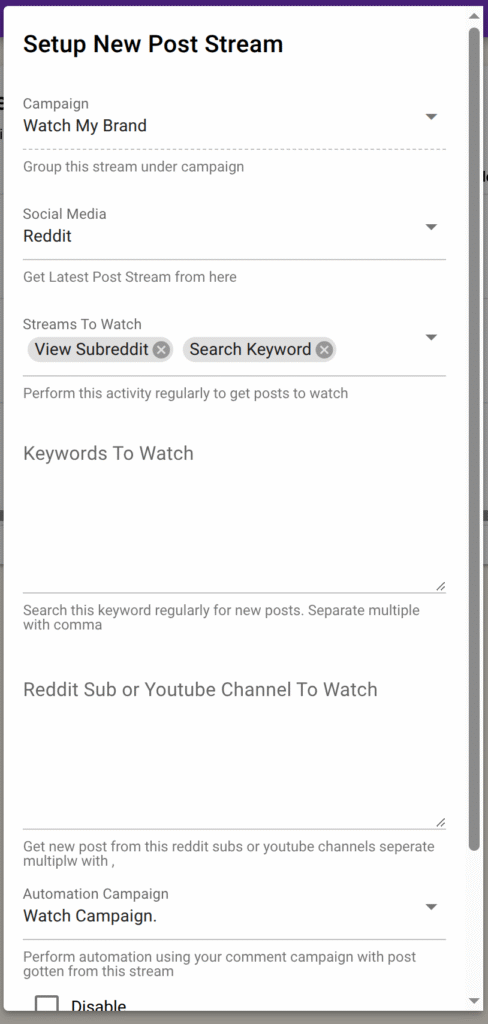
    CHAPTER 3: Automation Marketing Strategy

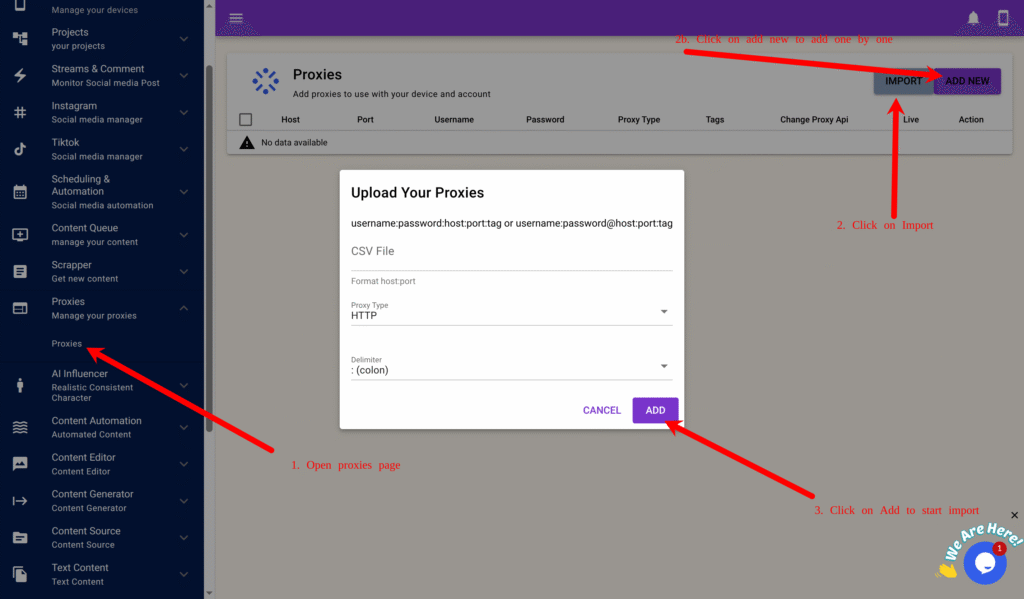
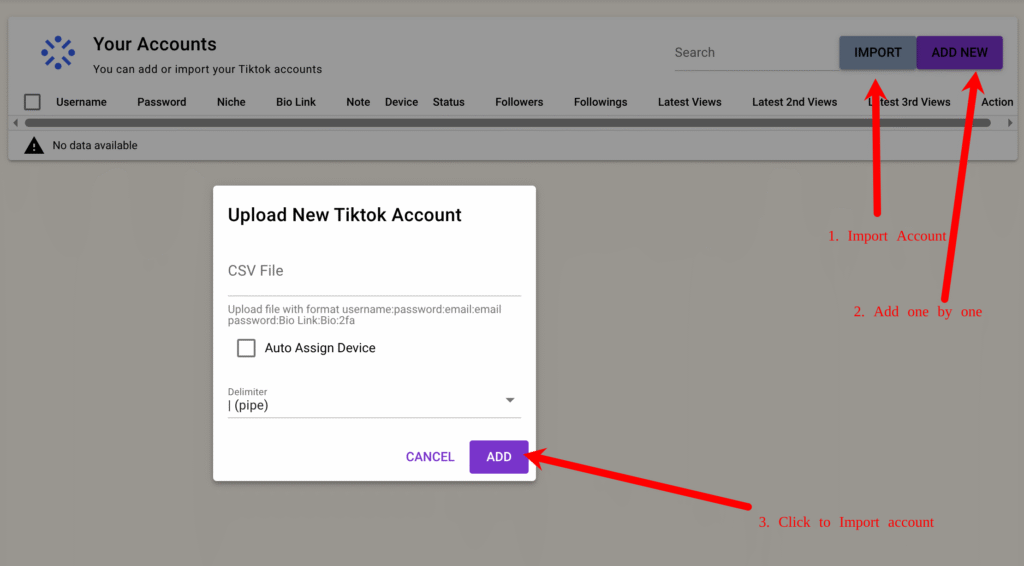
    PART 1: Account Setups & Proxies

    Agencies are to provide the needed accounts and proxies. We can recommend where to get this,

    Aged vs New Accounts

    Aged accounts are recommended:

    • Faster trust signals
    • Faster detection of bad proxies
    • Faster scaling decisions

    Account Setup

    • Optional Recommends aged IMAP‑enabled emails (auto‑verification support by socialappfarm)
    • Phone number optional
    • Profile photo uploaded
    • Bio CTA example:
      “More on IG 👉 @username”
    • Residential proxies (1 -3 account per proxies)

    Warm‑Up Process

    • Aged accounts: 3 days
    • New accounts: 5 days

    Actions during warm‑up:

    • Watch niche content
    • Like, comment, save
    • No posting on day 1

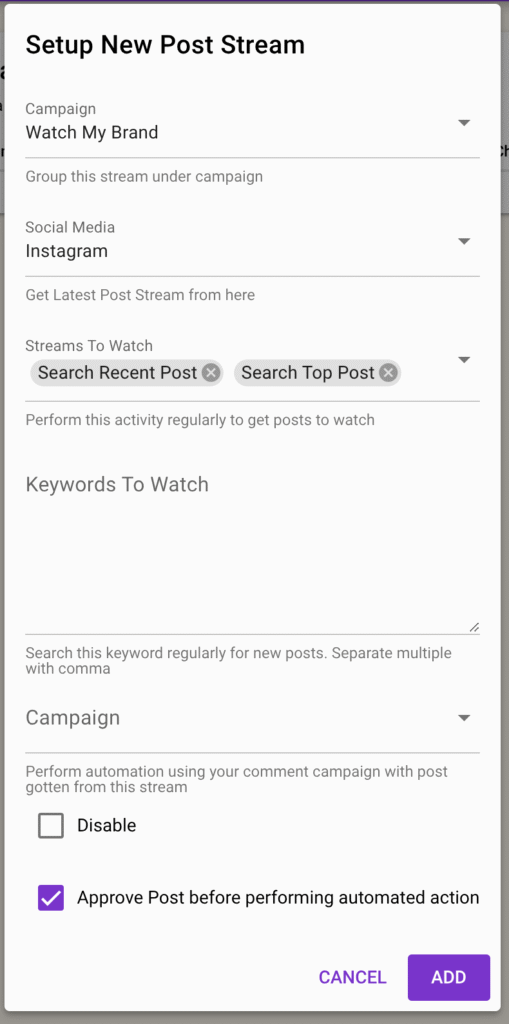
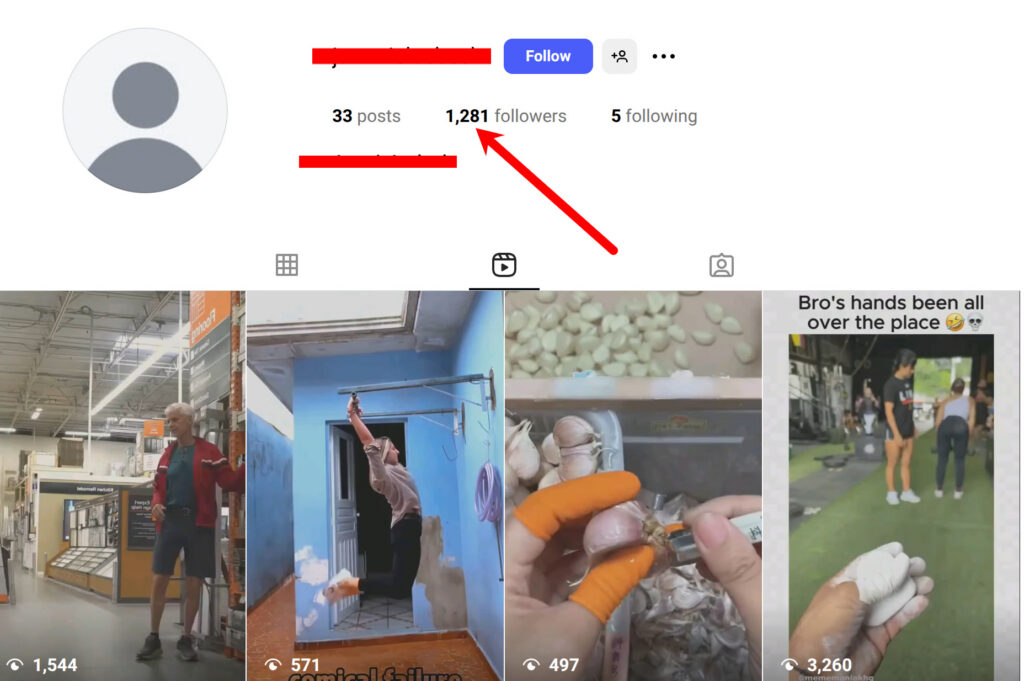
    PART 2: INSTAGRAM STRATEGY (BRANDING & HIGH‑INTENT LEADS)

    Instagram is a slow‑burn platform with higher‑quality leads. It takes longer to grow, but once it works, it becomes evergreen.

    What to Expect From Instagram

    • Slower reach for new accounts initially than TikTok. Eventually catches up
    • Better lead quality
    • Strong brand positioning
    • Higher trust
    • Long‑term value

    Instagram Account Structure

    Mother–Slave Model

    • Mother Account (Main Brand)
      • Primary model content provided by agency
      • Clean, consistent branding
      • Low‑risk actions only
    • Slave Accounts (Amplifiers)
      • Repurpose content
      • Commenting , liking, f/unf
      • Engage with competitors post
      • Funnel traffic to the Mother account

    Recommended ratio (early stage):
    5-20 Slave accounts → 1 Mother account


    Instagram Growth Rules

    • First week is warm‑up only
    • Focus on American content initially to target US
    • Slow actions with main account = account safety
    • Organic posting with quality visuals

    ⚠️ Follow/Unfollow is not recommended on the Mother account. If used at all, it should be done only on Slave accounts.


    Slave Account Strategies

    Strategy A: Repurposing Model Content

    • Repost Mother account content
    • Tag Mother account in caption
    • Soft CTA in bio

    Strategy B: Babe / Niche Pages

    • General babe or aesthetic pages
    • Repurpose trending content
    • Funnel traffic naturally to Mother account

    Note: Instagram will eventually request a phone number. This is normal and expected.

    • Strategy C: Realistic AI Influencer Slide Post with text overlay

    Instagram Content Guidelines

    • High‑quality images and reels
    • Strong visual identity
    • Consistent themes
    • Minimal explicit content (shadowban risk)

    Instagram rewards trust and consistency, not aggression.


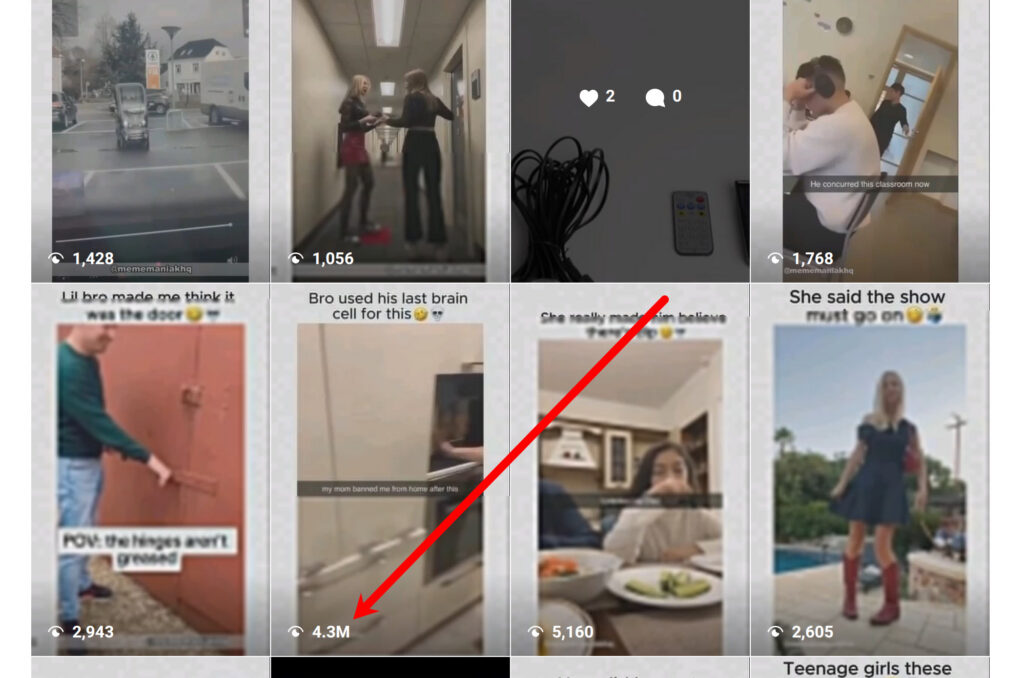
    PART 3: TIKTOK STRATEGY (DISCOVERY & SCALE)

    TikTok  is built for reach, discovery, and fast testing. 


    TikTok Account Structure

    We also use a Main + Slave model on TikTok.

    • Main Account
      • Posts the model’s core content
      • Clean, brand‑focused
    • Slave Accounts
      • Repost
      • React
      • Comment
      • Mention
      • Funnel traffic

    ⚠️ Follow/Unfollow is not needed on tiktok. 

    Early‑stage ratio:
    10 Slave accounts → 1 Main account


    PART 4: Content Strategy

    Automation amplifies content — it does not replace it.

    Recommend Main Account Content (From Agency)

    • Copy what other top models are doing
    • Skits
    • POV videos
    • Comedy
    • Public giveaways
    • Trend participation
    • Collaborations

    Automated Slave Account Content (Using SocialAppFarm)

    • AI influencer slides
    • Reaction videos
    • Babe niche pages
    • Repurposed content (metadata cleaned and video edited)
    • Scheduled posting

    ⚠️ Explicit content should be used sparingly to avoid shadowbans and takedown.


    PART 5: TikTok Pre-recorded Live Instant Traffic Strategy

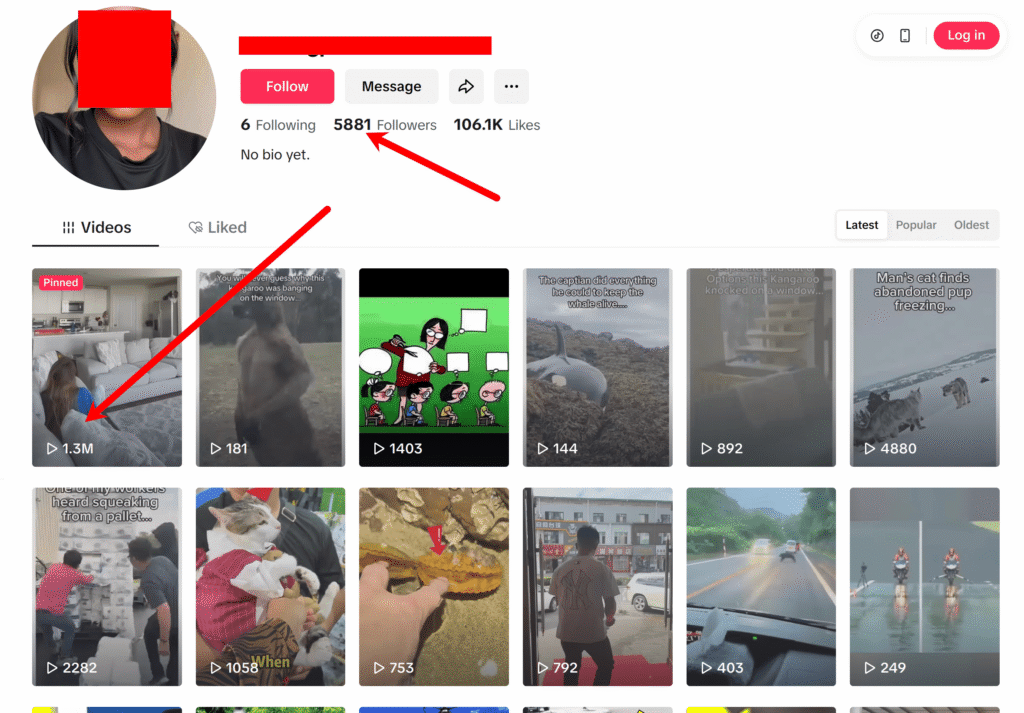
    • Start Lives at 1,000 followers
    • Use pre‑recorded Lives
    • Can increase reach drastically
    • Post a video hrs before going live 
    • 30–45 minutes per day

    Live ideas:

    • Watching a movie
    • Outfit changes
    • Whiteboard with IG username
    • Viewer challenges

    ⚠️ Never buy fake followers. TikTok detects low engagement instantly.

    ⚠️ Dont keep using the same video everytime. Tiktok flags it

    ⚠️ Agency may also need to provide chatters to keep tiktok live engaging. Tiktok flags when no reaction from streamer


    PART 6: Engagement & Optimization

    • drop comments consistently
    • Agency may need chatter to handle dm funnels
    • Post that encourage discussions
    • Use AI‑assisted rage‑bait or snarky comments on male dominated posts to increase profile views
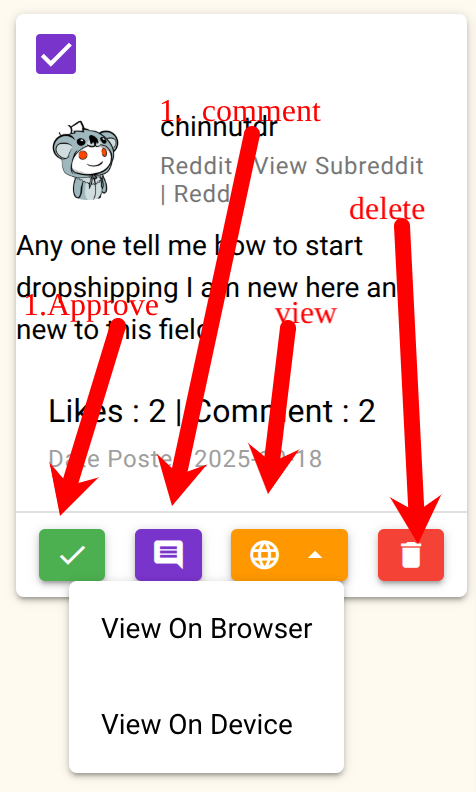
    • View user account by slave so they get notification
    • Replace shadowbanned accounts quickly

    PART 7: Funnels & Scaling For Agencies

    Once signals are strong:

    • Increase posting volume
    • Add more slave accounts
    • Funnel traffic to:
      • Instagram

    PART 8: Recommendation For Agency

    We advised agencies to funnel to telegram channels too as part of their campaign

    Telegram can be used to:

    • Jumpstart new accounts
    • Boost Lives
    • Amplify winning videos

    CHAPTER 4: Timelines

    Client Responsibilities (Required)

    Required Inputs

    • Primary niche 
    • Target country
    • 20–30 content pieces
    • Unique content strongly preferred
    • Slides, short clips, or repurposed reels

    Accounts & Proxies

    • TikTok: 10–30 aged accounts (recommended)
    • Instagram: 10–20 aged accounts (recommended)

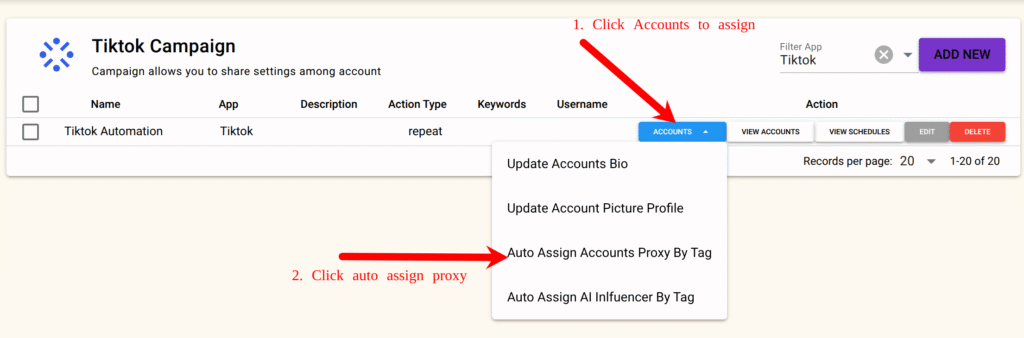
    PART 1: Account & Proxy Intake (Day 1–2)

    • One proxy per account (max 3 to save cost)
    • Unique fingerprint per account

    Diagnosis Rule

    If multiple accounts fail on the same proxy → proxy is replaced

    If individual accounts fail → accounts are replaced

    This allows fast isolation of issues.


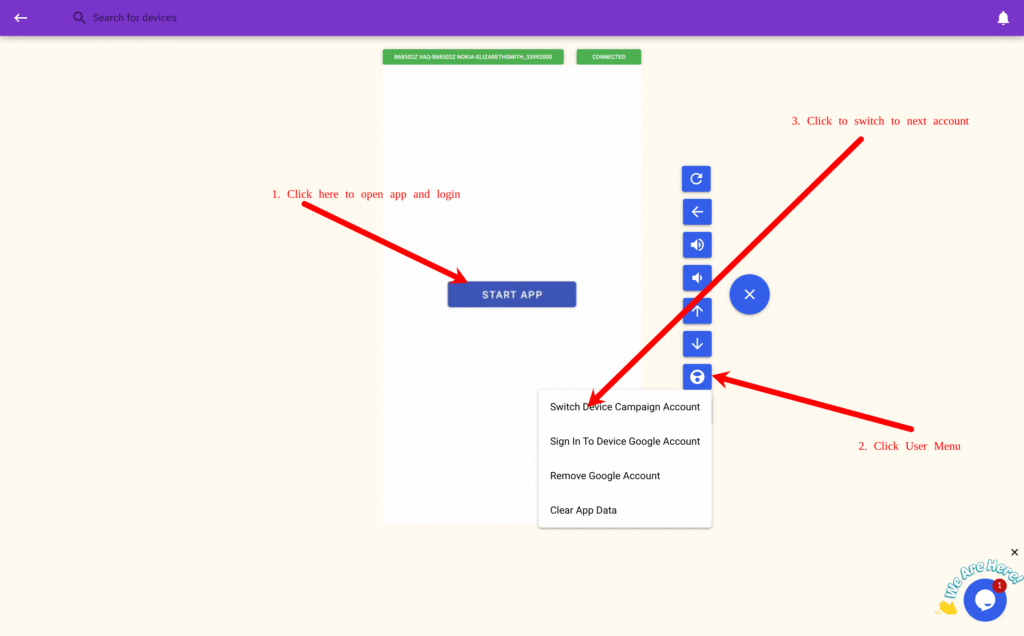
    PART 2:  Automated Warm-Up by Socialappfarm Phase (Day 2–3)

    TikTok

    • scrolling
    • Light likes
    • Saving
    • Can include commenting on 3rd day

    Instagram

    • Reel watching
    • Feed views
    • Explore browse
    • Liking and Saving
    • Can include commenting on 3rd day

    PART 3: Initial Posting Phase (Day 4–7)

    TikTok

    • 1–2 posts per day
    • Slides + short videos

    Instagram

    • 1–2 Reels per day
    • Optional carousel every 2–3 days

    Observed signals: – Reach distribution – Engagement – Suppression


    PART 4:  Full Engagement Automation (Week 2)

    Enabled gradually: – Auto likes (low volume) – Auto follows (limited) – AI post-aware comments on feed post,  and competitor post.

     AI post-aware comments on male dominated content

    This will be increased gradually. 


    PART 5: Strategy & Optimization Layer

    We actively: – Monitor growth, Analyze post performance – Identify winning hooks – Kill weak formats – Repurpose winning structures

    Clients receive direction, not raw data.


    PART 6:  Reporting & Communication

    Weekly Reports Include

    • Active vs replaced accounts
    • Proxy health
    • Reach / views
    • A/B Content reports

    PART 7: Timeline  Expectations

    Week 1

    • Initial reach
    • Account validation

    Week 2

    • Comment 
    • Likes
    • First qualified conversations

    Week 3

    • Clear winning Reels  & Post formats
    • Consistent inbound DMs

    Week 4+

    • Predictable comment volume
    • Easy scaling via more accounts

    CHAPTER 5: Final Notes

    SocialAppFarm provides:

    • Infrastructure
    • Automation
    • Strategy
    • Reporting
    • Scaling systems

    Clients provide:

    • Unique Content direction
    • Brand identity
    • Model positioning
    • Conversion and funneling
    • Process verification
    • Agency may need VA or chatter to help with DM funnels

    Together, this creates a repeatable, scalable lead‑generation engine for OnlyFans agencies.

  • How To Setup And Create Your Social Media Automation Project & Campaign

    This is the first and required step for using socialappfarm successfully. I.e

    1. Importing proxies
    2. Creating a project so we can get our reporting,
    3. Create Automation Campaign
    4. Importing Accounts to our campaign

    Chapter 1: Setting Up Your Proxy and Accounts


    Since we’ll run many accounts, a proxy is essential for stability and safety.

    Recommended Proxy Types

    • Best: 4G/5G Mobile Proxy
    • Good: ISP or Residential Proxy (cost-effective and reliable)

    👉 Ratio: 1 proxy for every 1–3 accounts (max 4).
    For 25 accounts, buy around 8 proxies.


    Step 1: Adding or Importing Proxies

    1. Go to Proxy → Proxy in the main menu.
    2. Click Add New and fill in the following as an exmample:
      • Host: 1.1.1.1
      • Port: 8080
      • Username: user
      • Password: pass
      • Tag: automation
      • Proxy Type: HTTP or Socks5
      • Proxy Change URL: (if you only have one proxy and its supports automatica rotation through url input the url)
    3. For bulk import, create a proxy.txt file: username1:password1:1.1.1.1:8080:automation username2:password2:1.1.1.2:8080:automation
    4. Click Import, select the file, proxy type and click Add.

    Chapter 2: Creating Your Project, Campaign, and Backup

    To support multiple accounts per device, we’ll back up data to Google Drive.


    Step 1: Connecting Google Drive

    1. Navigate to Technical → Data Backup → Connect Google Drive.
    2. Log in to your Google account and authorize SocialAppFarm.
    3. You’ll be redirected back automatically.

    For large-scale setups, you can alternatively use Cloudflare R2, Idrive E2, Amazon S3 or any S3-compatible storage.


    Step 2: Creating a Project

    1. Go to Projects → Projects → Add New.
    2. Example:
      • Name: Productivity Organic Social Media Growth
      • Description: Growing my social media accounts in the productivity niche.
    1. Click Save, then click the green checkmark to activate the project.
      All campaigns and accounts will automatically link to this active project.

    Step 3: Creating a Campaign

    For TikTok

    1. Go to TikTok → Campaign → Add New.
    2. Example:
      • Name: Productivity TikTok Automation Share
      • Device: Select your TikTok device
    3. Click Save.

    For Instagram

    1. Go to Instagram → Campaign → Add New.
    2. Example:
      • Name: Productivity Instagram Automation Share
      • Device: Select your Instagram device
    3. Click Save.

    Step 4: Importing Accounts

    For both TikTok and Instagram, repeat these steps:

    Note: Only username is important when adding or Importing your account but socialappfarm can help you auto login if you include your password, it can also retrieve code from email if your email has imap access and also generate 2fa code if you include your 2fa key.

    1. On the created campaign, click View Accounts → Import. (You can also add your account ony by one by clicking on Add New and fill in the account info)
    1. Format your bulk import (CSV or TXT): username:password:email:emailpassword:biolink:bio:2fakey (Example below)
      • username1::::::
      • username2:pass2:::::2faKey2
    1. Upload and import.
    2. Then go to the Campaign again and click Accounts → Auto Assign by Proxy Tag, input your tag (e.g., automation), and confirm.
      Proxies will now be evenly distributed to all accounts.

    Step 5: Logging Into Accounts

    1. Open your campaign and click Connect Device
      • (Important : Connect from the campaign page, not the device list).
    1. On the device stream page, click Start App, then log in manually.
    2. Click the “+” icon → User Menu → Switch Device Campaign Account, select the next account, and repeat the login.

    💡 Note: If you import usernames and passwords, SocialAppFarm will attempt auto-login during automation. If 2FA keys are imported, it will automatically handle two-factor authentication as well and email codes for imap enabled email

  • How to Farm & Prime Reddit Accounts Using Automation & AI Comments on SocialAppFarm

    When starting new Reddit accounts, priming them before posting is one of the most important steps to ensure your accounts build trust, karma, and engagement before running full automation campaigns.

    This guide will show you how to prime your Reddit accounts safely and automatically using SocialAppFarm’s built-in Reddit automation and AI comment system — so your accounts start behaving naturally and get better long-term results.


    🎯 Why Priming Matters

    New Reddit accounts that instantly start posting links or self-promotion are often shadowbanned or downvoted by the community.
    Priming solves this by making your accounts look human and engaged — browsing subreddits, commenting, and interacting just like a normal Redditor.

    After a few days of priming, you can safely transition to posting and marketing activities while maintaining healthy karma and account reputation.


    ⚙️ Step 1: Set Up Your Niche Configuration

    The first step is to define which subreddits your accounts will browse and comment on.
    Secondly, gather subreddit online that is friendly to new account or account without karma. You can also get more subreddit by looking at what other subreddits users on the subreddit are posting on.

    You have two options assign multiple subreddit to a single account only that account will comment in that subreddit (safe) or letting multiple accounts reply comments randomly to a group of subreddit (fast).

    Option A

    For the first option set the subreddits seperated by , on each of the accounts keyword

    Go to:

    Reddit → Accounts

    Add or Import your accounts then add your unique subreddit for each accounts keyword targeting then save.

    Option B

    Go to:
    Project → Niche Targeting → Add New

    Fill in the following:

    • Name: e.g. Motivation Reddit Niche
    • Subreddits (Keywords Field):
      Enter your target subreddits separated by commas r/subreddit, r/subreddit2, r/subreddit3

    Click Save.

    For both options

    • Use AI to Generate Comment: ✅ Tick this option.
      • AI Comment Prompt: Generate helpful, natural comments that add value to the discussion. if you don't have enough context rewrite other peoples comment

    This configuration will control how your Reddit automation browses and comments on posts.


    🧩 Step 2: Create Campaign and Link Niche Configuration to Accounts

    Go to:
    Reddit → Campaigns → Create Campaign

    • Name: Input a name .
    • Content Queue: Optional — only needed later for post automation.
    • Accounts: Select your imported reddit accounts
    • Device: Select your assigned device (or shared device if running multiple accounts).

    Click Save to apply.

    Assign Niche

    If you are using Niche setup assign your niche configuration to your specific accounts. Edit the accounts and set the niche to your niche configuration


    💬 Step 3: Schedule Subreddit Browsing and Commenting

    Now that your niche and AI prompts are set, we’ll schedule natural subreddit browsing and comment engagement.

    Go to your Reddit campaign:
    Reddit → Campaign → View Schedule

    Click on a time slot, then select:

    • Activity Type: Browse Subreddit
    • Action: Comment
    • Limit: 1–2
      (This means each account will comment on 1–2 posts per session, mimicking natural behavior.)

    You can schedule this daily and spread accross multiple browsing session per day

    Click Save.

    💡 Tip: You can also add a “”Browse Homepage”, “View Post” or “Upvote” activity between browsing sessions to make interactions appear even more authentic.


    🤖 Step 4: Let AI Handle the Engagement

    SocialAppFarm’s AI will now automatically:

    • Browse the subreddits you listed
    • Pick relevant posts
    • Generate natural, helpful comments
    • Engage in a human-like way from your real Android device in the cloud

    This makes your Reddit accounts appear aged and trustworthy, setting the foundation for viral posts later.


    📅 Step 5: Run the Priming Phase

    Run your priming automation for 7–14 days before enabling posting.
    You’ll notice:

    • Fewer post removals
    • Better organic visibility

    Once your accounts have warmed up, you can safely start automating post creation or brand comment marketing campaigns.


  • Schedule & Automate Bulk Reddit Posts On Multiple Subreddit with SocialAppFarm

    Running Reddit campaigns manually can be time-consuming. With SocialAppFarm, you can automatically post text, image, slide images, or video content to multiple subreddits all while maintaining safety and consistency using real Android devices.

    This guide walks you through how to set up Reddit post automation step by step.


    ⚙️ Step 1: Configure Your Niche and Subreddits

    Before scheduling your Reddit posts, you’ll need to define your target niche configuration.
    Your niche setup tells SocialAppFarm what type of content to post, which subreddits to post to, and which queues to pull content from.

    🧩 How to Set Up a Niche

    1. Go to Project → Niche Configuration
    2. Click Add New
    3. Fill in the form:
      • Name: e.g. My Reddit Marketing Niche
      • Keywords/Subreddits: Input your subreddit targets separated by commas
        Example: r/entrepreneur, r/startups, r/dropship, r/socialmedia
      • Content Queue: Select the queue where your Reddit post content (images/videos/text) will be pulled from
    4. You will now select the niche on your accounts . You can have multiple niche with different subreddit or a single subreddit. Socialappfarm will pick one niche to post to everytime the post schedule is running.
    5. Another option is to configure a content queue and a single subreddit directly on account so one account will post to a particular subreddit alone to maintain consistiency.

    Click Save once done.

    Your Reddit automation will now follow this niche setup for subreddit targeting and post content.


    🖼️ Step 2: Prepare Your Content Queues

    Reddit automation supports two post types:

    1. Image/ Image slides/Video Posts
    2. Text Posts

    You can use both depending on your strategy.


    🧠 Option A: Image or Video Posts

    If you’re posting images or videos, SocialAppFarm will use:

    • Content Name → as the Reddit Post Title
    • Content Description → as the Reddit Post Body

    To Set This Up:

    1. Go to Content Queue → Add New
    2. Name it something like Reddit Image Queue
    3. Upload your prepared images or videos
    4. Add a name and description under each item

    Make sure this queue is selected in your Niche Configuration or Campaign Settings.


    ✍️ Option B: Text-Only Posts

    To post text-only Reddit content (like discussions or questions):

    1. Go to Text Content → Text Feed
    2. Click Add New
    3. Fill in:
      • Name: Post title (this will appear as the Reddit post title)
      • Text Body: Your main Reddit content or discussion text
      • Output Queue: Select the queue that will feed this content into your Reddit automation (e.g., Reddit Text Queue)

    Click Save.

    Just like before, ensure the queue is linked to your Niche, Account, or Campaign.

    Note: You can select a post flair by including the flair before your post title:
    Flair : Post Title

    e.g Question : How do i put on my laptop

    “Question” would be selected as the post flair while “How do i put on my laptop” would be the post title.

    Lastly, if you don’t include a post flair or you include the wrong one. Socialappfarm will automatically pick a random flair while creating the reddit post


    🧭 Step 3: Assign the Queue to Your Campaign or Account

    After creating your queues, attach them to where they’ll be used:

    1. Go to Reddit → Campaigns
    2. Open your existing campaign or create a new one
    3. Under Content Queue, select your Reddit content queue (Image, Video, or Text)
    4. You can also link it at:
      • Account Level → for single-account posting
      • Niche Level → for category-based content targeting

    This ensures your Reddit automation always knows what to post and where.


    📅 Step 4: Schedule Your Reddit Post Automation

    Finally, schedule the automation so your Reddit posts go live automatically.

    1. Go to Reddit → Campaign → View Schedule
    2. Click Add New Schedule
    3. Select one of the following Interaction activty automation types:
      • Create Post (Images & Videos) → for visual content
      • Create Post (Text) → for text-only posts
    4. Schedule as much as you want socialappfarm will pick new content from the queue and post it on the subreddits specififed on the queue
    5. Click Save

    SocialAppFarm will now automatically create Reddit posts on your behalf, following your schedule, niche targeting, and queue content.


    ✅ Tips for Best Results

    • Use relevant subreddits that match your content type (avoid generic ones to prevent bans)
    • Use AI content automation to generate contents for you to scale easily.
    • Keep in mind some subreddit does not allow account without karma to create post and comment.
    • Always include short, readable titles — Reddit users prefer authenticity.
    • Rotate between text, image, and video formats for a natural posting pattern.
    • Combine with Reddit Comment Marketing Add-on for full community engagement.

    🚀 Result

    You’ve now fully automated Reddit posting using SocialAppFarm.
    Your setup will:

    • Pull images, videos, or text from your queues
    • Match subreddits defined in your niche
    • Post automatically on your schedule
    • Run on real Android devices — making your automation human-like and safe

    Now your Reddit campaigns can run 24/7 — posting, engaging, and growing your brand or affiliate offers hands-free.

  • How to Build and Automate Real and AI Babe/Model/OnlyFans Influencer Account with SocialAppFarm

    This guide shows how to create, train, and automate a Model / Only Fans/Babe-style influencer account using SocialAppFarm — the right way.

    Most Fresh “babe” pages fail because they post only thirst traps and boring babe images. It will never work on new accounts. Old babe accounts can get away with it becuase they have the numbers but not not new accounts.
    Social media platforms detect these patterns and limit their reach — even if the content looks great.
    The algorithm is designed to suppress repetitive, adult-leaning or low-conversation posts.

    The key to success in this niche is to:

    • Blend lifestyle and context (travel, fitness, fashion, etc.)
    • Use subtle sensuality without making the entire feed about it
    • Add personality or opinion via text overlays and AI-generated speech
    • Build a brand like a real model people know — not just a face

    This guide teaches how to automate a model/babe/OF-style influencer that’s algorithm-friendly and highly engaging.

    Note: You can run upto 25 babe accounts by using socialappfarm extra account addons per device. You can also resuse a single trained influencer on any of your social media accounts.


    ⚙️ You’ll Learn How To

    • Train an AI model or “babe” influencer properly (based on niche context).
    • Automatically generate lifestyle and fitness-style images
    • Create mixed media posts (images + text or quotes)
    • Generate general or AI talking videos with motivational or controversial speech
    • Automate content scheduling, commenting, and growth

    📘 Overview

    The goal isn’t to make a “sexy account” alone — it’s to build a marketable influencer page with visual appeal, personality, and niche alignment.

    You can target:

    • Travel / Luxury Babes (beachwear, bikini, vacations, city strolls)
    • Fitness Models (gymwear, healthy lifestyle, workouts)
    • Lifestyle & Motivation (fashion, quotes, relatable content)

    Each account runs independently on SocialAppFarm, automatically creating, posting, and engaging daily.


    ⚙️ Step 1: Train Your Babe / Model Influencer

    If you want to use an AI Influencer (recommended for scale), train one properly.

    1. Prepare 18–20 high-quality, niche-relevant sexy photos (No NSFW) of your model. You can also use realistic AI generated images from instagram for your AI influencer.
      • For fitness influencers: use gym, activewear, sneakers, workout poses.
      • For travel influencers: use beachwear, bikini, cafe, airport, city backgrounds.
      • For lifestyle influencers: use home outfits, casual photos, daily life vibes.
    2. Create a Content Queue called Model Training Images and upload the images.
    3. Go to AI Influencer → AI Characters → New Character.
    4. Fill in:
      • Name: e.g., “Sophia Fit”
      • Model: v2 (for realism)
      • Trigger Word: e.g., sophfit1
      • Training Queue: Model Training Images
    5. Click Save → Train.

    generate content.

    Once complete, your influencer will generate realistic lifestyle/model-style photos that match the trained niche.


    🧠 Step 2: Generate Daily Lifestyle / Fitness Images

    To avoid looking repetitive, you’ll generate lifestyle-inspired model images (not just poses).

    Step 2A – Create a Dynamic Prompt Queue

    1. Go to Content Queue → Add New, name it Lifestyle Prompts
    2. Create content Queue Model Lifestyle Images and tick Approve Content First Before Use.
    3. Go to Content Automation → Text Content → New.
    4. Fill in:
      • Run Times Per Day: 2
      • Prompt: You are a social media creative director generating lifestyle photo prompts for a model influencer.
        Mix fashion, fitness, and travel scenes. Include realistic body angles and natural poses.
        Example: “She’s walking in a tropical resort wearing gymwear and holding a smoothie.”
      • Output Queue: Lifestyle Prompts
    5. Click Save.

    Step 2B – Create AI Character Image Generation

    1. Go to Content Automation → AI Character Content → New.
    2. Fill in:
      • Run Times Per Day: 2
      • Dynamic Prompt Queue: Lifestyle Prompts
      • Influencer : your trained model
      • Output Queue: Model Lifestyle Images
    3. Click Save.

    Now your model automatically generates realistic lifestyle-style images daily.


    💬 Step 3: Creating Contnet Adding Personality with Text Overlays and Controversial Quotes

    Many new “babe” pages fail because they look robotic — all looks, no voice.
    Adding text captions or quotes builds personality, opinions, and relatability.

    You’ll use SocialAppFarm’s Text Content Automation to generate caption text and overlay it on images or short clips. Create a content queue Model Quote Texts

    Step 3A – Generate Text Content

    1. Go to Content Automation → Text Content → New.
    2. Fill in:
      • Run Times Per Day: 2
      • Prompt: Generate short, controversial or thought-provoking quotes from a female perspective that support men or challenge double standards.
        Keep it short and conversational (1–2 sentences) no hidden character or quotes.
        Example: “It’s okay for a man to expect loyalty too.”
      • Output Queue: Model Quote Texts
    3. Click Save.

    🎙️ Step 4: Create General or Talking Reaction Videos

    You can take your model influencer further by generating general or talking clips with short audio or captions.

    Step 4A – Create Text Style

    1. Go to Content Generator → Text Style → New Style.
    2. Example settings:
      • Name: Bold Quote Overlay
      • Position: Middle Center
      • Text Color: White (#ffffff)
      • Font Size: 16
      • Background: Box (semi-transparent)
    3. Preview and Save.

    Step 4B – Generate Videos

    1. Go to Content Generator → Faceless Content → New.
    2. Fill out:
      • Video Type: General (You can also use Talking once in a while )
      • Model: v1
      • Resolution: 720p
      • Input Queue: Model Lifestyle Images
      • Influencer: Select your created influencer
      • Text/Audio Queue: Model Audio Speech (The text from this queue would be overlayed on the Video if video type is General while the influencer will speak the text if video is Talking type)
      • Voice: Select voice
      • Style: Choose text style (Bold Quote Overlay)
      • Output Queue: Model Videos
    3. Click Save.

    Step 4C – To Use Image Group Posts Instead of Singles

    You can also mix group and slide post together with videos in your content strategy.
    Social platforms prefer carousel/group posts over single photos — they trigger more engagement.

    In Content Queue →Model Videos, you can:

    Select multiple related images

    Click Action → Mark As Multiple Post

    Add captions like “Travel Day Routine 🌴☕” or “Pre-Gym Morning Vibes 💪✨”


    🧩 Step 5: Create Campaign & Niche Targeting

    Now set up your niche, campaign to manage posting and engagement. We will target Men dominated and other babe niche keywords on socialmedia. We will comment and like post dominated in men and other babe account so our account can be noticed easily.

    Step 5A – Niche Targeting

    1. Go to project create a new project and activate it
    2. Go to Project → Niche Targeting → Add New.
    3. Example:
      • Name: Fitness Model Niche
      • Content Queue: Model Videos
      • Keywords: fitness, gym, travel, beauty, fashion, women lifestyle
      • Usernames: optional put usernames of big account in babe niche
      • Use AI To Determine Interaction “Engage with content about travel, lifestyle, babe, or fitness.only Like, follow, and comment on posts that look authentic.”
      • Use AI To Generate Comment “Write light, friendly, or funny comments like ‘Love this view!’ or ‘Queen energy 💪✨’.”
    4. Save it.

    Step 5B – Create Campaign

    1. Go to TikTok → Campaign or Instagram → Campaign.
    2. Click Add New:
      • Name: Model Campaign
      • Share Device: select device
      • Content Queue: Model Videos
    3. Save it.

    Step 5C – Add Accounts & Proxy

    1. On your campaign, click View Accounts → Add New.
    2. Fill in:
      • Username (required)
      • Password, Email, Email Password, or 2FA Key (optional)
    3. Click Save.

    Or bulk import using CSV format:

    username:password:email:emailpassword:biolink:bio:2fakey

    Select the newly created Niche for each account and assign your Influencer if you have one.


    Step 5D – Assign Proxies

    1. Go to Proxy → Add New with a proxy tag e.g automation or Import.
    2. Add or import proxies in this format:
    username:password:1.1.1.1:8080:automation
    

    3. Return to your campaign → View Accounts → click Auto Assign by Proxy Tag, enter your tag (e.g., “automation”), and click OK.


    💡 Step 6: Prime and Schedule

    Run a Priming Schedule for 5–7 days first:

    • Like and comment on fitness, gym, men related, other babes posts.

    Priming helps new accounts act naturally and establish trust with the algorithm.

    1. Go to TikTok → Campaign → View Schedule or Instagram → Campaign → View Schedule.
    2. Create a Priming Schedule:
    TimeActivityAction
    8 AMSearch TagsLike 5–10 posts
    12 PMSearch Video / FeedComment 1–3 posts
    4 PMView Profile Stats
    8 PMView Feed / FYPLike 5 posts
    11 PMView Feed / FYPComment 2 posts
    1. Save as “Priming Schedule.”
    2. Run it for 5–7 days before switching to your main posting schedule.

    Then switch to your Daily Posting Schedule:

    Once priming is done, switch to consistent posting and engagement:

    TimeActivityAction
    9 AMView Feed / FYPLike 5–10 posts
    12 PMCreate PostPost from My Influencer Videos queue
    6 PMUpdate Profile Stats
    9 PMView FeedComment 1–3 posts
    • 2–3 posts daily from Model Videos or grouped images
    • 1–2 comments per hour
    • AI auto-comments on relevant posts using your niche targeting

    Result

    You’ve built a sustainable model influencer brand that:

    • Looks authentic and appealing
    • Avoids reach restrictions
    • Mixes lifestyle, fitness, and opinion content
    • Posts and engages automatically

    This structure creates a brandable personality, not just a pretty face.

    You can also include follow in your schedule and run ads for your popular post after a while

  • How to Build and Automate a An Influencer Brand Account with SocialAppFarm

    This guide shows how to create and automate an influencer account using SocialAppFarm in Productivity Niche.
    You can use the Extra Add-on Account feature to manage 1–25 influencer accounts for TikTok or Instagram.

    You can use AI Influencer content or your own content.


    You’ll Learn How To:

    • Optionally train or use your own AI Influencer
    • Automatically generate podcast-style influencer images
    • Set up your campaign, accounts, proxies, and niche targeting
    • Optionally generate talking videos using text or uploaded audio
    • Prime your account for growth
    • Schedule automatic daily posting

    📘 Overview

    This setup is ideal for personal creators and small influencer brands who want to post daily, build niche authority, and stay consistent — all automatically.
    Each account runs independently, with its own automation flow.

    You can use:

    • Your own photos, videos, and voice, or
    • A trained AI Influencer created directly inside SocialAppFarm.

    If you don’t plan on using an AI Influencer from SocialAppFarm but still want to create talking videos using your own images:

    Create a Content Queue called Influencer Podcast Images, upload your images, and skip to Step 3.

    If you already create your content outside SocialAppFarm:

    Create a Content Queue called My Influencer Videos, upload your videos, and skip to Step 4.


    ⚙️ Step 1: Create Your Influencer

    Option 1: Train an AI Influencer

    1. Go to AI Influencer → AI Characters → New Character.
    2. Prepare 15–20 clear, high-quality images of your influencer in different poses and outfits.
    3. Create a Content Queue called My Influencer Training Images and upload your photos.
    4. Fill in the fields:
      • Name: e.g., Jane
      • Model: v1 or v2 (v2 offers higher realism)
      • Trigger Word: e.g., j1ne1
      • Training Images Queue: My Influencer Training Images
    5. Click Save → Train.

    Training takes about an hour. Once finished, your influencer is ready to generate content.


    🧠 Step 2: Automatically Generate Podcast-Style Images

    You can automate daily creation of influencer photos in podcast or lifestyle scenes.

    Step 2A – Create a Dynamic Prompt Queue

    1. Go to Content Queue → Add New, name it Podcast Image Prompts. Create another one Influencer Podcast Images and tick Approve Content First Before Use.
    2. Go to Content Automation → Text Content → New.
    3. Configure the form:
      • Run Times Per Day: 2
      • Prompt: You are a prompt engineer generating photo ideas for an AI influencer recording podcasts.
        Generate one short prompt describing her pose, outfit, and background.
        Example: “A realistic portrait of her speaking into a microphone in a studio, warm lighting, neutral background.”
      • Output Queue: Podcast Image Prompts
    4. Click Save.

    This queue will now generate new creative photo prompts daily.


    Step 2B – Create AI Character Content Automation

    1. Go to Content Automation → AI Character Content → New.
    2. Fill in:
      • Run Times Per Day: 2
      • Dynamic Prompt Queue: Podcast Image Prompts
      • AI Character: your trained influencer
      • Output Queue: Influencer Podcast Images
    3. Click Save.

    SocialAppFarm will now automatically generate influencer podcast-style images daily and store them in Influencer Podcast Images.


    Step 2C – Review and Approve

    Go to Content Queue → Influencer Podcast Images → View Content and approve the best images for posting.


    Step 2D – Use as Input for Video Generation

    Later (in Step 3), select Influencer Podcast Images as your Input Queue when generating talking videos.


    🎙️ Step 3: Prepare Your Audio or Script

    You can upload your own voice, generate AI voiceovers, or scrape trending audio.

    A. Upload Your Own Audio

    1. Go to Content Queue → Add New, name it My Audio Speech.
    2. Upload your recorded MP3 files.

    B. Generate Speech Using AI

    1. Go to Content Automation → Text Content → New.
    2. Example prompt: “Write a 30-second motivational podcast script about discipline and consistency.”
    3. Set Run Times Per Day: 3.
    4. Choose Output Queue: My Audio Speech.

    C. Scrape and Convert

    Use the Scraper Add-on to extract captions or speech from TikTok, Instagram, or YouTube videos.
    Rewrite or convert them into speech using the AI text tools.


    💬 Step 3B: Generate Talking Videos

    Step 3B-1: Create Text Style

    1. Go to Content Generator → Text Style → New Style.
    2. Example settings:
      • Name: White Caption Bottom Center
      • Position: Bottom Center
      • Text Color: White (#ffffff)
      • Font Size: 12
      • Background: Box or Full (optional)
      • Text Effect: Karaoke (for dynamic captions)
    3. Click Preview to check the design, then click Save.

    Step 3B-2: Create Video Automation

    1. Go to Content Generator → Faceless Content → New.
    2. Fill out the form:
      • Run Times Per Day: 1–3
      • Video Type: Talking
      • Resolution: 480p or 720p
      • Model: v1 or v2
      • Input Queue: Influencer Podcast Images
      • Influencer: Select your trained influencer
      • Text/Audio Queue: My Audio Speech
      • Generate Audio: ✅ (if using text input)
      • Voice: Select your preferred voice
      • Generate Subtitles:
      • Background Music Queue: Optional
      • Style: Select your text overlay style (e.g., “White Caption Bottom Center”)
      • Output Queue: My Influencer Videos
    3. Click Save.

    SocialAppFarm will now generate daily talking videos for your influencer using your approved images and speech.


    🧩 Step 4: Create Your Campaign and Set Niche Targeting

    Step 4A – Create Niche Targeting

    1. Go to Project create a new project and activate it.
    2. Go to Project → Niche Targeting → Add New.
    3. Fill in the form:
      • Name: Productivity Niche
      • Content Queue: My Influencer Videos
      • Keywords: productivity, motivation, self-growth, focus, daily routine, mindset, success habits
      • Use AI To Determine Interaction Interaction Prompt:
        “Engage only with English posts related to productivity or motivation. Like posts with more than 10 likes and avoid spam or private profiles.”
      • Use AI To Generate Comment Comment Prompt:
        “Write helpful or funny comments that feel natural. Example: ‘Love this energy!’ or ‘Such a great reminder!’.”
    4. Click Save.


    Step 4B – Create a Campaign

    1. Go to TikTok → Campaign or Instagram → Campaign.
    2. Click Add New and fill in:
      • Name: My Influencer Campaign
      • Share Device: Select your active device
      • Content Queue: My Influencer Videos (You can also upload your own videos here if you prefer.)
    3. Click Save.

    Step 4C – Add Accounts

    1. On your campaign, click View Accounts → Add New.
    2. Fill in:
      • Username (required)
      • Password, Email, Email Password, or 2FA Key (optional)
    3. Click Save.

    Or bulk import using CSV format:

    username:password:email:emailpassword:biolink:bio:2fakey
    

    Select the newly created Niche for each account and assign your Influencer if you have one.


    Step 4D – Assign Proxies

    1. Go to Proxy → Add New or Import.
    2. Add or import proxies in this format:
    username:password:1.1.1.1:8080:automation
    
    1. Return to your campaign → View Accounts → click Auto Assign by Proxy Tag, enter your tag (e.g., “automation”), and click OK.

    💡 Step 5: Prime Your Accounts

    Priming helps new accounts act naturally and establish trust with the algorithm.

    1. Go to TikTok → Campaign → View Schedule or Instagram → Campaign → View Schedule.
    2. Create a Priming Schedule:
    TimeActivityAction
    8 AMSearch TagsLike 5–10 posts
    12 PMSearch Video / FeedComment 1–3 posts
    4 PMView Profile Stats
    8 PMView Feed / FYPLike 5 posts
    11 PMView Feed / FYPComment 2 posts
    1. Save as “Priming Schedule.”
    2. Run it for 5–7 days before switching to your main posting schedule.

    📅 Step 6: Schedule Daily Posting

    Once priming is done, switch to consistent posting and engagement:

    TimeActivityAction
    9 AMView Feed / FYPLike 5–10 posts
    12 PMCreate PostPost from My Influencer Videos queue
    6 PMUpdate Profile Stats
    9 PMView FeedComment 1–3 posts
    1. Save as “Daily Posting Schedule.”
    2. Load it after priming — your influencer account will now post and engage automatically every day.

    Result

    You’ve successfully built a fully automated solo influencer system using SocialAppFarm.

    Your setup now:

    • Generates influencer images and talking videos automatically
    • Uses uploaded or AI-generated speech
    • Likes, comments, and interacts in relevant niches
    • Posts daily content — all from one dashboard

    Perfect for standalone influencer brands or small-scale content creators.

  • How to Automate Brand and Keyword Comment Marketing on Reddit With AI Support

    SocialAppFarm includes a powerful feature that lets you track new Reddit posts or comments containing your brand name or specific keywords — and automatically engage with them using AI-generated or manual comments.

    You can monitor multiple subreddits or keyword streams from your dashboard, review the posts, and decide whether to comment manually or let AI handle the responses automatically.

    Add-ons You’ll Need

    • Social Appfarm Main Device Subscription
    • Reddit Comment Marketing Addon

    Optional Addons

    You can also use multiple account for large projects and setups (Commenting is rotated among these account)

    • Manage up to 25 Extra Social Media Accounts per Device
    • Proxies (1-3) account per proxy
    • Google Drive account (for device backups)

    Chapter 1: Setting Up Your Proxy and Accounts

    If you plan on running many reddit accounts, a proxy is essential for stability and safety.

    Recommended Proxy Types

    • Best: 4G/5G Mobile Proxy
    • Good: ISP or Residential Proxy (cost-effective and reliable)

     Ratio: 1 proxy for every 1–3 accounts (max 4).
    For 25 accounts, buy around 8 proxies.


    Step 1: Adding or Importing Proxies

    1. Go to Proxy → Proxy in the main menu.
    2. Click Add New and fill in the following as an exmample:
      • Host: 1.1.1.1
      • Port: 8080
      • Username: user
      • Password: pass
      • Tag: automation
      • Proxy Type: HTTP or Socks5
      • Proxy Change URL: (if you only have one proxy and its supports automatica rotation through url input the url)
    3. For bulk import, create a proxy.txt file: 
      • username1:password1:1.1.1.1:8080:automation username2:password2:1.1.1.2:8080:automation
    4. Click Import, select the file, proxy type and click Add.

    Chapter 2: Creating Your Campaign, and Backup

    To support multiple accounts per device, we’ll back up data to Google Drive.


    Step 1: Connecting Google Drive

    1. Navigate to Technical → Data Backup → Connect Google Drive.
    2. Log in to your Google account and authorize SocialAppFarm.
    3. You’ll be redirected back automatically.

    For large-scale setups, you can alternatively use Cloudflare R2, Idrive E2, Amazon S3 or any S3-compatible storage.


    Step 2: Create a Reddit Automation Campaign

    1. From the main menu, go to Projects Campaign.
    2. Click Add New to create a new Reddit automation campaign.
      • Name: Enter a campaign name e.g Watch Campaign.
      • App: Select Reddit as your platform.
      • Share Device : Select your Reddit device
      • Use Comment & PM From Accounts: Untick field
      • Use AI To Generate Comment: Tick this (Requires credit)
      • Extra Comment Prompt: Input prompt for AI to generate comment for reddit post e.g Short Helpful comment that sounds human and natural. Mention my ebook about dog training “BOOK NAME” if post is about dog training
    3. Click Save.

    This campaign will handle the automatic commenting on tracked Reddit posts.

    Step 3: Import or Add Your Account

    Note: Only username is important when adding or Importing your account but socialappfarm can help you auto login if you include your password, it can also retrieve code from email if your email has imap access

    1. On the created campaign, click View Accounts → Import. (You can also add your account ony by one by clicking on Add New and fill in the account info)
    1. Format your bulk import (CSV or TXT): username:password:email:emailpassword:biolink:bio:2fakey (Example below)
      • username1::::::
      • username2:pass2:::::2faKey2
    1. Upload and import.
    2. Then go back to the Campaign page again and click Accounts → Auto Assign by Proxy Tag, input your tag (e.g., automation), and confirm.
    3. Proxies will now be evenly distributed to all accounts.

    Step 4: Logging Into Accounts

    1. Open your campaign and click Connect Device
      • (Important : Connect from the campaign page, not the device list).
    1. On the device stream page, click Start App, then log in manually.
    2. Click the “+” icon → User Menu → Switch Device Campaign Account, select the next account, and repeat the login.

    Step 5: Schedule Comment Stream On Your Campaign

    You need to set up a schedule for automatically commenting on stream posts from your automation campaign.

    • On the created campaign, click VIEW SCHEDULES

    Schedule the Stream Post Comment interaction activity for the days and hours you want comments to be posted.

    SocialAppFarm will automatically comment on all approved Reddit stream posts from your dashboard.

    You can:

    • Write comments manually, or
    • Allow AI to auto-generate replies based on your campaign’s comment prompt.

    Chapter 3: Creating Your Stream Campaign

    Step 1: Set Up a Stream Campaign for Reddit

    1. On the main menu, go to Streams & Comments → Stream Campaign.
    2. Click Add New to create a new stream campaign.
    1. Enter a name — for example: Watch My Brand on Reddit.
    2. Click ADD.

    Step 2: Set Up a Stream for Reddit

    1. Click View Stream Setup on your newly created campaign.
    1. Click Add New to create a stream setup.

    In the pop-up form:

    • Choose Reddit as the social media platform.

    You can choose between these stream types:

    • View Subreddit → Monitors specific subreddits for new posts or comments.
    • Search Keyword → Finds Reddit posts containing your chosen keywords across subreddits.

    In the Keywords field, enter the list of words or phrases you want to monitor — separated by commas.

    Example: shopify, dropshipping, ecommerce, viral product

    In the Subreddits field (for “View Subreddit” type), enter subreddit names separated by commas.

    Example: Entrepreneur, eCommerce, SmallBusiness, SideHustle

    In the Automation Campaign field, select the Reddit campaign you created under Project → Campaign. (Chapter 2 Step 2)
    ⚠️ Make sure “Stream Comment” is scheduled on that campaign so comments are posted regularly.


    Step 3: Additional Options

    • Approve Post Before Automated Action → ✅ Tick this to manually review Reddit posts before the system comments.
    • Disable → Temporarily stop fetching new posts for this specific stream.

    You can create multiple streams per Reddit campaign — for example:

    • One stream that watches keywords like Shopify or Dropshipping, and
    • Another stream that monitors subreddits like r/ecommerce or r/marketing.

    Click Add to save your stream setup.
    Repeat these steps to create multiple keyword or subreddit streams as needed.


    Step 4: Monitor and Manage Your Reddit Streams

    From the main menu, go to Your Stream to:

    • View all new Reddit posts matching your keywords or subreddit streams.
    • Open the posts directly in your browser or device for quick engagement.
    • Filter or hide posts that don’t match your brand or niche.
    • Use the AI Comment Generator to automatically create contextual comments.
    • Manually input or edit comments if needed.
    • Approve posts to enable automatic commenting by your selected automation campaign.

    Result

    You can now:

    • Monitor Reddit for new discussions mentioning your brand or keywords.
    • Automatically comment or reply using AI-powered responses.
    • Stay active in relevant communities without manual effort.
    • Manage everything directly from your SocialAppFarm dashboard.


    Example Use Cases

    • Track mentions of your product or brand across multiple subreddits (e.g., r/shopify, r/Entrepreneur).
    • Auto-comment on trending Reddit posts in your niche using AI-generated helpful or witty replies.
    • Drive organic traffic by engaging consistently in subreddit conversations — all on autopilot.
  • How to Automate Brand and Keyword Comment Marketing on TikTok and Instagram

    SocialAppFarm includes a powerful feature that lets you track and monitor new posts — or new user uploads — on TikTok and Instagram that contain your brand name or specific keywords, and then automatically comment on those posts.

    You can view all tracked posts directly from your dashboard, review them, and decide whether to comment manually or let AI generate comments automatically.


    Step 1: Create a Stream Campaign

    1. On the main menu, go to Streams & Comments → Stream Campaign.
    2. Click Add New to create a new campaign.
    3. Enter a campaign name — for example: Watch My Brand
    4. Click Save,

    Step 2: Set Up a Stream

    1. Click View Stream Setup to begin configuring the keyword streams for this campaign.
    2. Click Add New to create a new stream setup

    In the pop-up form:

    • Choose the social media platform you want to monitor (TikTok or Instagram).

    Instagram Stream Types

    • Search Top Posts — Finds high-engagement posts containing your keywords.
    • Search Recent Posts — Finds the latest posts matching your keywords.
    • Get User Latest Posts — Tracks posts from specific usernames.

    TikTok Stream Types

    • Search Top Videos (24 hrs) — Finds trending videos with your keywords.
    • View Your FYP — Monitors your “For You” Page for relevant videos.
    • Get User Latest Posts — Tracks recent uploads from specific users.

    In the Keywords field, enter a list of words or phrases you want to monitor, separated by commas.

    Example: shopify, dropshipping, ecommerce, viral product

    If your streams involve getting a user post enter list of usernames, to watch their post seprated by , in the usernames field.

    In the Automation Campaign field, select the campaign you want to use for posting comments.
    ⚠️ Make sure “Stream Comment” is scheduled on that campaign’s automation tab so comments are posted regularly.

    1. In the Automation Campaign field, select the automation campaign you want to use for posting comments. ⚠️ Make sure “Stream Comment” is scheduled on that campaign’s automation tab so comments are posted regularly.

    Step 3: Additional Options

    • Approve Post Before Automated Action → ✅ Tick this to manually review posts before the system comments.
    • Disable → Temporarily stop fetching new posts for this specific stream.
    • You can create multiple streams per platform (e.g., one for “Search Top Videos” and another for “User Latest Posts”). Note: Do not mix stream types that use different data inputs (for example, Search Recent Posts requires keywords, while Get User Latest Posts requires usernames).

    Click Add to save your stream setup.
    You can repeat these steps to create multiple keyword streams per campaign.

    Step 5: Schedule Comment Stream On Your Campaign

    You need to set up a schedule for automatically commenting on stream posts from your automation campaign.

    1. From the main menu, go to TikTok → Campaign or Instagram → Campaign.
    2. Select your automation campaign and click View Schedule.
    1. Schedule the Stream Post Comment interaction activity for the days you want comments to be posted

    ocialAppFarm will automatically comment on all approved stream posts from your dashboard.

    You can also:

    • Add manual comments yourself, or
    • Allow AI to automatically generate comments based on your campaign’s comment prompt.

    See the next section on how to approve live posts for commenting.


    Step 5: Monitor and Manage Your Streams

    You can now go daily to Your Stream from the main menu.
    to:

    • View all new posts from TikTok and Instagram that match your keyword streams.
    • Open posts directly in your browser or device for quick engagement.
    • Filter or hide posts that don’t match your brand or niche.
    • Use the AI Comment Generator to create relevant comments automatically.
    • Manually input your own comment if you prefer.
    • Approve posts to allow automatic commenting by your selected automation campaign even if you dont input comment.

    ✅ Result

    You can now:

    • Monitor your brand visibility across TikTok and Instagram.
    • Engage automatically with posts that mention your keywords.
    • Respond instantly using AI-powered or manual comments.
    • Manage all this activity directly from your SocialAppFarm dashboard.

    Example Use Cases

    • Monitor and comment on posts mentioning your brand (e.g., “MyStore,” “Shopify store,” etc.).
    • Automatically reply to trending videos in your niche with witty or helpful AI comments.
    • Build awareness by consistently engaging with audience conversations — all on autopilot.
  • Quick Traffic for E-Commerce and CPA, Affiliate & Business Using Instagram & TikTok Reuploads

    This guide will show you how to get fast traffic from Instagram and TikTok — even without building large accounts.
    You’ll learn how to use the SocialAppFarm Scraper and Content Editor add-ons to automatically collect, edit, and repost viral content safely and effectively.

    ⚠️ Disclaimer: Please always credit or respect original creators when reposting content.
    This guide is for educational and fair-use purposes only.


    📈 Real Results

    Using this method, you can easily get thousands of views, within days or few weeks — entirely through automated reuploads and smart editing filters.


    🔥 Recommended Niches

    Pick a content niche that goes viral easily:

    • Memes
    • Comedy skits
    • Movie narrations
    • Sports highlights
    • Pets
    • Children humor
    • Educational / “cool fact” videos

    Once you pick a niche, find 5–10 large accounts in that niche with lots of active posts.
    We’ll use those accounts later as scraping sources.


    ⚙️ Recommended Setup

    You can start small or scale big depending on your device setup:

    AccountsPlatformsDevices Needed
    25–50TikTok or Instagram1–2 devices
    100 (50 TikTok + 50 Instagram)Both platforms4 devices

    Ensure you have:

    • The Scraper Add-on
    • The Content Editor Add-on

    Create a project and activate it. Then create an automation campaign either for instagram or tiktok. Then import your accounts into it.
    Click here to learn how https://socialappfarm.com/blog/how-to-setup-and-create-your-social-media-automation-project-campaign-first-st/


    Step 1: Create Unique Video Editing Pipelines

    We’ll use Content Editor Pipelines to make scraped videos look unique before reuploading them to TikTok or Instagram.

    To get started:

    1. Review the pipeline options below and choose one that best fits your content style.
    2. You can also create multiple pipelines for different content queues to compare results and find which edits perform best.
    3. If you’d like to build your own unique pipeline, click on your preferred filters in the right-hand pane and fill in the required input fields.
    4. Each filter includes a hint to help guide you on the recommended input range and purpose.

    This setup ensures every video is slightly different, helping your uploads stay unique and perform better across platforms.

    Creating a New Pipeline

    1. Go to Content Editor → Editor Pipelines.
    2. Click New.
    1. Enter a name for your pipeline.
    2. On the right-side panel, add the following filters and parameters.

    🎥 Pipeline Option 1: Basic Anti-Detection Filter

    EffectSetting
    Noise Addition20
    Zooming1.2
    Color Tintcolor: blue
    Intensity: 0.2
    HSV ShiftHue shift: 10
    Audio EffectPitch: 1.1
    Tempo: 1.0

    ✅ Click Save.


    🎞️ Pipeline Option 2: Rotation & Overlay Effect

    EffectSetting
    RotationDegree: 2
    Colored Thin-Lined OverlayBlur strength: 5
    Height: 10
    Padding: 10
    Opacity: 0.7
    Position: Middle
    Color: #000000 (black)
    HSV ShiftHue shift: 10
    Audio EffectPitch: 1.1 Tempo: 1
    Force YUV Format✅ Tick this if re-uploading from YouTube

    ✅ Click Save.


    ✨ Pipeline Option 3: Glow & Highlight Filter

    EffectSetting
    Sweep Glow/Blurred Thin Lined Overlay
    /Lens Flare/Colored Thin Lined Overlay
    Glow size: 50
    Speed: 100
    Color: #ffffff (white)
    Direction: Diagonal
    HSV ShiftHue shift: 10
    Audio EffectPitch: 1.1/Tempo: 1
    Force YUV Format✅ Tick this if scraping from YouTube

    ✅ Click Save.

    ✨ Pipeline Option 4: Edge Pertubation

    EffectSetting
    Edge PertubationLuma msize x: 9
    luma amount: 1
    intensity: 2
    Correct lense: True
    BlurBlur strenght: 0.8
    Noise additionNoise: 15
    Audio EffectPitch: 1.1/Tempo: 1

    ✨ Pipeline Option 5: Stack Video

    EffectSetting
    Stack videoFile: Select reaction video
    Stack Type: Vertical
    Size: 100
    Vintage
    Noise additionNoise: 15
    Audio EffectPitch: 1.1/Tempo: 1

    ✨ Pipeline Option 6: Overlay Video

    EffectSetting
    Overlay Image or VideoFile: Select file to overlay on video
    Content Width: 0
    COntent Hieght: 0
    Transparent: Top Left
    Padding: 0
    Transparent: True
    Transparency: 0.2
    Vintage
    Noise additionNoise: 15
    Audio EffectPitch: 1.1/Tempo: 1

    Step 2: Add CTA (Call-to-Action) or Brand Overlay

    Once your content starts gaining views (after ~2–3 weeks), you can embed your own link or CTA.

    Option A – Text Overlay

    Go to your editor pipeline → click Overlay Text.
    Set:

    Text: Check my bio 👇
    Color: #000000 (black)
    Font Size: 13
    Position: Bottom Center
    Padding: 10
    Background: True
    Background Size: 20
    Background Color: #ffffff (White)
    Bg Transparent: 0.4
    

    Option B – Join with CTA Video

    Use Join Video → select a short promotional clip (e.g., A video that says check out bio for link).
    It will be attached automatically at the end of each edited video.

    ✅ Finally, click Save.

    Option C – Use Content Source to include links or shortened links direclty from your shopify store products, woocommerce products, or wordpress post


    Step 3: Create a Content Queue

    1. Go to Content Queue → Add New.
    2. Name it based on your niche (e.g., Viral Meme Queue).
    3. Select this content queue on the automation campaign you created previously in the beginning
    4. In the Editor Pipeline field, select one of the pipelines you just created.
    5. Click Save

    Step 4: Set Up the Scraper (Headless Mode)

    1. Go to Scraper → Scraper (Headless).
    2. Click Scrape Content to create a new scraper task.
    3. Choose your scraping service (TikTok, Instagram, or YouTube).
    4. Enter the usernames of the large accounts you found earlier, separated by commas. exampleuser1,exampleuser2,exampleuser3
    5. In the Content Queue field, select the queue you created earlier.
    6. Click Convert Session Data (For Youtube)→ Save.

    Step 5: Automate Uploads and Tracking

    SocialAppFarm will now automatically:

    • Scrape content from the usernames you provided
    • Edit them using your selected Editor Pipeline
    • Save to your Content Queue
    • Auto-post to your accounts through your active campaigns

    📊 Tracking Performance

    Use these built-in tools to optimize your results:

    • Content Queue A/B Graph Report: Identify which content format or filter or niche performs best. Scrap different niche into different queue and compare.
    • Projects Dashboard: Monitor overall account engagement, follower growth, and total content left in the queue.

    ✅ Summary Workflow

    StepModuleDescription
    1Editor PipelinesCreate filters to make scraped videos unique
    2Content QueueLink queue to your chosen pipeline
    3ScraperFetch videos from top-performing accounts
    4CampaignAuto-upload videos to TikTok/Instagram
    5ReportingTrack engagement and reupload performance

    🚀 Result

    Your SocialAppFarm setup will now:

    • Continuously scrape viral content
    • Edit it automatically to make it unique
    • Reupload it to your TikTok and Instagram accounts
    • Drive organic traffic to your e-commerce store, CPA, or affiliate offers — on complete autopilot.

  • Influencer Automation: Generating Realistic Talking Videos for Your AI Influencer Using Audio or Text

    You can now create realistic talking videos for your AI influencer’s images using SocialAppFarm’s Faceless Content Generator.
    This feature allows your influencer to speak from text or audio, creating dynamic and engaging videos for platforms like TikTok and Instagram.

    If you haven’t yet created your AI influencer images, first check the previous article on Generating AI Influencer Images.
    For this workflow, we recommend generating images in talking or podcast-style poses — e.g., prompts like:

    “A podcaster sitting in front of a microphone, medium shot.”

    This ensures your AI influencer looks natural when converted into talking videos.


    Step 1: Create Content Queues

    We’ll set up three queues for this workflow.

    1. Talking Video Queue
      • Go to Content Queue → Content Queue.
      • Click Add New.
      • Name it: My Talking Video Queue
      • Click Save.
    2. Audio Speech Queue
      • Click Add New again.
      • Name it: My Audio Speech
      • Click Save.
    3. (Optional)Background Music Queue
      • Create another queue called: Background Music
      • Upload background tracks (MP3 ) to this queue and Save.

    Step 2: Add Audio or Text to Your Audio Speech Queue

    Your have 3 options to fill the Audio Speech Queue with the words your AI influencer will say.

    Option 1: Upload Recorded Audio

    • Upload your recorded .mp3 or .wav files directly to the My Audio Speech queue.

    Option 2: Use Text-to-Speech (TTS) or Generate Text Using AI

    • Go to Text Content → Text Feed.
    • Click Add NEW Text.
    • Enter the text you want your influencer to say.
    • In the Audio Queue field, select My Audio Speech.
    • Click Save.
      This text will be converted into speech automatically during generation.

    Option 3: Use the Scraper Add-on

    If you have the SocialAppFarm Scraper Add-on, you can:

    • Scrape viral speeches or quotes from TikTok, Instagram, or YouTube.
    • Automatically rewrite them before saving into your Audio Speech Queue.

    Step 3: Create the Faceless Content Automation

    Now we’ll create the automation that combines your influencer’s images, speech, and optional background music into talking videos.

    1. Go to Content Generator → Faceless Content.
    2. Click New to create a new automation form.
    3. Fill in the fields as follows:
    FieldDescription
    Run TimesNumber of times per day to generate new talking videos (e.g., 2–4).
    Video TypeSelect Talking.
    ResolutionChoose 480p or 720p (720p is higher quality but more expensive).
    ModelSelect v1 or v2 (v2 gives more realistic lip-sync and lighting).
    Input QueueChoose the queue where your AI Influencer images are stored. These images will be used to create the talking videos.
    Generate Audio✅ Tick this if using text input instead of pre-recorded audio.
    VoiceChoose your preferred voice for text-to-speech output if using text input instead of pre-recorded audio.
    Text Queue / Audio QueueSelect your My Audio Speech queue where your audios or text are saved.
    Background Music QueueSelect Background Music (optional).
    Generate Subtitles✅ Tick this to display captions that match the spoken audio.
    Display subtitle one word at a time✅ Tick this to display captions One word at a time
    Text StyleSelect your previously created text style (e.g., My First Text Style).
    Output QueueSelect My Talking Video Queue.

    Step 4: Save and Start Generating

    Once all fields are filled:

    1. Click Save.
    2. SocialAppFarm will now automatically:
      • Take influencer images from the input queue
      • Use text or audio from the audio queue
      • Generate realistic lip-syncing and talking animations
      • Apply background music and subtitles (if enabled)
      • Save the finished videos into the output queue

    Step 5: Auto-Post to Social Media

    To automatically post your generated talking videos:

    1. Go to your TikTok or Instagram campaign.
    2. Set the Content Queue to your My Talking Video Queue.
    3. SocialAppFarm will automatically post these talking videos based on your active schedule
    4. Just keep uploading your speech or text to the audio queue. Socialappfarm will create new talking video for you and auto-post to your account

    ✅ Final Workflow Summary

    StepTaskPurpose
    1Create queuesOrganize images, audio, and output videos
    2Add text or audioProvide speech for your influencer
    3Configure Faceless ContentCombine voice, image, and effects
    4Save & generateAutomate realistic talking videos
    5Auto-postInstantly publish to TikTok & Instagram

    ✨ Result

    Your AI influencer now talks naturally, delivering dynamic videos created from either text or audio — fully automated.
    You can continuously feed new text or speech into the Audio Queue, and SocialAppFarm will keep generating new talking videos daily.