Category: AI Influencer

  • How to Build and Automate Real and AI Babe/Model/OnlyFans Influencer Account with SocialAppFarm

    This guide shows how to create, train, and automate a Model / Only Fans/Babe-style influencer account using SocialAppFarm — the right way.

    Most Fresh “babe” pages fail because they post only thirst traps and boring babe images. It will never work on new accounts. Old babe accounts can get away with it becuase they have the numbers but not not new accounts.
    Social media platforms detect these patterns and limit their reach — even if the content looks great.
    The algorithm is designed to suppress repetitive, adult-leaning or low-conversation posts.

    The key to success in this niche is to:

    • Blend lifestyle and context (travel, fitness, fashion, etc.)
    • Use subtle sensuality without making the entire feed about it
    • Add personality or opinion via text overlays and AI-generated speech
    • Build a brand like a real model people know — not just a face

    This guide teaches how to automate a model/babe/OF-style influencer that’s algorithm-friendly and highly engaging.

    Note: You can run upto 25 babe accounts by using socialappfarm extra account addons per device. You can also resuse a single trained influencer on any of your social media accounts.


    ⚙️ You’ll Learn How To

    • Train an AI model or “babe” influencer properly (based on niche context).
    • Automatically generate lifestyle and fitness-style images
    • Create mixed media posts (images + text or quotes)
    • Generate general or AI talking videos with motivational or controversial speech
    • Automate content scheduling, commenting, and growth

    📘 Overview

    The goal isn’t to make a “sexy account” alone — it’s to build a marketable influencer page with visual appeal, personality, and niche alignment.

    You can target:

    • Travel / Luxury Babes (beachwear, bikini, vacations, city strolls)
    • Fitness Models (gymwear, healthy lifestyle, workouts)
    • Lifestyle & Motivation (fashion, quotes, relatable content)

    Each account runs independently on SocialAppFarm, automatically creating, posting, and engaging daily.


    ⚙️ Step 1: Train Your Babe / Model Influencer

    If you want to use an AI Influencer (recommended for scale), train one properly.

    1. Prepare 18–20 high-quality, niche-relevant sexy photos (No NSFW) of your model. You can also use realistic AI generated images from instagram for your AI influencer.
      • For fitness influencers: use gym, activewear, sneakers, workout poses.
      • For travel influencers: use beachwear, bikini, cafe, airport, city backgrounds.
      • For lifestyle influencers: use home outfits, casual photos, daily life vibes.
    2. Create a Content Queue called Model Training Images and upload the images.
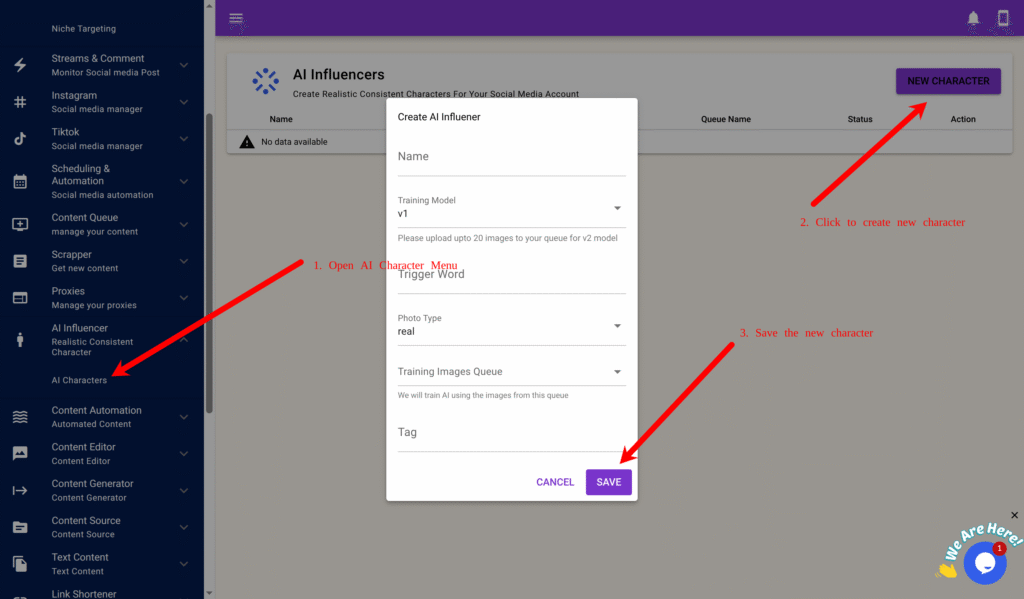
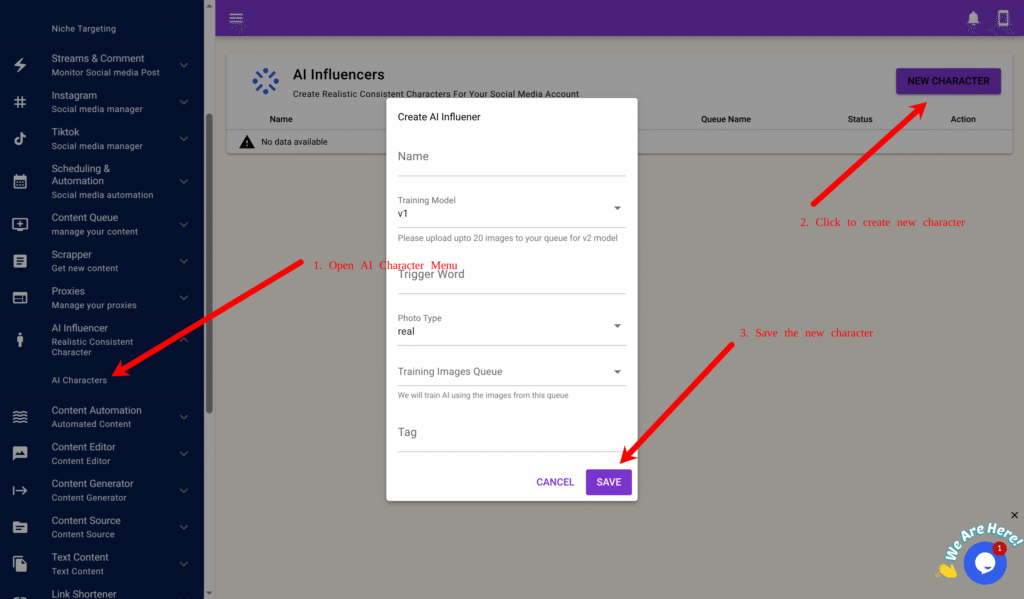
    3. Go to AI Influencer → AI Characters → New Character.
    4. Fill in:
      • Name: e.g., “Sophia Fit”
      • Model: v2 (for realism)
      • Trigger Word: e.g., sophfit1
      • Training Queue: Model Training Images
    5. Click Save → Train.

    generate content.

    Once complete, your influencer will generate realistic lifestyle/model-style photos that match the trained niche.


    🧠 Step 2: Generate Daily Lifestyle / Fitness Images

    To avoid looking repetitive, you’ll generate lifestyle-inspired model images (not just poses).

    Step 2A – Create a Dynamic Prompt Queue

    1. Go to Content Queue → Add New, name it Lifestyle Prompts
    2. Create content Queue Model Lifestyle Images and tick Approve Content First Before Use.
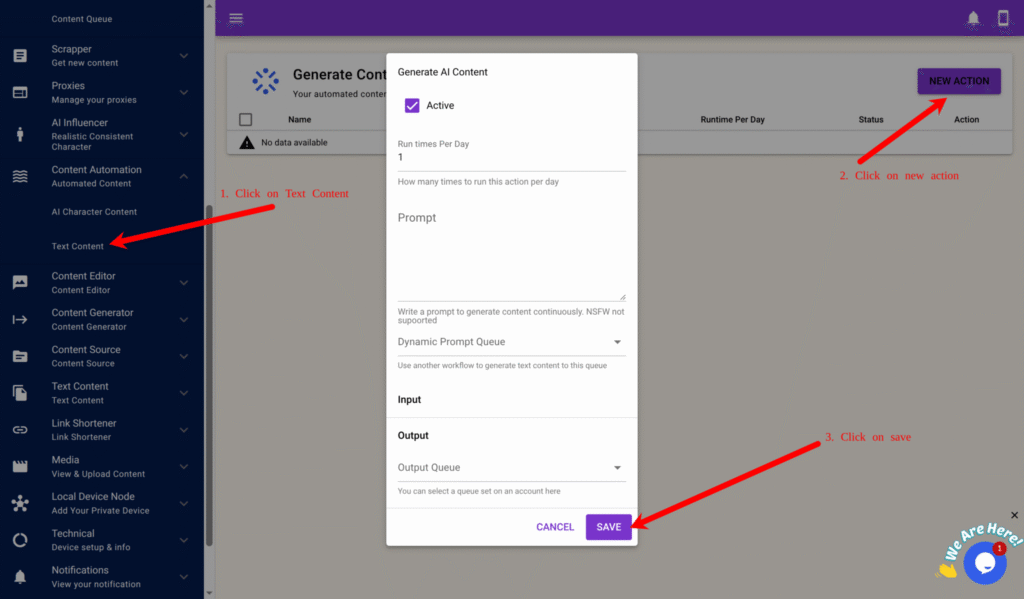
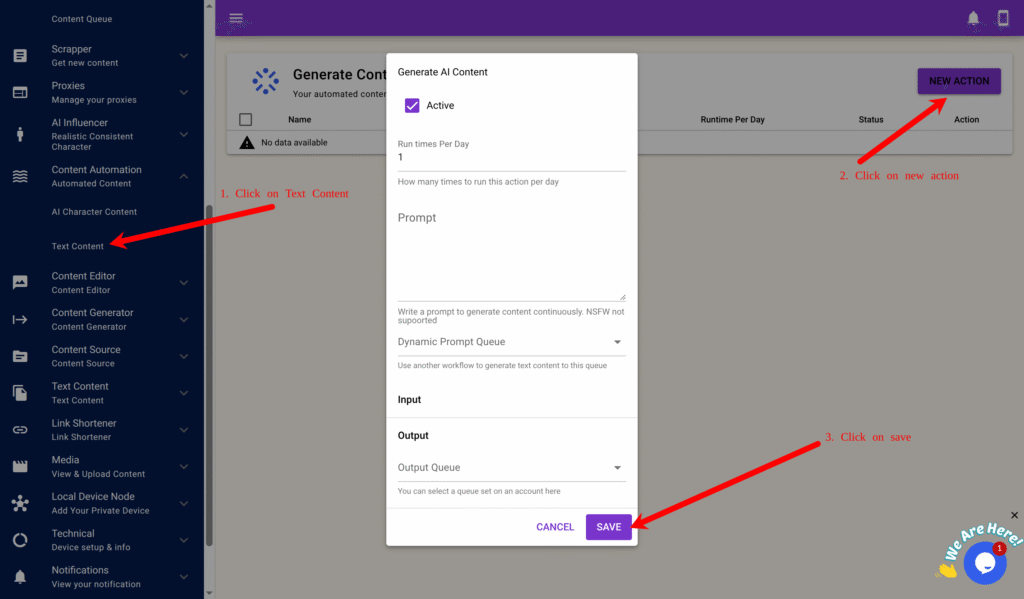
    3. Go to Content Automation → Text Content → New.
    4. Fill in:
      • Run Times Per Day: 2
      • Prompt: You are a social media creative director generating lifestyle photo prompts for a model influencer.
        Mix fashion, fitness, and travel scenes. Include realistic body angles and natural poses.
        Example: “She’s walking in a tropical resort wearing gymwear and holding a smoothie.”
      • Output Queue: Lifestyle Prompts
    5. Click Save.

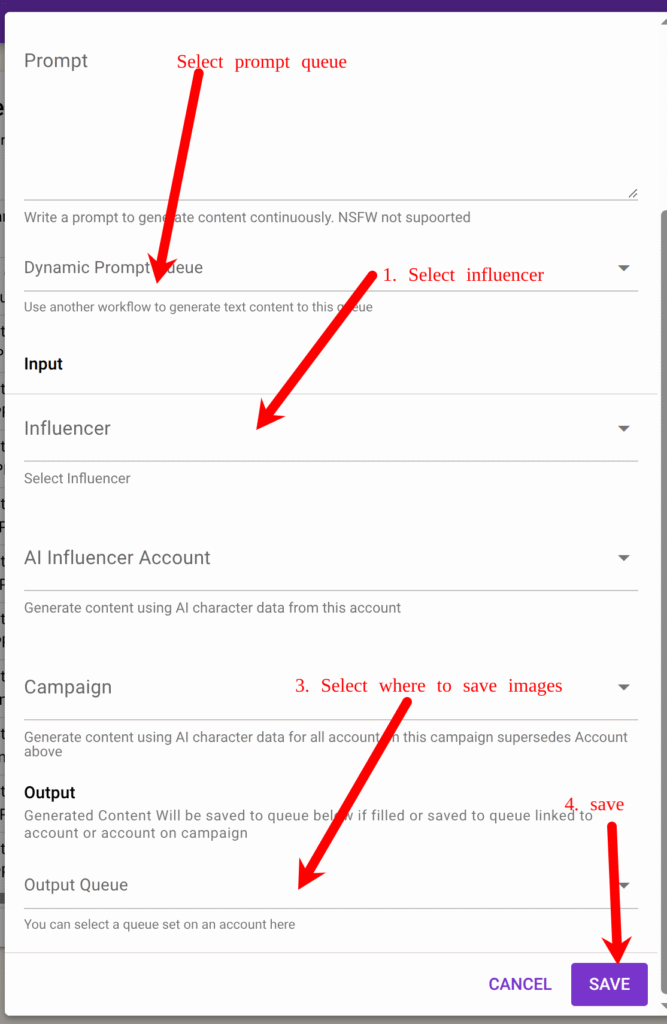
    Step 2B – Create AI Character Image Generation

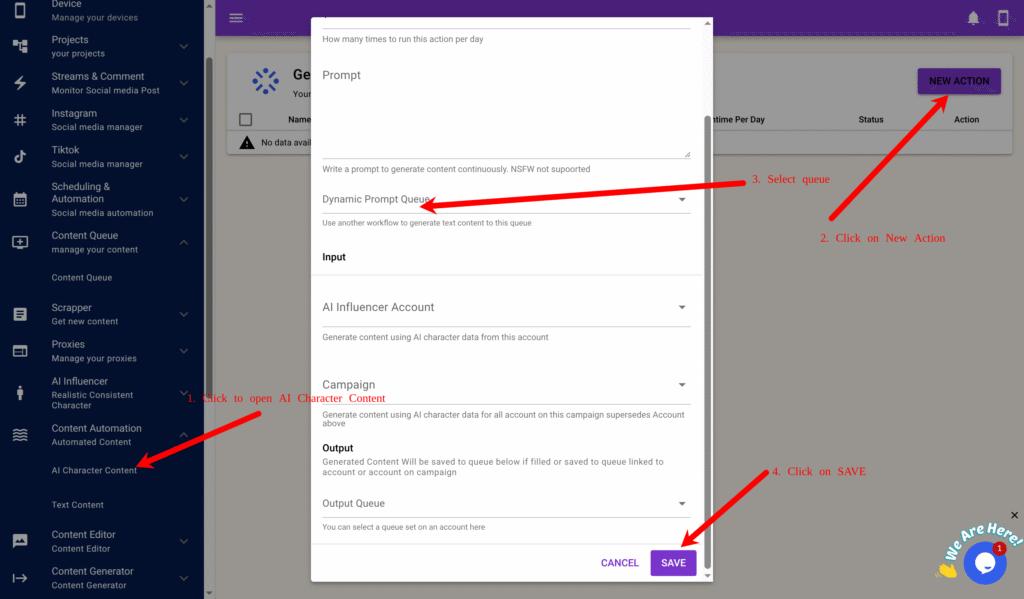
    1. Go to Content Automation → AI Character Content → New.
    2. Fill in:
      • Run Times Per Day: 2
      • Dynamic Prompt Queue: Lifestyle Prompts
      • Influencer : your trained model
      • Output Queue: Model Lifestyle Images
    3. Click Save.

    Now your model automatically generates realistic lifestyle-style images daily.


    💬 Step 3: Creating Contnet Adding Personality with Text Overlays and Controversial Quotes

    Many new “babe” pages fail because they look robotic — all looks, no voice.
    Adding text captions or quotes builds personality, opinions, and relatability.

    You’ll use SocialAppFarm’s Text Content Automation to generate caption text and overlay it on images or short clips. Create a content queue Model Quote Texts

    Step 3A – Generate Text Content

    1. Go to Content Automation → Text Content → New.
    2. Fill in:
      • Run Times Per Day: 2
      • Prompt: Generate short, controversial or thought-provoking quotes from a female perspective that support men or challenge double standards.
        Keep it short and conversational (1–2 sentences) no hidden character or quotes.
        Example: “It’s okay for a man to expect loyalty too.”
      • Output Queue: Model Quote Texts
    3. Click Save.

    🎙️ Step 4: Create General or Talking Reaction Videos

    You can take your model influencer further by generating general or talking clips with short audio or captions.

    Step 4A – Create Text Style

    1. Go to Content Generator → Text Style → New Style.
    2. Example settings:
      • Name: Bold Quote Overlay
      • Position: Middle Center
      • Text Color: White (#ffffff)
      • Font Size: 16
      • Background: Box (semi-transparent)
    3. Preview and Save.

    Step 4B – Generate Videos

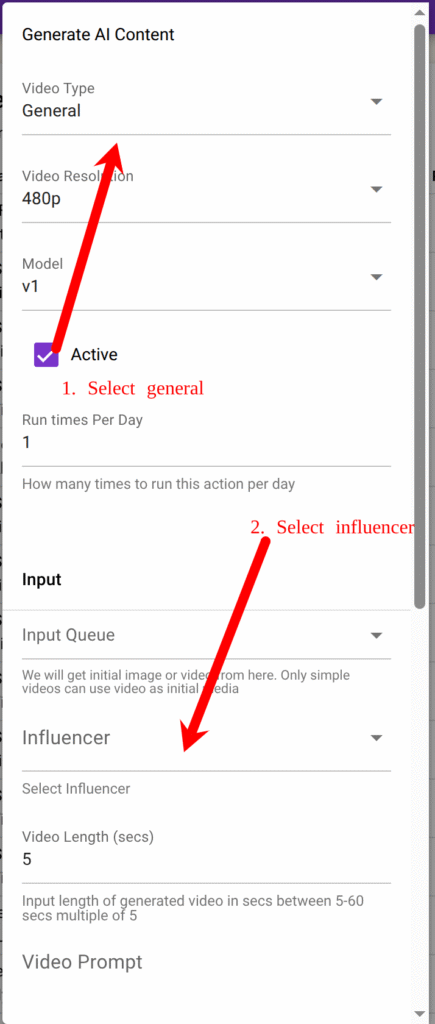
    1. Go to Content Generator → Faceless Content → New.
    2. Fill out:
      • Video Type: General (You can also use Talking once in a while )
      • Model: v1
      • Resolution: 720p
      • Input Queue: Model Lifestyle Images
      • Influencer: Select your created influencer
      • Text/Audio Queue: Model Audio Speech (The text from this queue would be overlayed on the Video if video type is General while the influencer will speak the text if video is Talking type)
      • Voice: Select voice
      • Style: Choose text style (Bold Quote Overlay)
      • Output Queue: Model Videos
    3. Click Save.

    Step 4C – To Use Image Group Posts Instead of Singles

    You can also mix group and slide post together with videos in your content strategy.
    Social platforms prefer carousel/group posts over single photos — they trigger more engagement.

    In Content Queue →Model Videos, you can:

    Select multiple related images

    Click Action → Mark As Multiple Post

    Add captions like “Travel Day Routine 🌴☕” or “Pre-Gym Morning Vibes 💪✨”


    🧩 Step 5: Create Campaign & Niche Targeting

    Now set up your niche, campaign to manage posting and engagement. We will target Men dominated and other babe niche keywords on socialmedia. We will comment and like post dominated in men and other babe account so our account can be noticed easily.

    Step 5A – Niche Targeting

    1. Go to project create a new project and activate it
    2. Go to Project → Niche Targeting → Add New.
    3. Example:
      • Name: Fitness Model Niche
      • Content Queue: Model Videos
      • Keywords: fitness, gym, travel, beauty, fashion, women lifestyle
      • Usernames: optional put usernames of big account in babe niche
      • Use AI To Determine Interaction “Engage with content about travel, lifestyle, babe, or fitness.only Like, follow, and comment on posts that look authentic.”
      • Use AI To Generate Comment “Write light, friendly, or funny comments like ‘Love this view!’ or ‘Queen energy 💪✨’.”
    4. Save it.

    Step 5B – Create Campaign

    1. Go to TikTok → Campaign or Instagram → Campaign.
    2. Click Add New:
      • Name: Model Campaign
      • Share Device: select device
      • Content Queue: Model Videos
    3. Save it.

    Step 5C – Add Accounts & Proxy

    1. On your campaign, click View Accounts → Add New.
    2. Fill in:
      • Username (required)
      • Password, Email, Email Password, or 2FA Key (optional)
    3. Click Save.

    Or bulk import using CSV format:

    username:password:email:emailpassword:biolink:bio:2fakey

    Select the newly created Niche for each account and assign your Influencer if you have one.


    Step 5D – Assign Proxies

    1. Go to Proxy → Add New with a proxy tag e.g automation or Import.
    2. Add or import proxies in this format:
    username:password:1.1.1.1:8080:automation
    

    3. Return to your campaign → View Accounts → click Auto Assign by Proxy Tag, enter your tag (e.g., “automation”), and click OK.


    💡 Step 6: Prime and Schedule

    Run a Priming Schedule for 5–7 days first:

    • Like and comment on fitness, gym, men related, other babes posts.

    Priming helps new accounts act naturally and establish trust with the algorithm.

    1. Go to TikTok → Campaign → View Schedule or Instagram → Campaign → View Schedule.
    2. Create a Priming Schedule:
    TimeActivityAction
    8 AMSearch TagsLike 5–10 posts
    12 PMSearch Video / FeedComment 1–3 posts
    4 PMView Profile Stats
    8 PMView Feed / FYPLike 5 posts
    11 PMView Feed / FYPComment 2 posts
    1. Save as “Priming Schedule.”
    2. Run it for 5–7 days before switching to your main posting schedule.

    Then switch to your Daily Posting Schedule:

    Once priming is done, switch to consistent posting and engagement:

    TimeActivityAction
    9 AMView Feed / FYPLike 5–10 posts
    12 PMCreate PostPost from My Influencer Videos queue
    6 PMUpdate Profile Stats
    9 PMView FeedComment 1–3 posts
    • 2–3 posts daily from Model Videos or grouped images
    • 1–2 comments per hour
    • AI auto-comments on relevant posts using your niche targeting

    Result

    You’ve built a sustainable model influencer brand that:

    • Looks authentic and appealing
    • Avoids reach restrictions
    • Mixes lifestyle, fitness, and opinion content
    • Posts and engages automatically

    This structure creates a brandable personality, not just a pretty face.

    You can also include follow in your schedule and run ads for your popular post after a while
  • How to Build and Automate a An Influencer Brand Account with SocialAppFarm

    This guide shows how to create and automate an influencer account using SocialAppFarm in Productivity Niche.
    You can use the Extra Add-on Account feature to manage 1–25 influencer accounts for TikTok or Instagram.

    You can use AI Influencer content or your own content.


    You’ll Learn How To:

    • Optionally train or use your own AI Influencer
    • Automatically generate podcast-style influencer images
    • Set up your campaign, accounts, proxies, and niche targeting
    • Optionally generate talking videos using text or uploaded audio
    • Prime your account for growth
    • Schedule automatic daily posting

    📘 Overview

    This setup is ideal for personal creators and small influencer brands who want to post daily, build niche authority, and stay consistent — all automatically.
    Each account runs independently, with its own automation flow.

    You can use:

    • Your own photos, videos, and voice, or
    • A trained AI Influencer created directly inside SocialAppFarm.

    If you don’t plan on using an AI Influencer from SocialAppFarm but still want to create talking videos using your own images:

    Create a Content Queue called Influencer Podcast Images, upload your images, and skip to Step 3.

    If you already create your content outside SocialAppFarm:

    Create a Content Queue called My Influencer Videos, upload your videos, and skip to Step 4.


    ⚙️ Step 1: Create Your Influencer

    Option 1: Train an AI Influencer

    1. Go to AI Influencer → AI Characters → New Character.
    2. Prepare 15–20 clear, high-quality images of your influencer in different poses and outfits.
    3. Create a Content Queue called My Influencer Training Images and upload your photos.
    4. Fill in the fields:
      • Name: e.g., Jane
      • Model: v1 or v2 (v2 offers higher realism)
      • Trigger Word: e.g., j1ne1
      • Training Images Queue: My Influencer Training Images
    5. Click Save → Train.

    Training takes about an hour. Once finished, your influencer is ready to generate content.


    🧠 Step 2: Automatically Generate Podcast-Style Images

    You can automate daily creation of influencer photos in podcast or lifestyle scenes.

    Step 2A – Create a Dynamic Prompt Queue

    1. Go to Content Queue → Add New, name it Podcast Image Prompts. Create another one Influencer Podcast Images and tick Approve Content First Before Use.
    2. Go to Content Automation → Text Content → New.
    3. Configure the form:
      • Run Times Per Day: 2
      • Prompt: You are a prompt engineer generating photo ideas for an AI influencer recording podcasts.
        Generate one short prompt describing her pose, outfit, and background.
        Example: “A realistic portrait of her speaking into a microphone in a studio, warm lighting, neutral background.”
      • Output Queue: Podcast Image Prompts
    4. Click Save.

    This queue will now generate new creative photo prompts daily.


    Step 2B – Create AI Character Content Automation

    1. Go to Content Automation → AI Character Content → New.
    2. Fill in:
      • Run Times Per Day: 2
      • Dynamic Prompt Queue: Podcast Image Prompts
      • AI Character: your trained influencer
      • Output Queue: Influencer Podcast Images
    3. Click Save.

    SocialAppFarm will now automatically generate influencer podcast-style images daily and store them in Influencer Podcast Images.


    Step 2C – Review and Approve

    Go to Content Queue → Influencer Podcast Images → View Content and approve the best images for posting.


    Step 2D – Use as Input for Video Generation

    Later (in Step 3), select Influencer Podcast Images as your Input Queue when generating talking videos.


    🎙️ Step 3: Prepare Your Audio or Script

    You can upload your own voice, generate AI voiceovers, or scrape trending audio.

    A. Upload Your Own Audio

    1. Go to Content Queue → Add New, name it My Audio Speech.
    2. Upload your recorded MP3 files.

    B. Generate Speech Using AI

    1. Go to Content Automation → Text Content → New.
    2. Example prompt: “Write a 30-second motivational podcast script about discipline and consistency.”
    3. Set Run Times Per Day: 3.
    4. Choose Output Queue: My Audio Speech.

    C. Scrape and Convert

    Use the Scraper Add-on to extract captions or speech from TikTok, Instagram, or YouTube videos.
    Rewrite or convert them into speech using the AI text tools.


    💬 Step 3B: Generate Talking Videos

    Step 3B-1: Create Text Style

    1. Go to Content Generator → Text Style → New Style.
    2. Example settings:
      • Name: White Caption Bottom Center
      • Position: Bottom Center
      • Text Color: White (#ffffff)
      • Font Size: 12
      • Background: Box or Full (optional)
      • Text Effect: Karaoke (for dynamic captions)
    3. Click Preview to check the design, then click Save.

    Step 3B-2: Create Video Automation

    1. Go to Content Generator → Faceless Content → New.
    2. Fill out the form:
      • Run Times Per Day: 1–3
      • Video Type: Talking
      • Resolution: 480p or 720p
      • Model: v1 or v2
      • Input Queue: Influencer Podcast Images
      • Influencer: Select your trained influencer
      • Text/Audio Queue: My Audio Speech
      • Generate Audio: ✅ (if using text input)
      • Voice: Select your preferred voice
      • Generate Subtitles:
      • Background Music Queue: Optional
      • Style: Select your text overlay style (e.g., “White Caption Bottom Center”)
      • Output Queue: My Influencer Videos
    3. Click Save.

    SocialAppFarm will now generate daily talking videos for your influencer using your approved images and speech.


    🧩 Step 4: Create Your Campaign and Set Niche Targeting

    Step 4A – Create Niche Targeting

    1. Go to Project create a new project and activate it.
    2. Go to Project → Niche Targeting → Add New.
    3. Fill in the form:
      • Name: Productivity Niche
      • Content Queue: My Influencer Videos
      • Keywords: productivity, motivation, self-growth, focus, daily routine, mindset, success habits
      • Use AI To Determine Interaction Interaction Prompt:
        “Engage only with English posts related to productivity or motivation. Like posts with more than 10 likes and avoid spam or private profiles.”
      • Use AI To Generate Comment Comment Prompt:
        “Write helpful or funny comments that feel natural. Example: ‘Love this energy!’ or ‘Such a great reminder!’.”
    4. Click Save.


    Step 4B – Create a Campaign

    1. Go to TikTok → Campaign or Instagram → Campaign.
    2. Click Add New and fill in:
      • Name: My Influencer Campaign
      • Share Device: Select your active device
      • Content Queue: My Influencer Videos (You can also upload your own videos here if you prefer.)
    3. Click Save.

    Step 4C – Add Accounts

    1. On your campaign, click View Accounts → Add New.
    2. Fill in:
      • Username (required)
      • Password, Email, Email Password, or 2FA Key (optional)
    3. Click Save.

    Or bulk import using CSV format:

    username:password:email:emailpassword:biolink:bio:2fakey
    

    Select the newly created Niche for each account and assign your Influencer if you have one.


    Step 4D – Assign Proxies

    1. Go to Proxy → Add New or Import.
    2. Add or import proxies in this format:
    username:password:1.1.1.1:8080:automation
    
    1. Return to your campaign → View Accounts → click Auto Assign by Proxy Tag, enter your tag (e.g., “automation”), and click OK.

    💡 Step 5: Prime Your Accounts

    Priming helps new accounts act naturally and establish trust with the algorithm.

    1. Go to TikTok → Campaign → View Schedule or Instagram → Campaign → View Schedule.
    2. Create a Priming Schedule:
    TimeActivityAction
    8 AMSearch TagsLike 5–10 posts
    12 PMSearch Video / FeedComment 1–3 posts
    4 PMView Profile Stats
    8 PMView Feed / FYPLike 5 posts
    11 PMView Feed / FYPComment 2 posts
    1. Save as “Priming Schedule.”
    2. Run it for 5–7 days before switching to your main posting schedule.

    📅 Step 6: Schedule Daily Posting

    Once priming is done, switch to consistent posting and engagement:

    TimeActivityAction
    9 AMView Feed / FYPLike 5–10 posts
    12 PMCreate PostPost from My Influencer Videos queue
    6 PMUpdate Profile Stats
    9 PMView FeedComment 1–3 posts
    1. Save as “Daily Posting Schedule.”
    2. Load it after priming — your influencer account will now post and engage automatically every day.

    Result

    You’ve successfully built a fully automated solo influencer system using SocialAppFarm.

    Your setup now:

    • Generates influencer images and talking videos automatically
    • Uses uploaded or AI-generated speech
    • Likes, comments, and interacts in relevant niches
    • Posts daily content — all from one dashboard

    Perfect for standalone influencer brands or small-scale content creators.

  • Creating Your Ultra-Realistic AI Influencer with SocialAppFarm

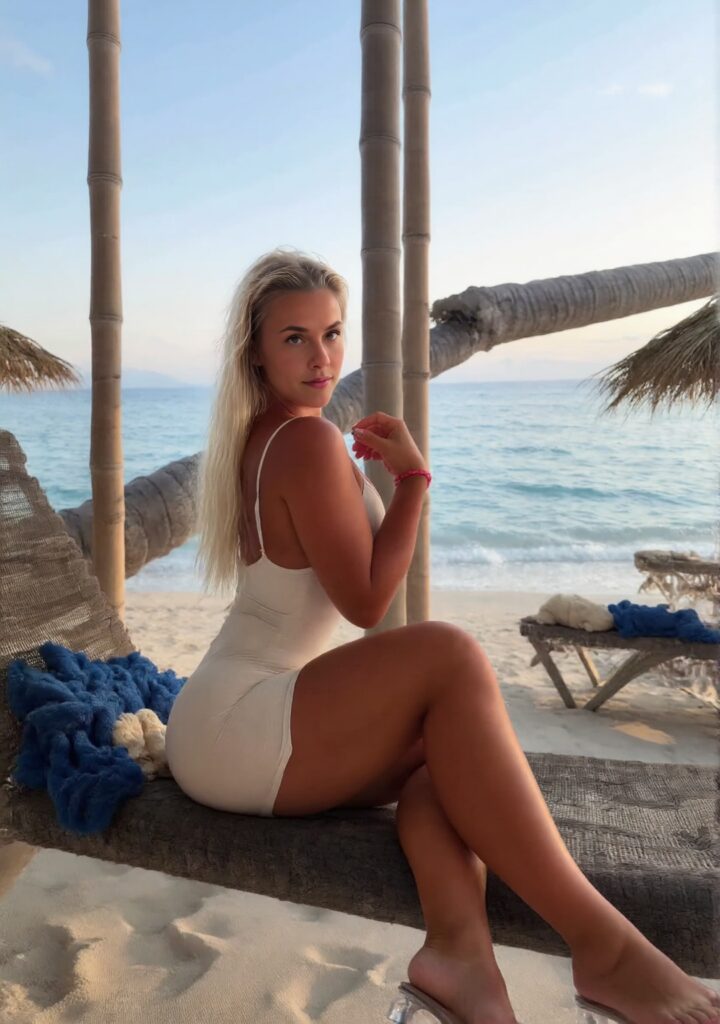
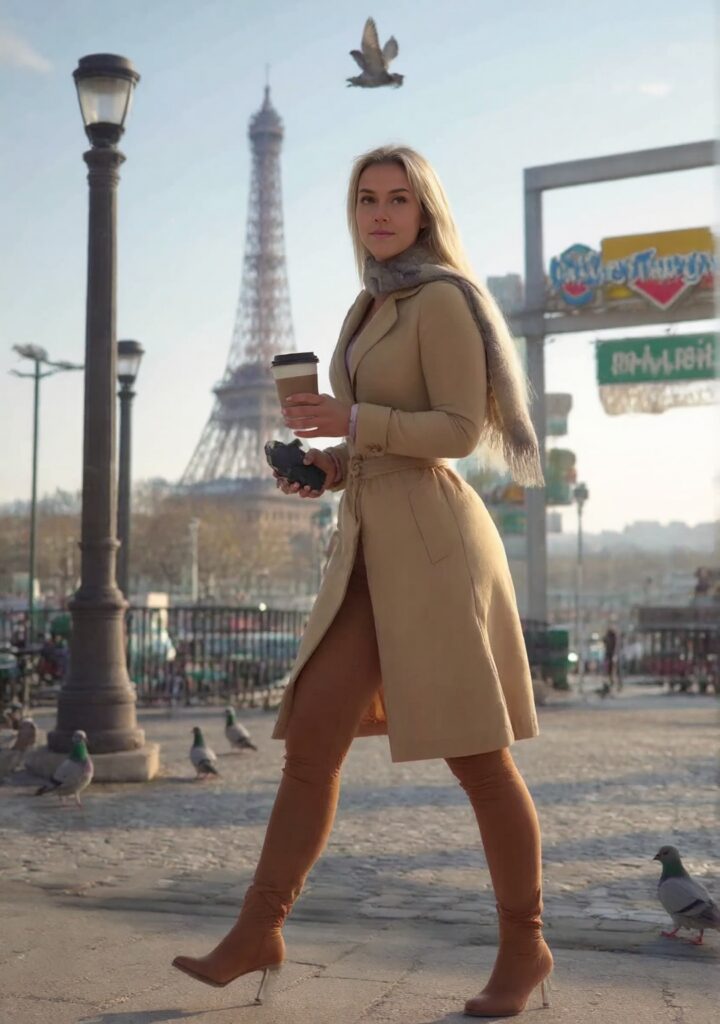
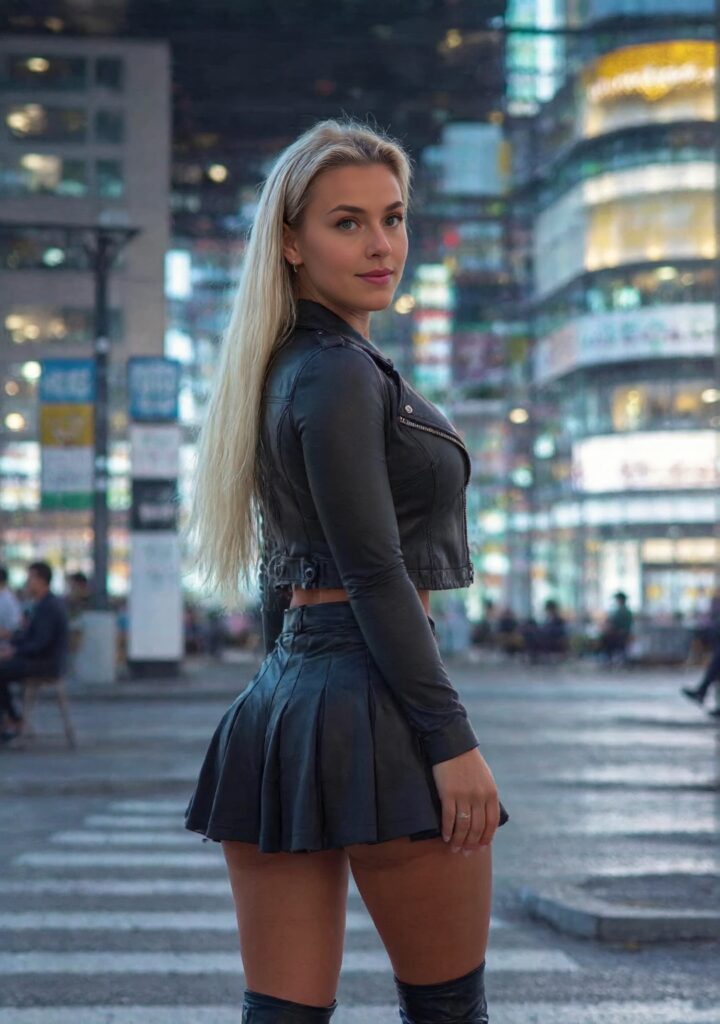
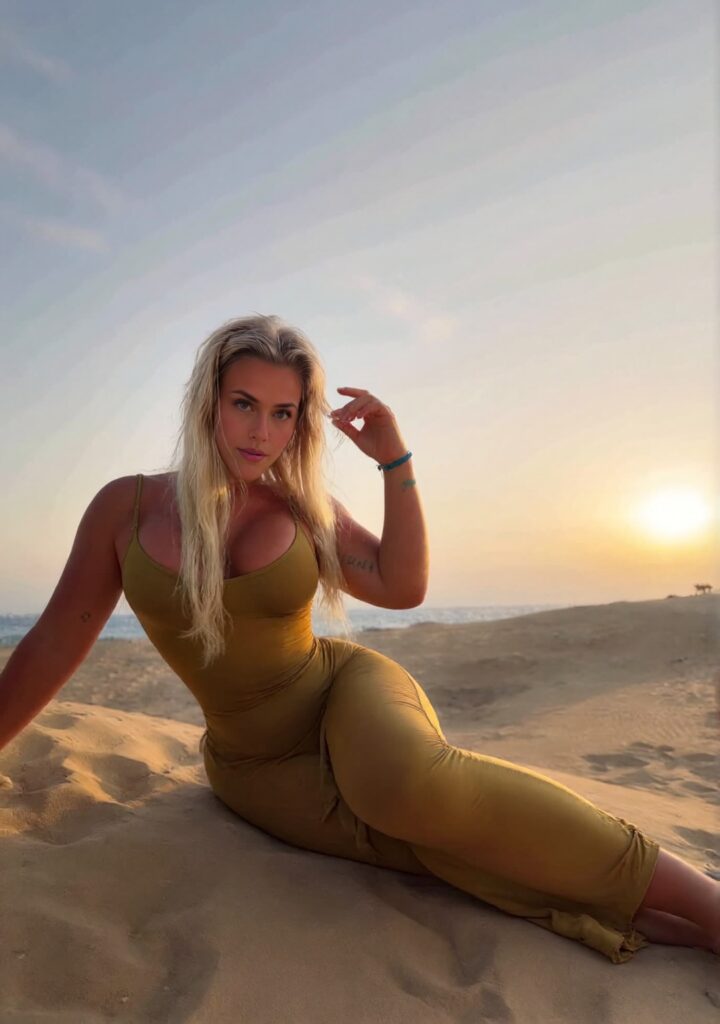
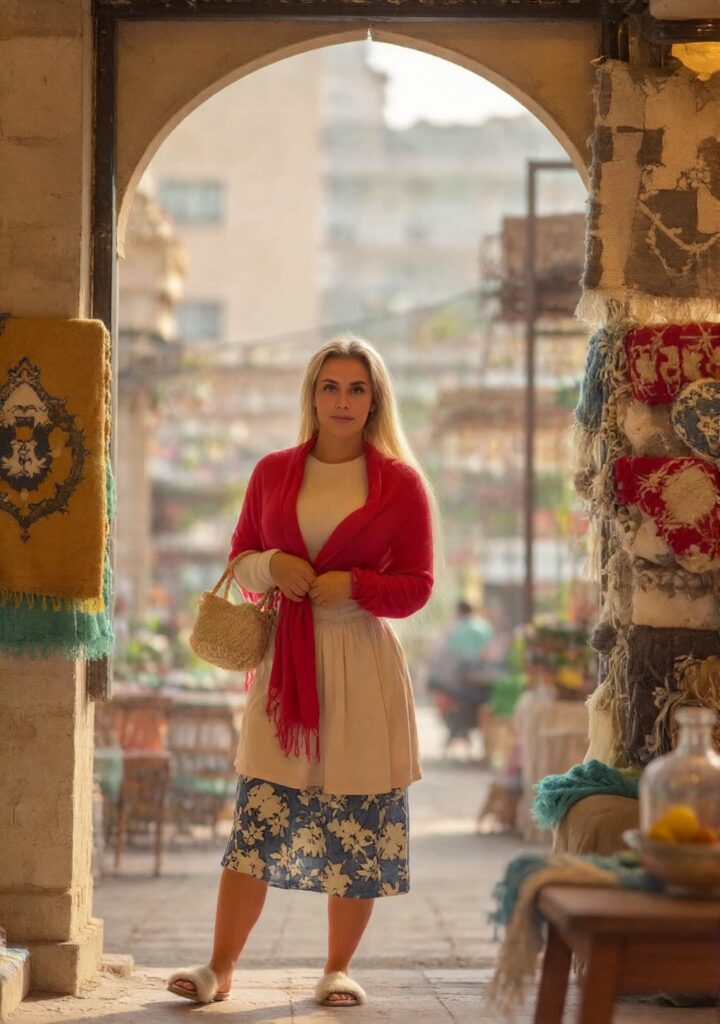
    What if I told you the people in those images and videos aren’t real?
    They’re AI Influencers — created entirely using SocialAppFarm.
    And here’s the best part: you can create your own AI influencers too, then plug them directly into your automation campaigns on SocialAppFarm to generate a constant flow of endless, high-quality content for your social media accounts.

    Creating your AI influencer using SocialAppFarm is simple — you don’t need expensive GPUs, technical setups, or any AI expertise.
    With SocialAppFarm, you can create your influencer in just a few clicks and automatically generate high-quality content that connects directly into your social media campaigns and content automation pipelines.

    This guide walks you step-by-step through how to create your first AI influencer.


    📸 Step 1: Gather Your Training Images

    The first step is to collect clear, well-lit photos of the influencer or model you want to train.

    Image Requirements

    • Quantity: 15–20 images (the more variety, the better the results).
    • Quality: Use sharp, high-quality images with good lighting. Avoid blurry or low-resolution photos.
    • Format: JPEG or PNG.
    • Resolution: Aim for 512×512 or higher.
    • Variety: Include photos of the same person in different poses, clothing, and backgrounds. Variety helps the AI generalize and produce more realistic results.

    Tip: Avoid filters or heavy edits — natural photos give more accurate AI likeness.


    🧰 Step 2: Create a Content Queue for Training Images

    Once your images are ready:

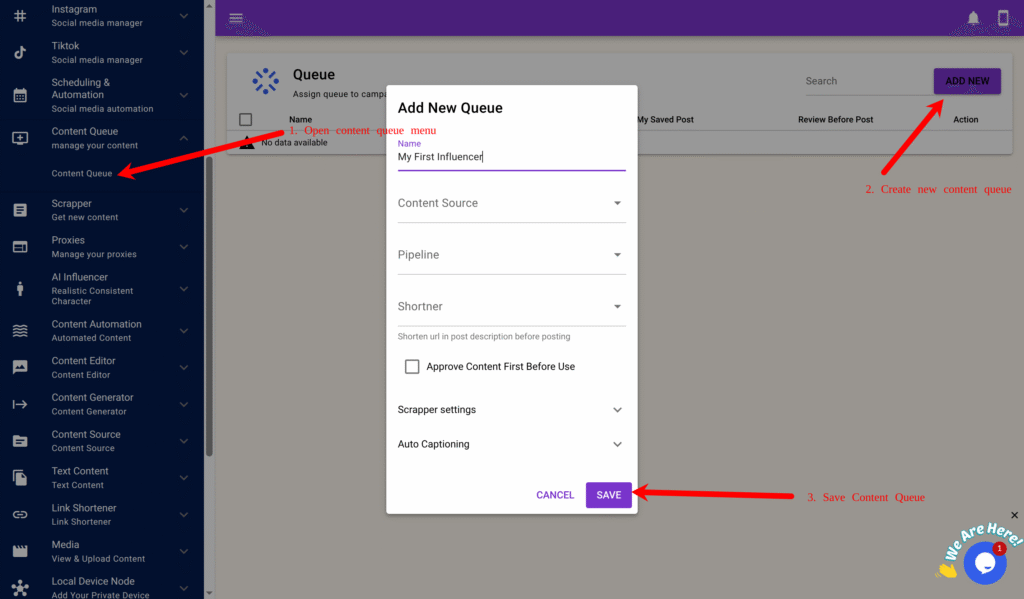
    1. Go to Content Queue → Content Queue on the main menu.
    2. Click Add New and enter a name — for example: My First Influencer
    1. Click Save.
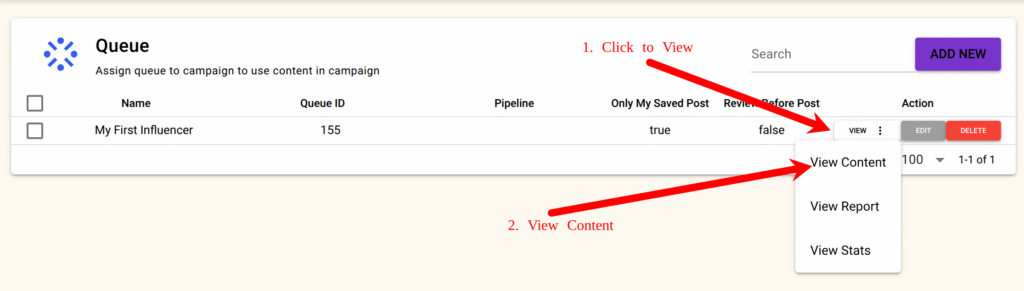
    2. Next, click View → View Content on your newly created content queue.
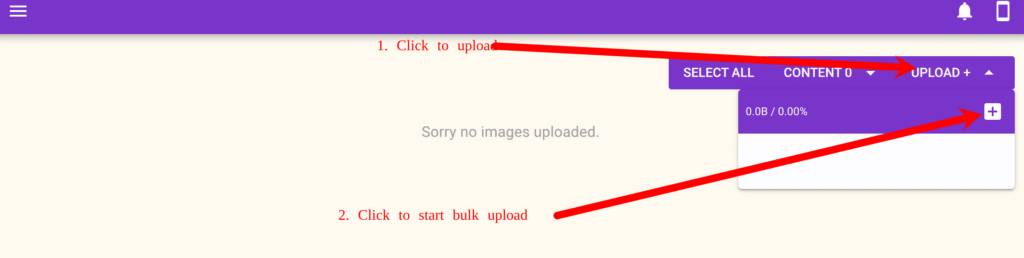
    1. Click the + Upload icon and upload all your prepared images.

    If any uploads fail, simply re-upload those specific images.
    This queue will serve as your training image source for the AI model.


    🤖 Step 3: Create a New AI Influencer

    Now that your training images are uploaded:

    1. From the main menu, go to AI Influencer → AI Characters.
    2. Click the New Character button.
    3. Fill in the fields as follows: FieldDescription
      • Name: The display name of your AI Influencer (e.g., Jane).
      • Model: Choose v1 or v2.
        🔹 v1 = cheaper and faster
        🔹 v2 = more realistic and higher quality.
      • Trigger Word: A unique keyword used when generating images (e.g., j1ne1). This acts as your influencer’s “identity.”
      • Photo Type: Normal Select the base image style (portrait, lifestyle, studio, etc.). You can change this later.
      • Training Images Queue: Select the queue where you uploaded your training photos (e.g., My First Influencer).
      • Tag(Optional): A label to help organize or assign your influencer in campaigns later.
    4. Once filled, click Save to create your influencer.

    ⚡ Step 4: Train Your AI Influencer

    After saving, click the Train button to start training your influencer.

    SocialAppFarm will automatically begin AI model training using your uploaded images.
    The process usually takes about 20 – 30 minutes, depending on the model type and server load.

    You can monitor progress from the Status field next to your influencer name.


    🖼️ Step 5: Generate Test Images

    Once training is complete, you’ll see a Generate button next to your influencer.

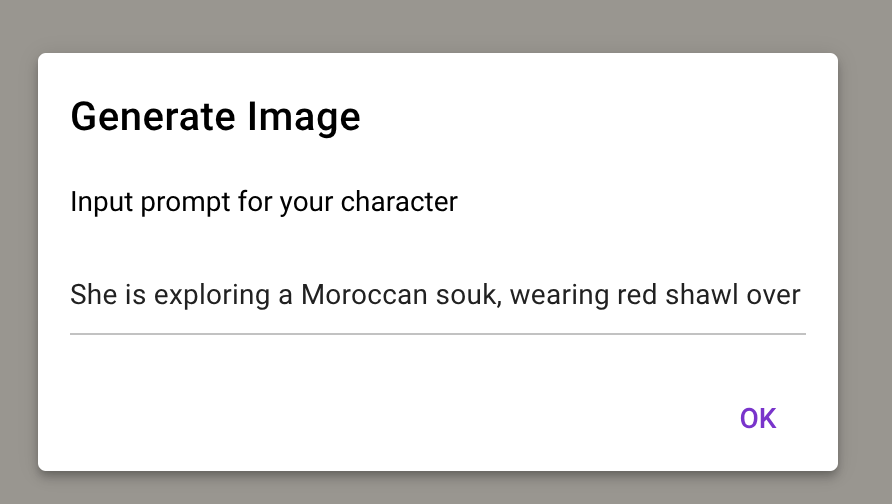
    1. Click Generate to open the prompt dialog box.
    2. Enter a short descriptive prompt — for example:
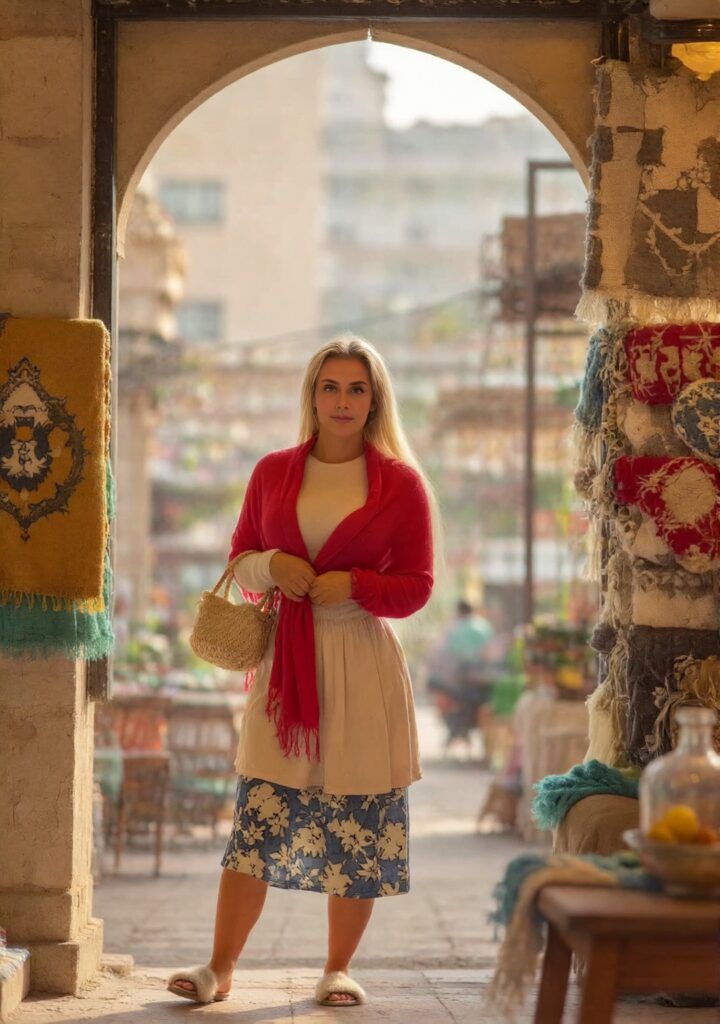
      • She is exploring a Moroccan souk, wearing red shawl over cream blouse, patterned skirt, carrying woven bag, colorful carpets and spices around, soft dust haze in air, afternoon light filtering through, warm tones
    3. Click Generate Image.

    Within seconds, SocialAppFarm will create and display your AI-generated image in a pop-up window.

    Tip: Try creative prompts to explore different angles, lighting, or scenarios:

    • “Wearing business casual in a modern office.”
    • “Sunset portrait by the beach.”
    • “Studio photo with soft lighting and neutral background.”

    📈 Step 6: Integrate into Campaigns

    Once your influencer is trained and tested, you can:

    • Use our content Automation To Keep Generating Fresh And cool images For your AI Influncer
    • Plug the AI influencer into SocialAppFarm campaigns & Account for automated posting.
    • Use it with Content Generator or Content Editor for captions and media blending.
    • Assign it to different projects or devices to automate multi-platform influencer activity.

    ✅ Summary

    You’ve just created your first realistic AI influencer — without writing a single line of code or owning a GPU.

    With SocialAppFarm, you can:

    • Build custom influencers with unique trigger words
    • Generate endless photorealistic images
    • Automate their social media activity
    • Integrate AI influencers directly into your content pipelines

    Continue experimenting with prompts, photo types, and models (v1 vs v2) to find the perfect look and personality for your AI influencer.