This guide shows how to create and automate an influencer account using SocialAppFarm in Productivity Niche.
You can use the Extra Add-on Account feature to manage 1–25 influencer accounts for TikTok or Instagram.
You can use AI Influencer content or your own content.
You’ll Learn How To:
- Optionally train or use your own AI Influencer
- Automatically generate podcast-style influencer images
- Set up your campaign, accounts, proxies, and niche targeting
- Optionally generate talking videos using text or uploaded audio
- Prime your account for growth
- Schedule automatic daily posting
📘 Overview
This setup is ideal for personal creators and small influencer brands who want to post daily, build niche authority, and stay consistent — all automatically.
Each account runs independently, with its own automation flow.
You can use:
- Your own photos, videos, and voice, or
- A trained AI Influencer created directly inside SocialAppFarm.
If you don’t plan on using an AI Influencer from SocialAppFarm but still want to create talking videos using your own images:
Create a Content Queue called
Influencer Podcast Images, upload your images, and skip to Step 3.
If you already create your content outside SocialAppFarm:
Create a Content Queue called
My Influencer Videos, upload your videos, and skip to Step 4.
⚙️ Step 1: Create Your Influencer
Option 1: Train an AI Influencer
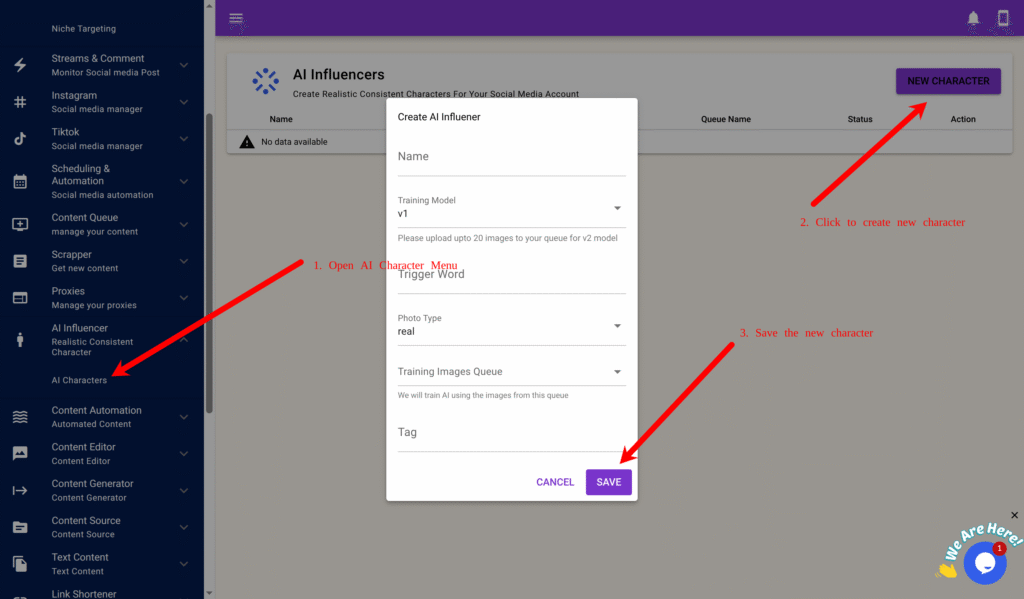
- Go to AI Influencer → AI Characters → New Character.
- Prepare 15–20 clear, high-quality images of your influencer in different poses and outfits.
- Create a Content Queue called
My Influencer Training Imagesand upload your photos. - Fill in the fields:
- Name: e.g., Jane
- Model: v1 or v2 (v2 offers higher realism)
- Trigger Word: e.g.,
j1ne1 - Training Images Queue:
My Influencer Training Images
- Click Save → Train.
Training takes about an hour. Once finished, your influencer is ready to generate content.
🧠 Step 2: Automatically Generate Podcast-Style Images
You can automate daily creation of influencer photos in podcast or lifestyle scenes.
Step 2A – Create a Dynamic Prompt Queue
- Go to Content Queue → Add New, name it
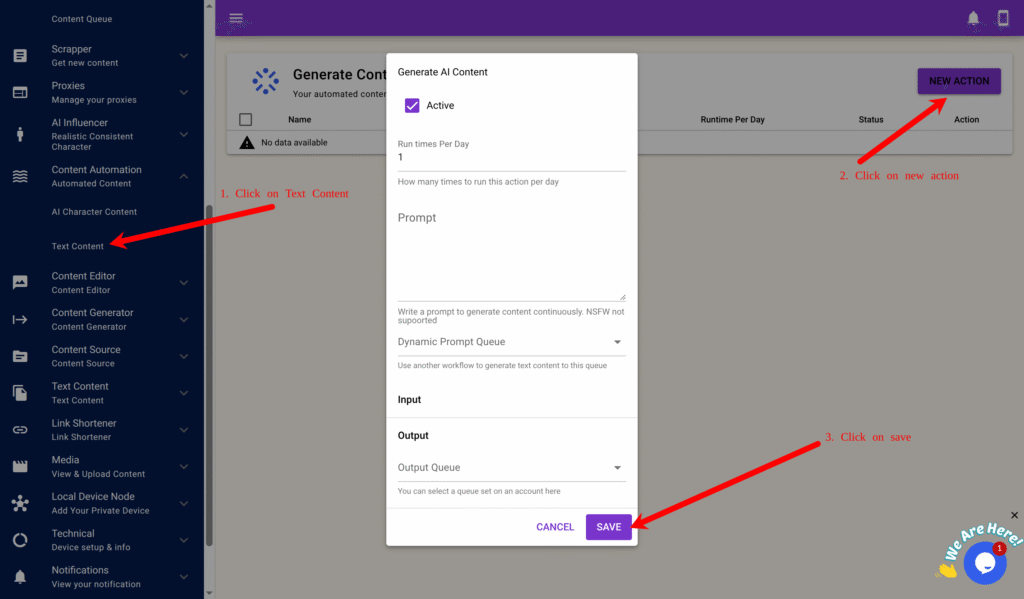
Podcast Image Prompts. Create another oneInfluencer Podcast Imagesand tick Approve Content First Before Use. - Go to Content Automation → Text Content → New.
- Configure the form:
- Run Times Per Day: 2
- Prompt: You are a prompt engineer generating photo ideas for an AI influencer recording podcasts.
Generate one short prompt describing her pose, outfit, and background.
Example: “A realistic portrait of her speaking into a microphone in a studio, warm lighting, neutral background.” - Output Queue:
Podcast Image Prompts
- Click Save.
This queue will now generate new creative photo prompts daily.
Step 2B – Create AI Character Content Automation
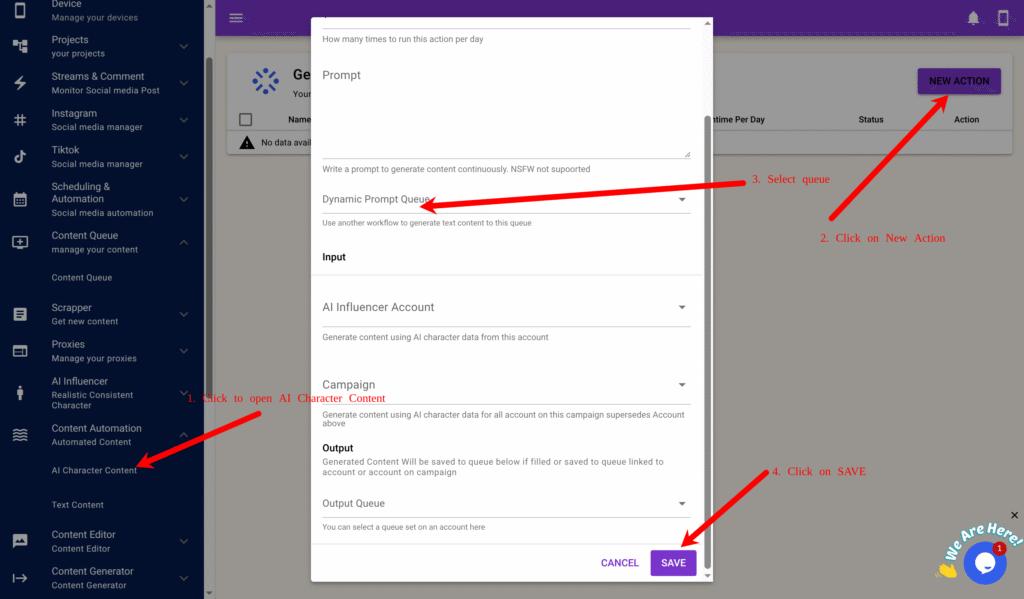
- Go to Content Automation → AI Character Content → New.
- Fill in:
- Run Times Per Day: 2
- Dynamic Prompt Queue:
Podcast Image Prompts - AI Character: your trained influencer
- Output Queue:
Influencer Podcast Images
- Click Save.
SocialAppFarm will now automatically generate influencer podcast-style images daily and store them in Influencer Podcast Images.
Step 2C – Review and Approve
Go to Content Queue → Influencer Podcast Images → View Content and approve the best images for posting.
Step 2D – Use as Input for Video Generation
Later (in Step 3), select Influencer Podcast Images as your Input Queue when generating talking videos.
🎙️ Step 3: Prepare Your Audio or Script
You can upload your own voice, generate AI voiceovers, or scrape trending audio.
A. Upload Your Own Audio
- Go to Content Queue → Add New, name it
My Audio Speech. - Upload your recorded MP3 files.
B. Generate Speech Using AI
- Go to Content Automation → Text Content → New.
- Example prompt: “Write a 30-second motivational podcast script about discipline and consistency.”
- Set Run Times Per Day: 3.
- Choose Output Queue:
My Audio Speech.
C. Scrape and Convert
Use the Scraper Add-on to extract captions or speech from TikTok, Instagram, or YouTube videos.
Rewrite or convert them into speech using the AI text tools.
💬 Step 3B: Generate Talking Videos
Step 3B-1: Create Text Style
- Go to Content Generator → Text Style → New Style.
- Example settings:
- Name:
White Caption Bottom Center - Position: Bottom Center
- Text Color: White (#ffffff)
- Font Size: 12
- Background: Box or Full (optional)
- Text Effect: Karaoke (for dynamic captions)
- Name:
- Click Preview to check the design, then click Save.
Step 3B-2: Create Video Automation
- Go to Content Generator → Faceless Content → New.
- Fill out the form:
- Run Times Per Day: 1–3
- Video Type:
Talking - Resolution: 480p or 720p
- Model: v1 or v2
- Input Queue:
Influencer Podcast Images - Influencer: Select your trained influencer
- Text/Audio Queue:
My Audio Speech - Generate Audio: ✅ (if using text input)
- Voice: Select your preferred voice
- Generate Subtitles: ✅
- Background Music Queue: Optional
- Style: Select your text overlay style (e.g., “White Caption Bottom Center”)
- Output Queue:
My Influencer Videos
- Click Save.
SocialAppFarm will now generate daily talking videos for your influencer using your approved images and speech.
🧩 Step 4: Create Your Campaign and Set Niche Targeting
Step 4A – Create Niche Targeting
- Go to Project create a new project and activate it.
- Go to Project → Niche Targeting → Add New.
- Fill in the form:
- Name:
Productivity Niche - Content Queue:
My Influencer Videos - Keywords: productivity, motivation, self-growth, focus, daily routine, mindset, success habits
- ✅ Use AI To Determine Interaction Interaction Prompt:
“Engage only with English posts related to productivity or motivation. Like posts with more than 10 likes and avoid spam or private profiles.” - ✅ Use AI To Generate Comment Comment Prompt:
“Write helpful or funny comments that feel natural. Example: ‘Love this energy!’ or ‘Such a great reminder!’.”
- Name:
- Click Save.
Step 4B – Create a Campaign
- Go to TikTok → Campaign or Instagram → Campaign.
- Click Add New and fill in:
- Name:
My Influencer Campaign - Share Device: Select your active device
- Content Queue:
My Influencer Videos(You can also upload your own videos here if you prefer.)
- Name:
- Click Save.
Step 4C – Add Accounts
- On your campaign, click View Accounts → Add New.
- Fill in:
- Username (required)
- Password, Email, Email Password, or 2FA Key (optional)
- Click Save.
Or bulk import using CSV format:
username:password:email:emailpassword:biolink:bio:2fakey
Select the newly created Niche for each account and assign your Influencer if you have one.
Step 4D – Assign Proxies
- Go to Proxy → Add New or Import.
- Add or import proxies in this format:
username:password:1.1.1.1:8080:automation
- Return to your campaign → View Accounts → click Auto Assign by Proxy Tag, enter your tag (e.g., “automation”), and click OK.
💡 Step 5: Prime Your Accounts
Priming helps new accounts act naturally and establish trust with the algorithm.
- Go to TikTok → Campaign → View Schedule or Instagram → Campaign → View Schedule.
- Create a Priming Schedule:
| Time | Activity | Action |
|---|---|---|
| 8 AM | Search Tags | Like 5–10 posts |
| 12 PM | Search Video / Feed | Comment 1–3 posts |
| 4 PM | View Profile Stats | — |
| 8 PM | View Feed / FYP | Like 5 posts |
| 11 PM | View Feed / FYP | Comment 2 posts |
- Save as “Priming Schedule.”
- Run it for 5–7 days before switching to your main posting schedule.
📅 Step 6: Schedule Daily Posting
Once priming is done, switch to consistent posting and engagement:
| Time | Activity | Action |
|---|---|---|
| 9 AM | View Feed / FYP | Like 5–10 posts |
| 12 PM | Create Post | Post from My Influencer Videos queue |
| 6 PM | Update Profile Stats | — |
| 9 PM | View Feed | Comment 1–3 posts |
- Save as “Daily Posting Schedule.”
- Load it after priming — your influencer account will now post and engage automatically every day.
✅ Result
You’ve successfully built a fully automated solo influencer system using SocialAppFarm.
Your setup now:
- Generates influencer images and talking videos automatically
- Uses uploaded or AI-generated speech
- Likes, comments, and interacts in relevant niches
- Posts daily content — all from one dashboard
Perfect for standalone influencer brands or small-scale content creators.
Leave a Reply