This guide shows how to create, train, and automate a Model / Only Fans/Babe-style influencer account using SocialAppFarm — the right way.
Most Fresh “babe” pages fail because they post only thirst traps and boring babe images. It will never work on new accounts. Old babe accounts can get away with it becuase they have the numbers but not not new accounts.
Social media platforms detect these patterns and limit their reach — even if the content looks great.
The algorithm is designed to suppress repetitive, adult-leaning or low-conversation posts.
The key to success in this niche is to:
- Blend lifestyle and context (travel, fitness, fashion, etc.)
- Use subtle sensuality without making the entire feed about it
- Add personality or opinion via text overlays and AI-generated speech
- Build a brand like a real model people know — not just a face
This guide teaches how to automate a model/babe/OF-style influencer that’s algorithm-friendly and highly engaging.
Note: You can run upto 25 babe accounts by using socialappfarm extra account addons per device. You can also resuse a single trained influencer on any of your social media accounts.
⚙️ You’ll Learn How To
- Train an AI model or “babe” influencer properly (based on niche context).
- Automatically generate lifestyle and fitness-style images
- Create mixed media posts (images + text or quotes)
- Generate general or AI talking videos with motivational or controversial speech
- Automate content scheduling, commenting, and growth
📘 Overview
The goal isn’t to make a “sexy account” alone — it’s to build a marketable influencer page with visual appeal, personality, and niche alignment.
You can target:
- Travel / Luxury Babes (beachwear, bikini, vacations, city strolls)
- Fitness Models (gymwear, healthy lifestyle, workouts)
- Lifestyle & Motivation (fashion, quotes, relatable content)
Each account runs independently on SocialAppFarm, automatically creating, posting, and engaging daily.
⚙️ Step 1: Train Your Babe / Model Influencer
If you want to use an AI Influencer (recommended for scale), train one properly.
- Prepare 18–20 high-quality, niche-relevant sexy photos (No NSFW) of your model. You can also use realistic AI generated images from instagram for your AI influencer.
- For fitness influencers: use gym, activewear, sneakers, workout poses.
- For travel influencers: use beachwear, bikini, cafe, airport, city backgrounds.
- For lifestyle influencers: use home outfits, casual photos, daily life vibes.
- Create a Content Queue called
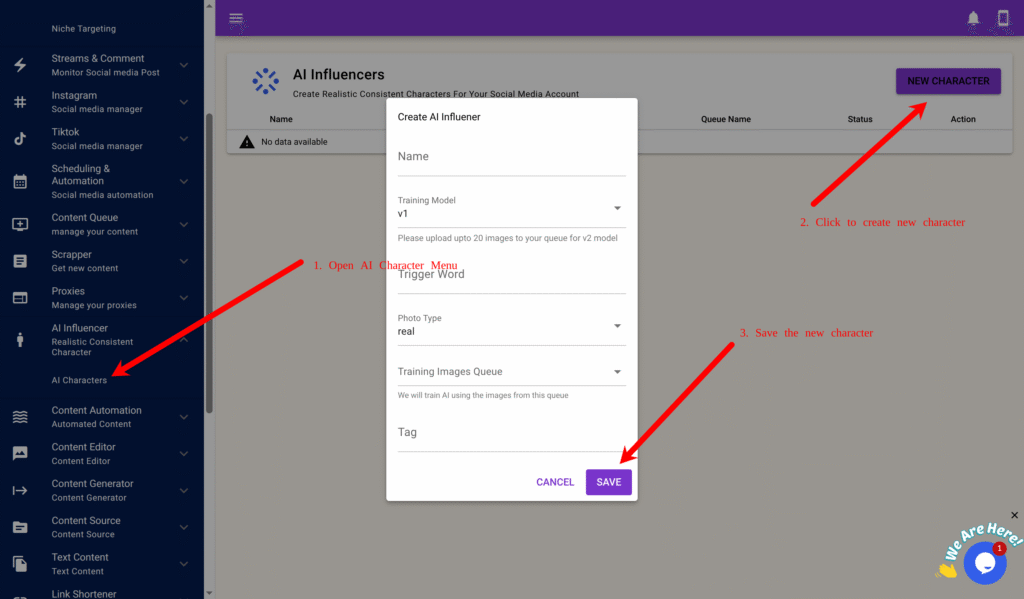
Model Training Imagesand upload the images. - Go to AI Influencer → AI Characters → New Character.
- Fill in:
- Name: e.g., “Sophia Fit”
- Model: v2 (for realism)
- Trigger Word: e.g.,
sophfit1 - Training Queue:
Model Training Images
- Click Save → Train.
generate content.
Once complete, your influencer will generate realistic lifestyle/model-style photos that match the trained niche.
🧠 Step 2: Generate Daily Lifestyle / Fitness Images
To avoid looking repetitive, you’ll generate lifestyle-inspired model images (not just poses).
Step 2A – Create a Dynamic Prompt Queue
- Go to Content Queue → Add New, name it
Lifestyle Prompts - Create content Queue
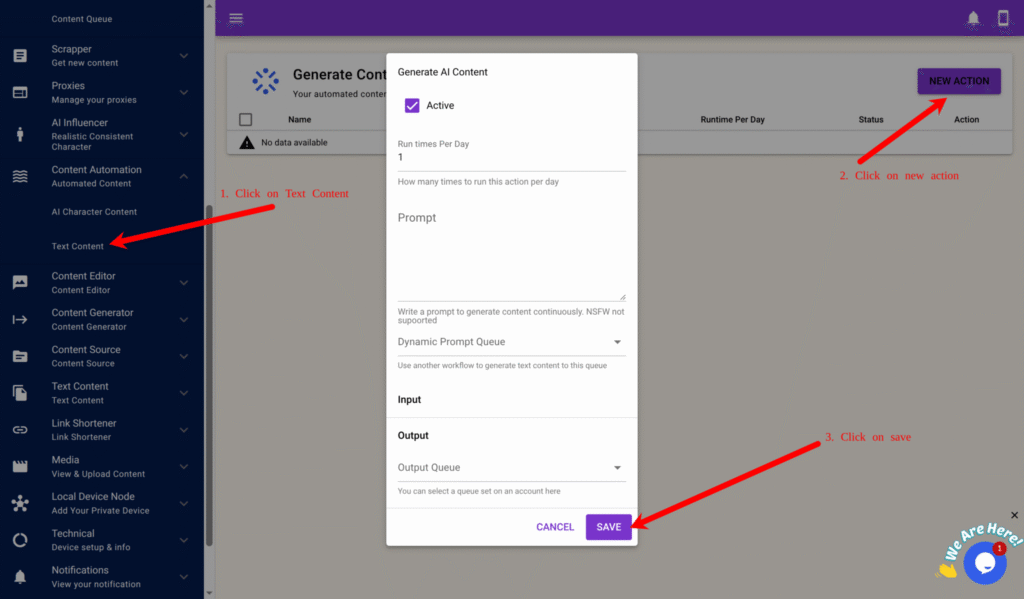
Model Lifestyle Imagesand tick Approve Content First Before Use. - Go to Content Automation → Text Content → New.
- Fill in:
- Run Times Per Day:
2 - Prompt: You are a social media creative director generating lifestyle photo prompts for a model influencer.
Mix fashion, fitness, and travel scenes. Include realistic body angles and natural poses.
Example: “She’s walking in a tropical resort wearing gymwear and holding a smoothie.” - Output Queue:
Lifestyle Prompts
- Run Times Per Day:
- Click Save.
Step 2B – Create AI Character Image Generation
- Go to Content Automation → AI Character Content → New.
- Fill in:
- Run Times Per Day:
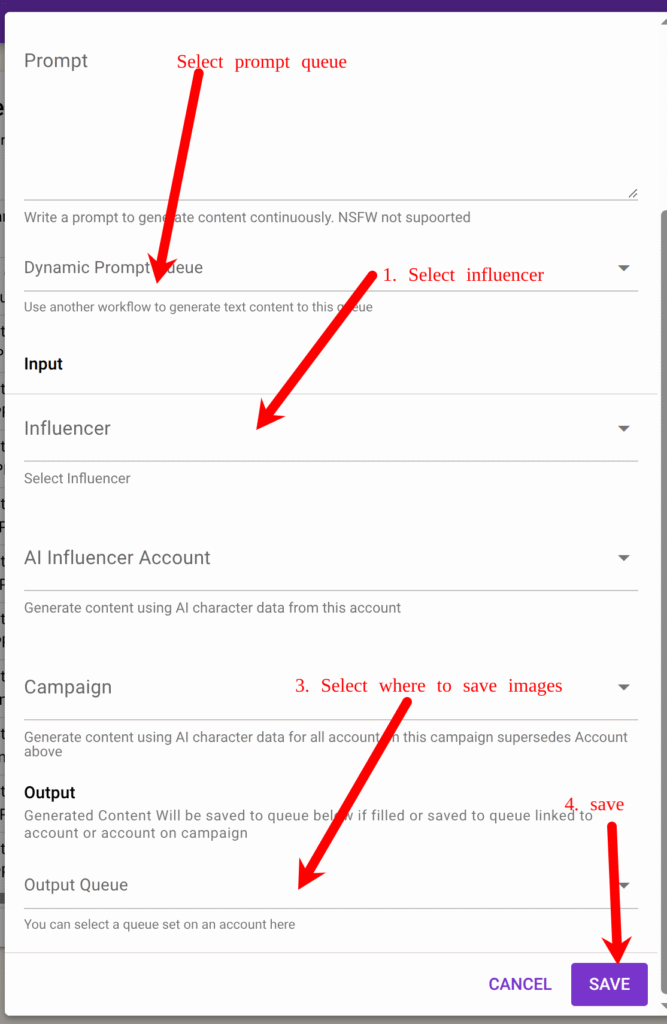
2 - Dynamic Prompt Queue:
Lifestyle Prompts - Influencer : your trained model
- Output Queue:
Model Lifestyle Images
- Run Times Per Day:
- Click Save.
Now your model automatically generates realistic lifestyle-style images daily.
💬 Step 3: Creating Contnet Adding Personality with Text Overlays and Controversial Quotes
Many new “babe” pages fail because they look robotic — all looks, no voice.
Adding text captions or quotes builds personality, opinions, and relatability.
You’ll use SocialAppFarm’s Text Content Automation to generate caption text and overlay it on images or short clips. Create a content queue Model Quote Texts
Step 3A – Generate Text Content
- Go to Content Automation → Text Content → New.
- Fill in:
- Run Times Per Day: 2
- Prompt: Generate short, controversial or thought-provoking quotes from a female perspective that support men or challenge double standards.
Keep it short and conversational (1–2 sentences) no hidden character or quotes.
Example: “It’s okay for a man to expect loyalty too.” - Output Queue:
Model Quote Texts
- Click Save.
🎙️ Step 4: Create General or Talking Reaction Videos
You can take your model influencer further by generating general or talking clips with short audio or captions.
Step 4A – Create Text Style
- Go to Content Generator → Text Style → New Style.
- Example settings:
- Name:
Bold Quote Overlay - Position: Middle Center
- Text Color: White (#ffffff)
- Font Size: 16
- Background: Box (semi-transparent)
- Name:
- Preview and Save.
Step 4B – Generate Videos
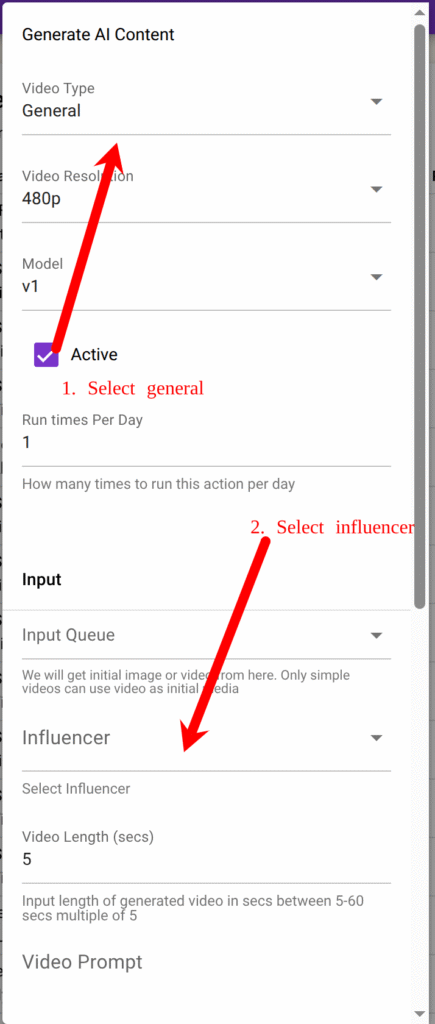
- Go to Content Generator → Faceless Content → New.
- Fill out:
- Video Type: General (You can also use Talking once in a while )
- Model: v1
- Resolution: 720p
- Input Queue:
Model Lifestyle Images - Influencer: Select your created influencer
- Text/Audio Queue:
Model Audio Speech(The text from this queue would be overlayed on the Video if video type is General while the influencer will speak the text if video is Talking type) - Voice: Select voice
- Style: Choose text style (
Bold Quote Overlay) - Output Queue:
Model Videos
- Click Save.
Step 4C – To Use Image Group Posts Instead of Singles
You can also mix group and slide post together with videos in your content strategy.
Social platforms prefer carousel/group posts over single photos — they trigger more engagement.
In Content Queue →Model Videos, you can:
Select multiple related images
Click Action → Mark As Multiple Post
Add captions like “Travel Day Routine 🌴☕” or “Pre-Gym Morning Vibes 💪✨”
🧩 Step 5: Create Campaign & Niche Targeting
Now set up your niche, campaign to manage posting and engagement. We will target Men dominated and other babe niche keywords on socialmedia. We will comment and like post dominated in men and other babe account so our account can be noticed easily.
Step 5A – Niche Targeting
- Go to project create a new project and activate it
- Go to Project → Niche Targeting → Add New.
- Example:
- Name:
Fitness Model Niche - Content Queue:
Model Videos - Keywords: fitness, gym, travel, beauty, fashion, women lifestyle
- Usernames: optional put usernames of big account in babe niche
- ✅ Use AI To Determine Interaction “Engage with content about travel, lifestyle, babe, or fitness.only Like, follow, and comment on posts that look authentic.”
- ✅ Use AI To Generate Comment “Write light, friendly, or funny comments like ‘Love this view!’ or ‘Queen energy 💪✨’.”
- Name:
- Save it.
Step 5B – Create Campaign
- Go to TikTok → Campaign or Instagram → Campaign.
- Click Add New:
- Name:
Model Campaign - Share Device: select device
- Content Queue:
Model Videos
- Name:
- Save it.
Step 5C – Add Accounts & Proxy
- On your campaign, click View Accounts → Add New.
- Fill in:
- Username (required)
- Password, Email, Email Password, or 2FA Key (optional)
- Click Save.
Or bulk import using CSV format:
username:password:email:emailpassword:biolink:bio:2fakeySelect the newly created Niche for each account and assign your Influencer if you have one.
Step 5D – Assign Proxies
- Go to Proxy → Add New with a proxy tag e.g automation or Import.
- Add or import proxies in this format:
username:password:1.1.1.1:8080:automation
3. Return to your campaign → View Accounts → click Auto Assign by Proxy Tag, enter your tag (e.g., “automation”), and click OK.
💡 Step 6: Prime and Schedule
Run a Priming Schedule for 5–7 days first:
- Like and comment on fitness, gym, men related, other babes posts.
Priming helps new accounts act naturally and establish trust with the algorithm.
- Go to TikTok → Campaign → View Schedule or Instagram → Campaign → View Schedule.
- Create a Priming Schedule:
| Time | Activity | Action |
|---|---|---|
| 8 AM | Search Tags | Like 5–10 posts |
| 12 PM | Search Video / Feed | Comment 1–3 posts |
| 4 PM | View Profile Stats | — |
| 8 PM | View Feed / FYP | Like 5 posts |
| 11 PM | View Feed / FYP | Comment 2 posts |
- Save as “Priming Schedule.”
- Run it for 5–7 days before switching to your main posting schedule.
Then switch to your Daily Posting Schedule:
Once priming is done, switch to consistent posting and engagement:
| Time | Activity | Action |
|---|---|---|
| 9 AM | View Feed / FYP | Like 5–10 posts |
| 12 PM | Create Post | Post from My Influencer Videos queue |
| 6 PM | Update Profile Stats | — |
| 9 PM | View Feed | Comment 1–3 posts |
- 2–3 posts daily from
Model Videosor grouped images - 1–2 comments per hour
- AI auto-comments on relevant posts using your niche targeting
✅ Result
You’ve built a sustainable model influencer brand that:
- Looks authentic and appealing
- Avoids reach restrictions
- Mixes lifestyle, fitness, and opinion content
- Posts and engages automatically
This structure creates a brandable personality, not just a pretty face.
You can also include follow in your schedule and run ads for your popular post after a while
Leave a Reply