This guide continues from where we left off — showing you how to generate realistic videos for your AI influencer by copying the motion and camera style from real influencer videos. Using SocialAppFarm, your AI influencer can mimic real-world movement, posture, and style automatically.
⚠️ Important
AI generation results may vary. While SocialAppFarm’s AI tools are designed to create high-quality content, outputs are not always perfect. You may need to generate multiple times or adjust prompts and settings to achieve the best results. Quality improves with better input images, detailed prompts, and consistent experimentation.
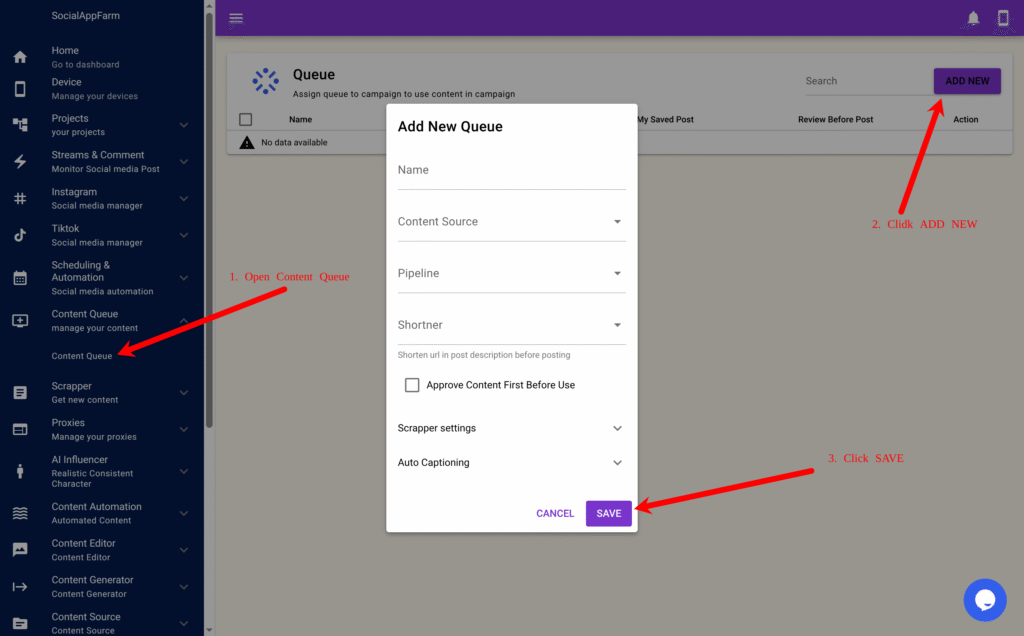
We’ll need two content queues — one for the AI influencer videos and one for the reference videos we want to copy movement from.
Go to Content Queue → Content Queue.
Click Add New, name it: My Influencer Video Queue Then click Save.
Click Add New again, name the second queue: Copy Movement Videos Upload the reference videos whose style or motion you want your AI influencer to imitate. These videos will act as motion templates for your AI influencer’s generated clips.
Step 2: Create Faceless Content Automation
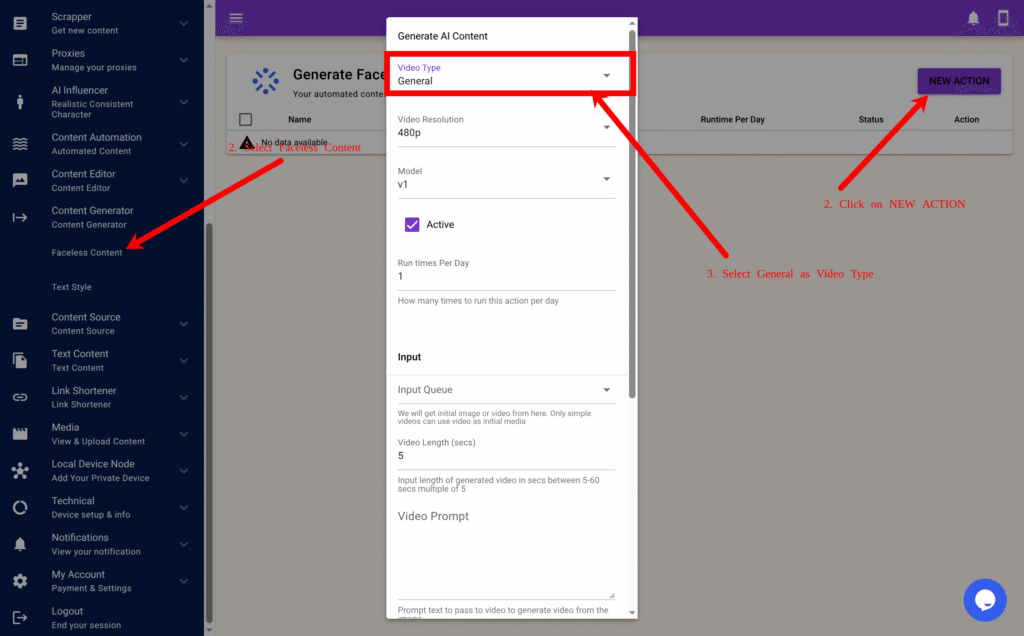
Go to Content Generator → Faceless Content.
Click the New button to create a new automation form.
Fill in the fields as follows:
Field
Description
Run Times
Number of times per day you want videos generated (e.g., 2–4 times daily).
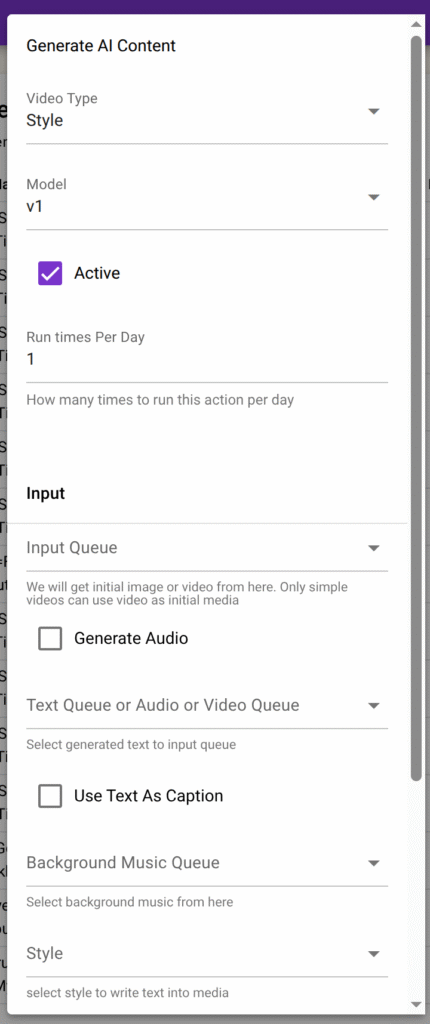
Video Type
Select Style.
Resolution
Choose 480p or 720p (720p offers higher quality but uses more credits).
Input Queue
Select the queue where your AI-generated images are stored. These images will be used to build the videos.
Text / Media Queue
Select Copy Movement Videos — this provides the video style and motion.
Background Music Queue
Choose a queue that contains your background music files.
Text Style
Select the text style you created earlier (e.g., My First Text Style).
Output Queue
Select My Influencer Video Queue — where finished videos will be saved.
Caption Notes
If the image in your input queue has a caption, it will automatically be transferred to the generated video. If a caption includes a colon (:), SocialAppFarm will treat it as:
Text before the colon → shown as an overlay on the video.
Text after the colon → used as the post caption on social media.
Example:
At the beach: A relaxing moment by the sea
“At the beach” → displayed as video text.
“A relaxing moment by the sea” → used as your post caption.
Step 3: Save and Start Generating
Once all fields are filled:
Click Save to activate the automation.
SocialAppFarm will now automatically:
Take new images from your Input Queue
Apply movement and style from your Copy Movement Videos
Add background music and text overlays (if configured)
Save the finished video to your Output Queue
IMPORTANT
Always use a clear input photo and reference video where the character’s face is visible from the very first frame.
Avoid cluttered inputs. If there are multiple faces, blur the non-priority ones or keep them in the background. The main character must be in the foreground.
If your reference video is a close-up, your input photo should also be framed as a close-up.
If the reference is a medium or full-body shot, match that style with the input.
Step 4: Auto-Post Your Generated Videos
You can now connect your video output queue directly to your campaign:
Go to your TikTok or Instagram campaign settings.
Set the Content Queue to your output queue (e.g., My Influencer Video Queue).
SocialAppFarm will automatically post the newly generated videos based on your campaign schedule.
Just keep uploading fresh images or generate it using your AI Influencer to your input queue Socialappfarm will keep generating new videos and post to your account
✅ Summary
Step
Action
Result
1
Create input & reference queues
Store AI images and motion source videos
2
Configure faceless content automation
Combine images + movement + text
3
Save automation
Auto-generate realistic AI influencer videos
4
Link output queue to campaign
Automatically post to social media
Your AI influencer can now continuously create and post dynamic, realistic videos that replicate the style and rhythm of real influencers — entirely automated through SocialAppFarm.
In this tutorial, we’ll walk through how to automatically generate realistic videos and talking-style clips for your AI Influencer using SocialAppFarm.
Before we begin, make sure you’ve completed the following:
AI generation results may vary. While SocialAppFarm’s AI tools are designed to create high-quality content, outputs are not always perfect. You may need to generate multiple times or adjust prompts and settings to achieve the best results. Quality improves with better input images, detailed prompts, and consistent experimentation.
Step 1: Create Content Queues
We’ll create three queues — one for videos, one for daily text quotes (optional), and one for background music (optional).
Go to Content Queue → Content Queue in the main menu.
Click Add New, enter the name: My Influencer Video Queue Click Save.
Click Add New again, enter the name: My Daily Quotes Click Save.
Click Add New once more, enter: Background Music Upload your preferred background tracks into this queue, then click Save.
Step 2: Automate Daily Quote Generation
Now, we’ll use AI to automatically generate new daily quotes for our influencer videos.
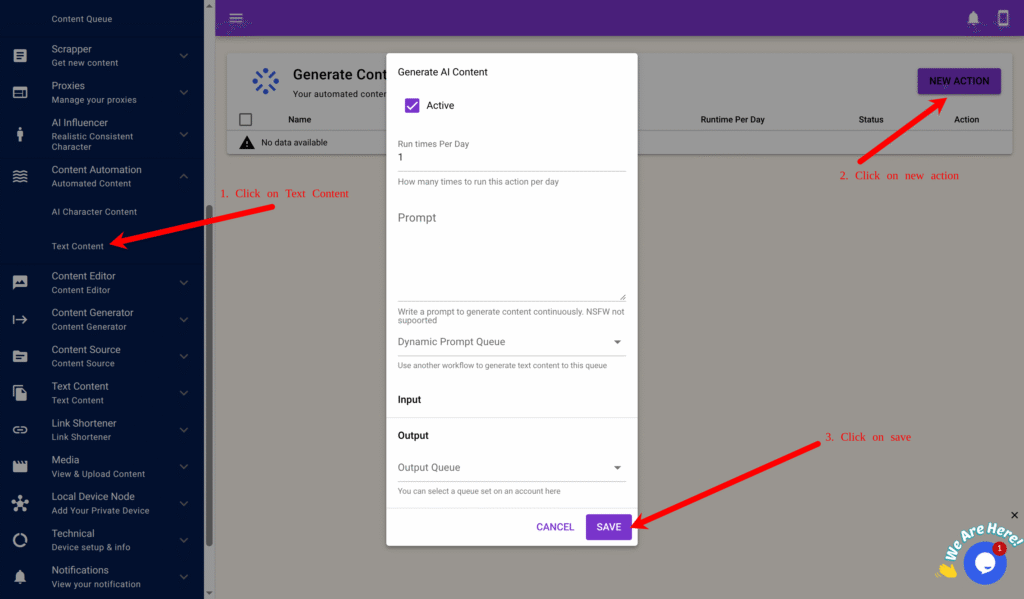
Go to Content Automation → Text Content.
Click New.
In Run Times Per Day, enter 4 (so it runs four times daily).
In the Prompt box, enter: You are a social media post expert. Generate a daily quote of a person living their best life . Return only the text — no quotation marks or extra commentary or invisible lines.
In the Output Queue, select My Daily Quotes.
Click Save.
✅ SocialAppFarm will now generate fresh motivational quotes automatically throughout the day.
Step 3: Automate Video Generation
Now we’ll connect all the parts — images, quotes, music, and text style — to automatically produce full influencer videos.
Go to Content Generator → Faceless Content.
Click New to create a new video automation form.
Fill in the fields as follows:
Field
Description
Run Times Per Day
Choose how many times per day to generate videos (e.g., 2).
Video Type
Select General.
Resolution
Choose 480p or 720p (720p gives better quality but uses more credits).
Model
Select v1 or v2 (v2 is higher quality, more realistic).
Input Queue
Select the queue that stores your AI influencer images.
Video Length
Enter the video duration in seconds (e.g., 5, 10 or 15).
Video Prompt
Optional: enter a default prompt (e.g., “happy and smiling”) or leave blank for dynamic prompts.
Text Queue (Optional)
Select My Daily Quotes (from Step 2).
Background Music Queue (Optional )
Select Background Music.
Text Style
Choose the style you previously created (e.g., My First Text Style).
Output Queue
Select My Influencer Video Queue.
Click Save.
Caption Notes
If the image in your input queue has a caption, it will automatically be transferred to the generated video. If a caption includes a colon (:), SocialAppFarm will treat it as:
Text before the colon → shown as an overlay on the video.
Text after the colon → used as the post caption on social media.
Example:
At the beach: A relaxing moment by the sea
“At the beach” → displayed as video text.
“A relaxing moment by the sea” → used as your post caption.
Step 4: Review and Auto-Post
Once saved, SocialAppFarm will begin generating daily AI videos automatically.
Just keep uploading fresh images or generate it using your AI Influencer to your input queue Socialappfarm will keep generating new videos and post to your account.
Each video will:
Use images from your AI influencer image queue
Optionally add quotes from your daily text queue
Apply your custom text style for captions
Optionally Add background music
Save the final result into your video output queue
✅ You can review generated videos by going to: Content Queue → View → View Content under My Influencer Video Queue.
From there:
Click on a video to preview or trim unwanted sections.
Approve the videos you want posted.
Finally, set your campaign to use the My Influencer Video Queue as its content source. SocialAppFarm will automatically post approved videos to your TikTok and Instagram accounts on schedule.
🎬 Automation Workflow Summary
Step
Task
Purpose
1
Create content queues
Organize videos, quotes, and music
2
Automate quote generation
Produce daily captions dynamically
3
Configure faceless video automation
Combine images, quotes, and music
4
Review and approve videos
Ensure content quality before posting
5
Campaign auto-posting
Publish videos to TikTok & Instagram
✨ Final Result
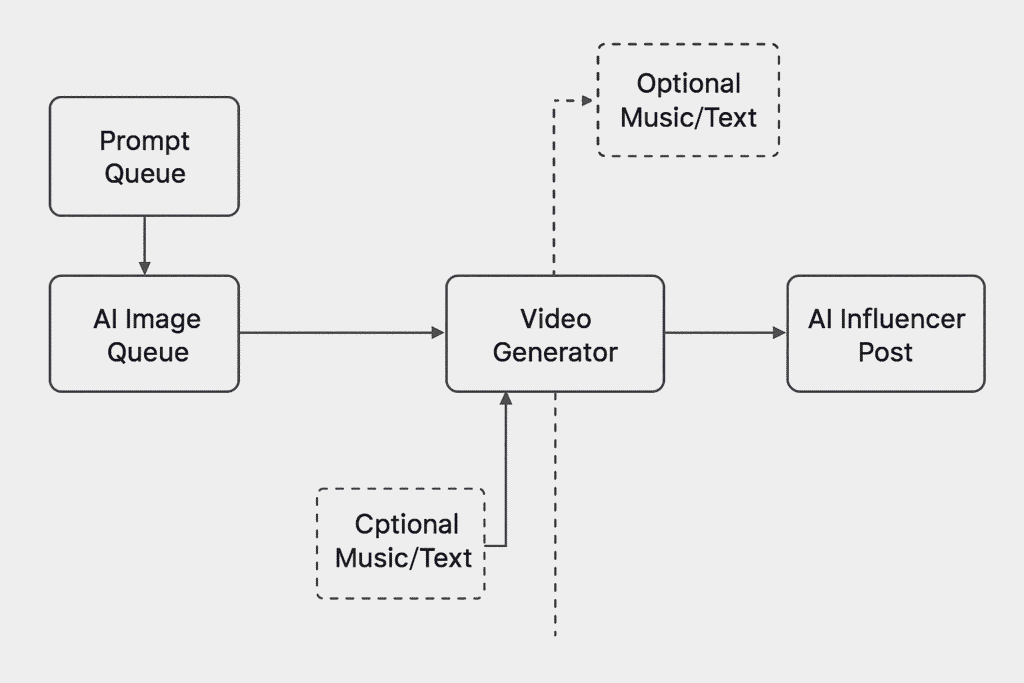
You now have a fully automated AI influencer video pipeline:
Prompts → generate quotes
Quotes + AI images → create videos
Videos → automatically posted to TikTok & Instagram
With SocialAppFarm, your AI influencer can now speak, move, and post — creating content 24/7 without any manual effort.
After creating your AI influencer, SocialAppFarm can continuously generate new photos and videos for them — and even automatically post that content directly to your TikTok and Instagram accounts.
This automation turns your AI influencer into a self-sustaining content engine that never stops producing.
First thing is to make sure you have created an AI Influencer click below
Step 1: Attach Your AI Influencer to an Account
To allow SocialAppFarm to post as your AI influencer, you’ll first need to link the influencer to one or more of your social accounts.
Learn how to setup your accounts by clicking the link below
Go to TikTok or Instagram on the main menu (depending on your platform).
Click Accounts and find the account you want to attach the influencer to.
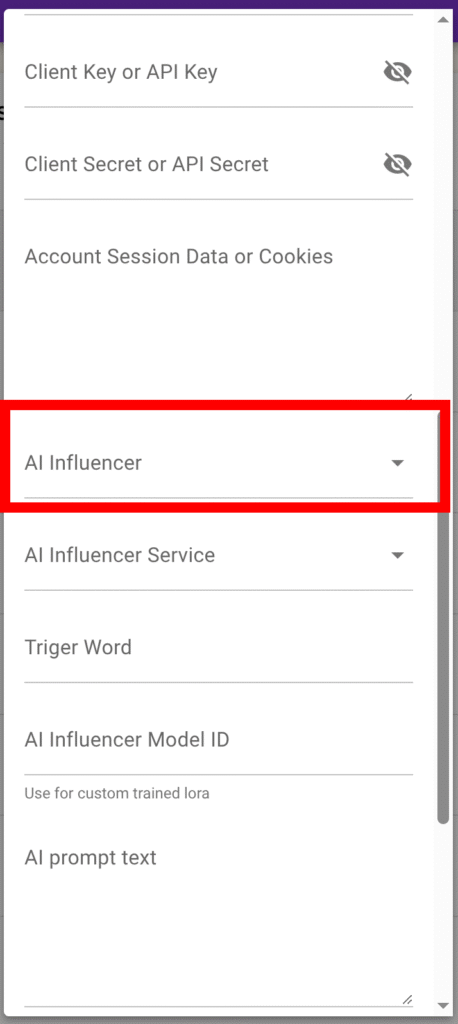
Click Edit, scroll down to the AI Influencer field, and select your desired influencer.
Click Save.
✅ Assign to Multiple Accounts at Once:
Select multiple accounts using the checkboxes.
Click the Action button at the top → Update Account.
In the AI Influencer field, choose the influencer you want to assign.
Click Save. All selected accounts will now be linked to that AI influencer.
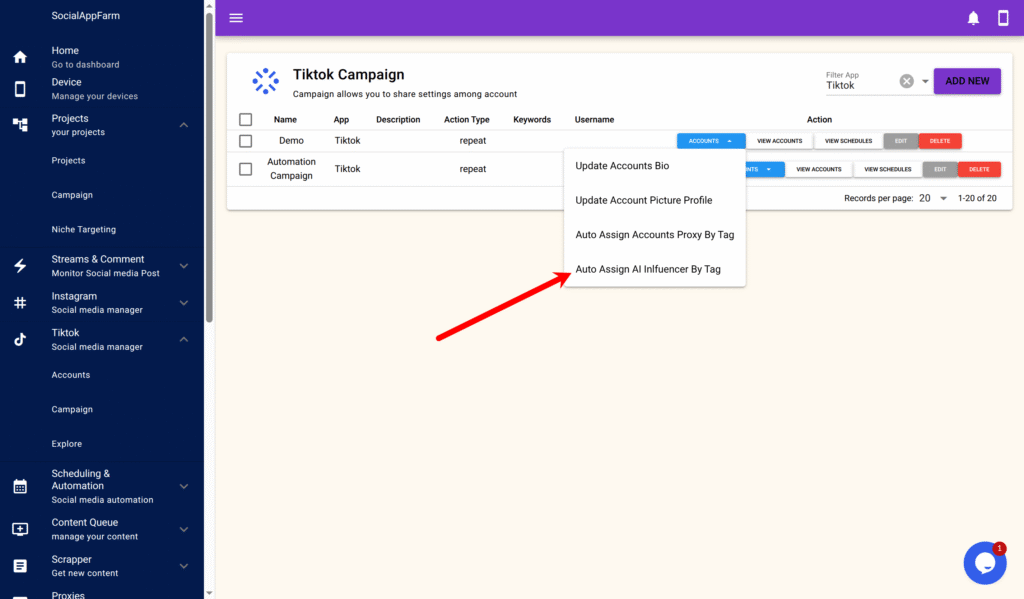
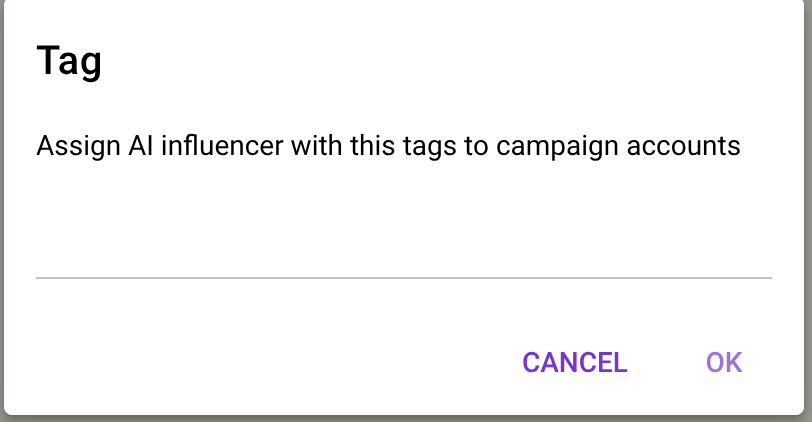
💡 Alternative Method: If you have many influencers to manage, you can mass-assign them to entire campaigns using AI Influencer Tags. Go to your campaign → assign an AI Influencer Tag → all accounts in that campaign with the same tag will automatically receive the corresponding influencer.
Step 2: Create Content Queues
We’ll create two content queues:
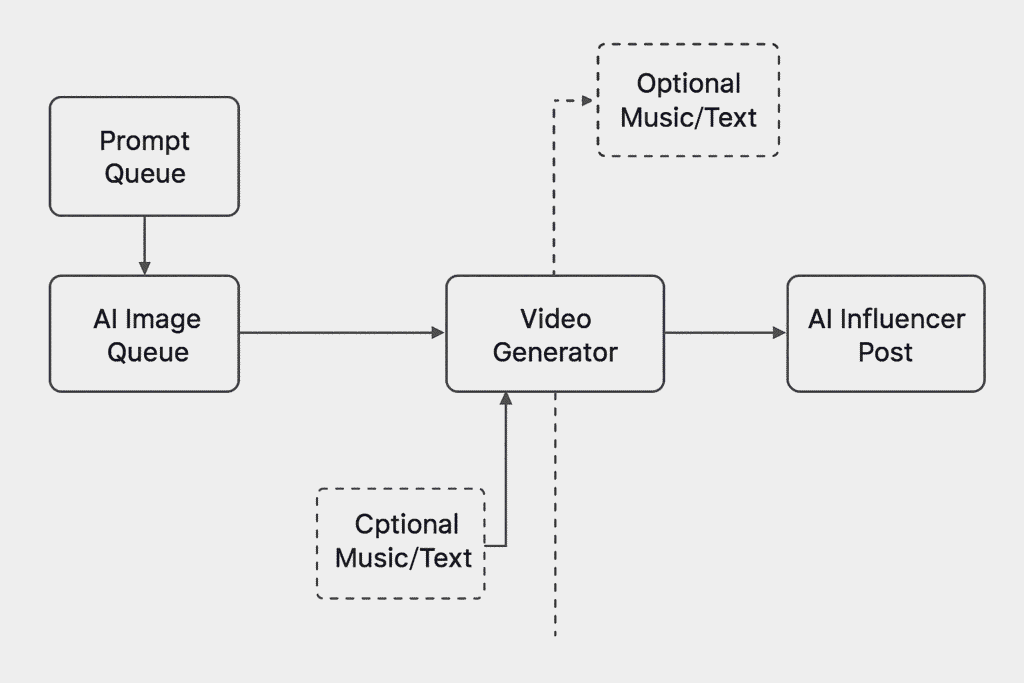
One for storing text prompts
One for storing generated images
Create the Prompt Queue
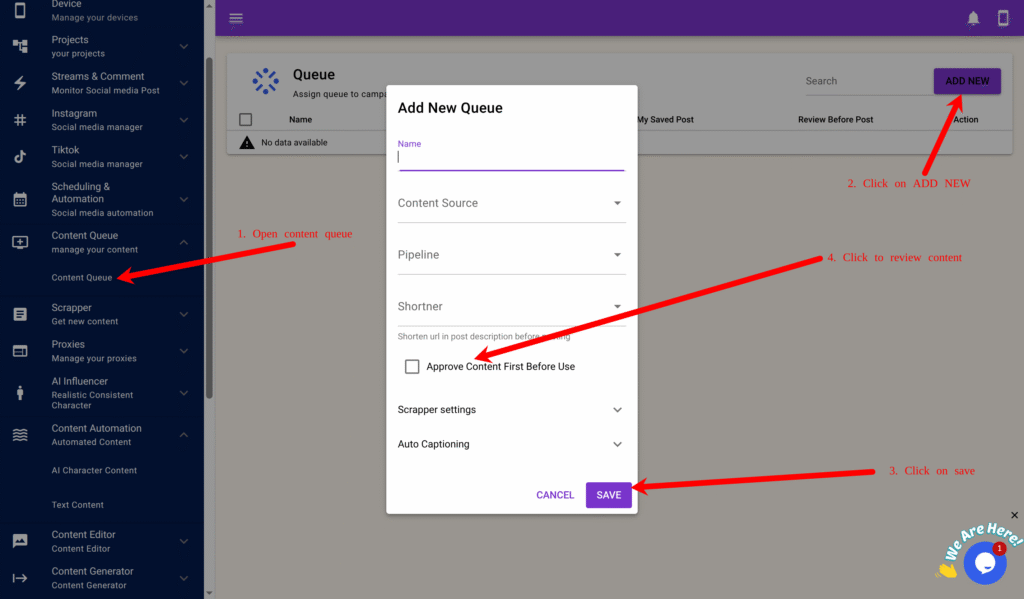
Go to Content Queue → Content Queue.
Click Add New.
Enter a name like: Prompts for My First Influencer
Click Save.
Create the Image Queue
Click Add New again.
Enter a name like: Images for My First Influencer
Enable “Approve Content First Before Use.” This allows you to review each generated image before it gets posted.
Click Save.
Step 3: Automate Prompt Generation
Now, we’ll create automation to generate prompts for your influencer’s photos.
On the main menu, go to Content Automation → Text Content.
Click New.
Set Run Times Per Day to 4 — this means it will run automatically four times daily.
In the Prompt box, enter instructions for generating your influencer’s scene prompts.
Example Prompt
You are a social media image prompter for an  influencer in the travel niche.
Generate a creative photo prompt as if she’s traveling around the world.
Include detailed clothing  and surroundings
Be dynamic and random. Return only the text prompt without any extra commentary or symbol or quotes or invisible characters .
In the Output Queue field, select the Prompt for My First Influencer queue created earlier.
Click Save.
Now SocialAppFarm will automatically generate new scene ideas for your AI influencer several times a day.
Step 4: Automate AI Image Generation
Next, we’ll turn those prompts into actual AI-generated photos.
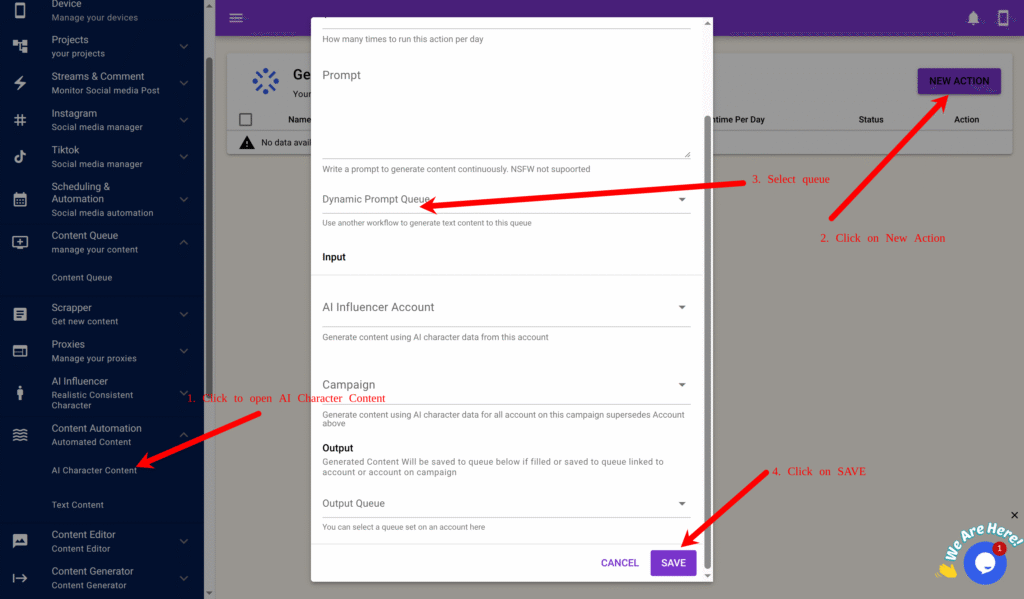
Go to Content Automation → AI Character Content.
Click New.
Set Run Times to 2 (this will generate images twice a day).
In the Dynamic Prompt Queue field, select the queue you created earlier: Prompts for My First Influencer
In the Influencer Account field, select an account that already has your AI influencer assigned (the one you linked in Step 1).
In the Output Queue field, select: Images for My First Influencer
Click Save.
✅ Result: SocialAppFarm will now automatically generate realistic images for your AI influencer multiple times per day based on dynamic prompts.
Step 5: Review and Approve Generated Content
After a few hours, you’ll start seeing new content appear in your output queue.
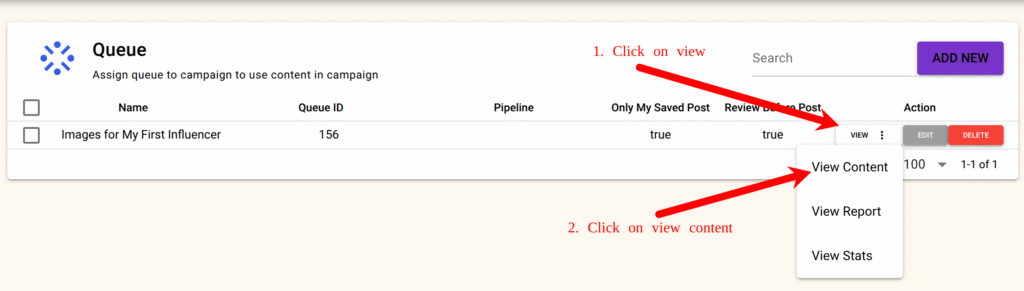
Go to Content Queue (Images for My First Influencer)→ View → View Content.
You’ll see all generated images listed.
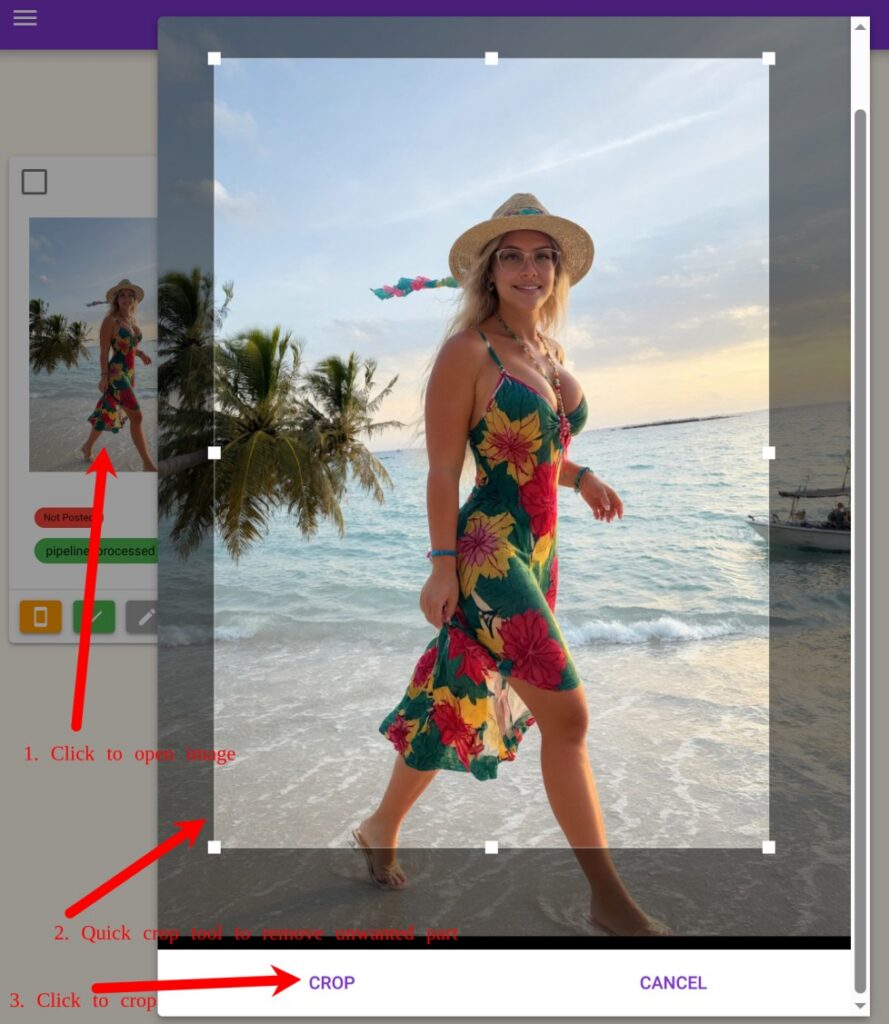
Click any image to open the Crop/Preview tool and trim any unwanted parts.
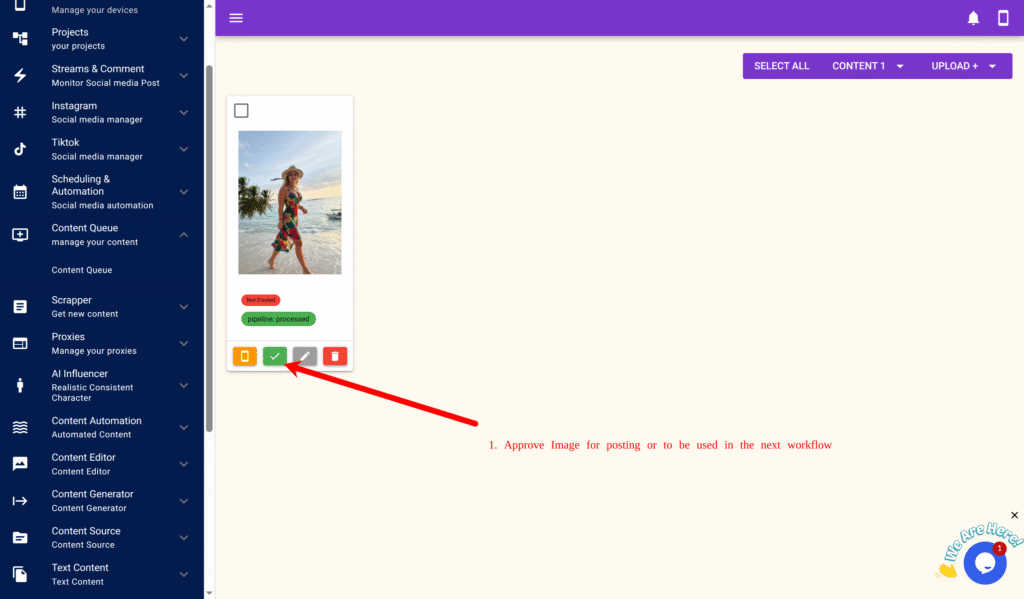
Approve the images you want to post by clicking Approve next to them.
If you enable Approval on the queue. Only approved content will be eligible for posting.
Step 6: Auto-Post to Social Media
Make sure the queue containing approved influencer images is properly linked:
On your account form or campaign form, ensure the Content Queue is set to your image queue (e.g., Images for My First Influencer).
Once connected, SocialAppFarm will automatically post approved content according to your campaign schedule (e.g., your Normal or Aggressive Schedule).
This guide walks you through how to build and automate TikTok and Instagram accounts using the Mother–Child strategy with SocialAppFarm.
We’ll use a sample setup of 50 accounts (25 TikTok + 25 Instagram) in the productivity niche, but you can also follow this guide for just one or two accounts in any niche.
📘 Chapter Overview
Chapter 1: Setting Up Your Accounts
Chapter 2: Setting Up Your Proxy
Chapter 3: Creating Your Project, Campaign, and Google Drive Backup
Chapter 4: Configuring Content Queues, Niches, and Targeting
Chapter 5: Priming and Scheduling Your Accounts
Chapter 6: (Optional) Agressive Growth Scheduling
Add-ons You’ll Need
Social Appfarm Main Device Subscription
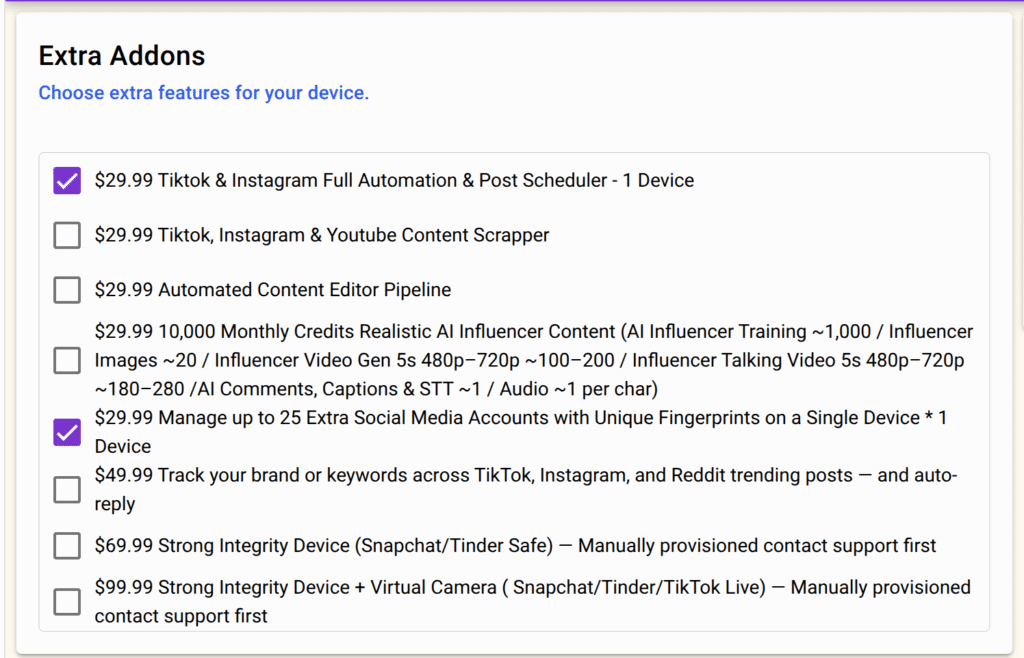
TikTok & Instagram Full Automation + Post Scheduler Add-ons (for each device)
Manage up to 25 Extra Social Media Accounts per Device
Proxy (optional for small setups, essential for large-scale operations)
Google Drive account (for device backups)
Chapter 1: Setting Up Your Accounts
We’ll create:
4 main accounts (2 TikTok + 2 Instagram)
46 child accounts (23 TikTok + 23 Instagram) for interaction, comments, and engagement support
Main accounts focus on quality content and low automation, while child accounts like, comment, follow, and engage to boost visibility.
Step 1: Creating or Buying Accounts
Create your 4 main accounts manually on your phone.
Purchase the remaining 46 accounts from the marketplace to save time.
Alternatively, register all accounts directly through SocialAppFarm devices using a clean 5G proxy if targeting another country (With this You can register U.S. Tiktok accounts even if you’re outside the U.S.).
Step 2: Buying Devices
Click Pricing on the homepage, or from the main go to My Account → Subscription Plans.
Choose the default plan, set quantity to 2, and add these add-ons:
TikTok & Instagram Full Automation + Post Scheduler
Manage up to 25 Extra Accounts
Click Start Subscription, then complete payment.
Step 3: Generating Devices
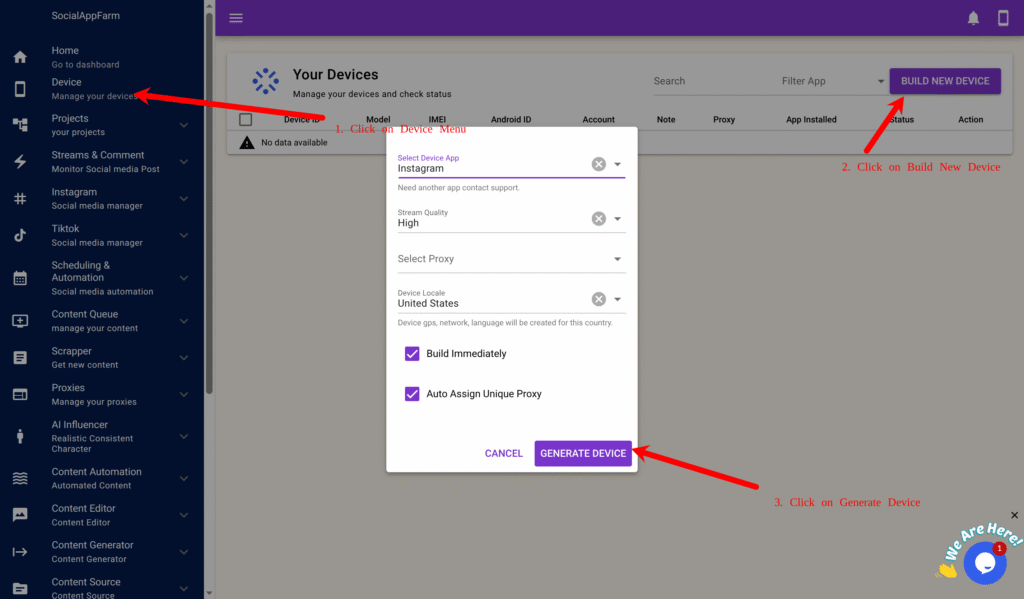
Go to Devices → Build New Device.
Select Instagram, then click Generate Device.
Repeat the same step, selecting TikTok, and click Generate Device again.
✅ You now have one TikTok and one Instagram device ready to automate.
Chapter 2: Setting Up Your Proxy and Accounts
Since we’ll run many accounts, a proxy is essential for stability and safety.
Recommended Proxy Types
Best: 4G/5G Mobile Proxy
Good: ISP or Residential Proxy (cost-effective and reliable)
👉 Ratio: 1 proxy for every 1–3 accounts (max 4). For 25 accounts, buy around 8 proxies.
Step 1: Adding or Importing Proxies
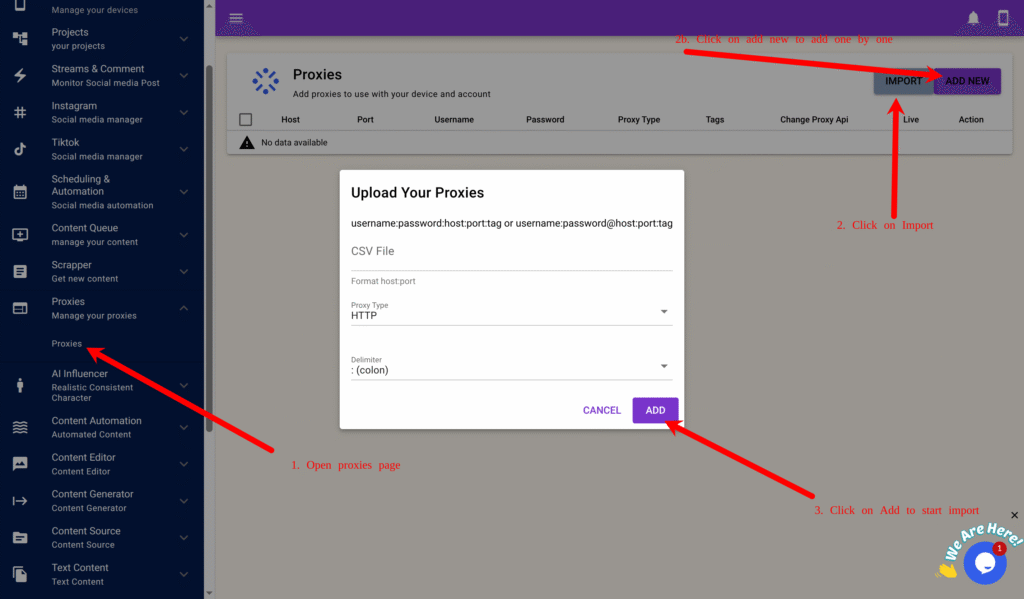
Go to Proxy → Proxy in the main menu.
Click Add New and fill in the following as an exmample:
Host: 1.1.1.1
Port: 8080
Username: user
Password: pass
Tag: automation
Proxy Type: HTTP or Socks5
Proxy Change URL: (if you only have one proxy and its supports automatica rotation through url input the url)
For bulk import, create a proxy.txt file: username1:password1:1.1.1.1:8080:automation username2:password2:1.1.1.2:8080:automation
Click Import, select the file, proxy type and click Add.
Chapter 3: Creating Your Project, Campaign, and Backup
To support multiple accounts per device, we’ll back up data to Google Drive.
Step 1: Connecting Google Drive
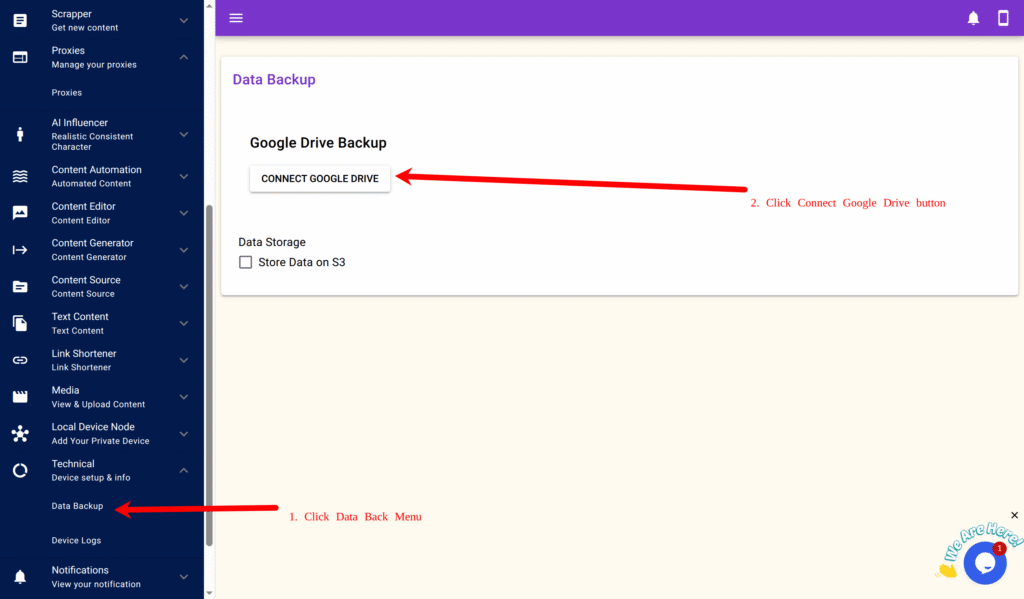
Navigate to Technical → Data Backup → Connect Google Drive.
Log in to your Google account and authorize SocialAppFarm.
You’ll be redirected back automatically.
For large-scale setups, you can alternatively use Cloudflare R2, Idrive E2, Amazon S3 or any S3-compatible storage.
Step 2: Creating a Project
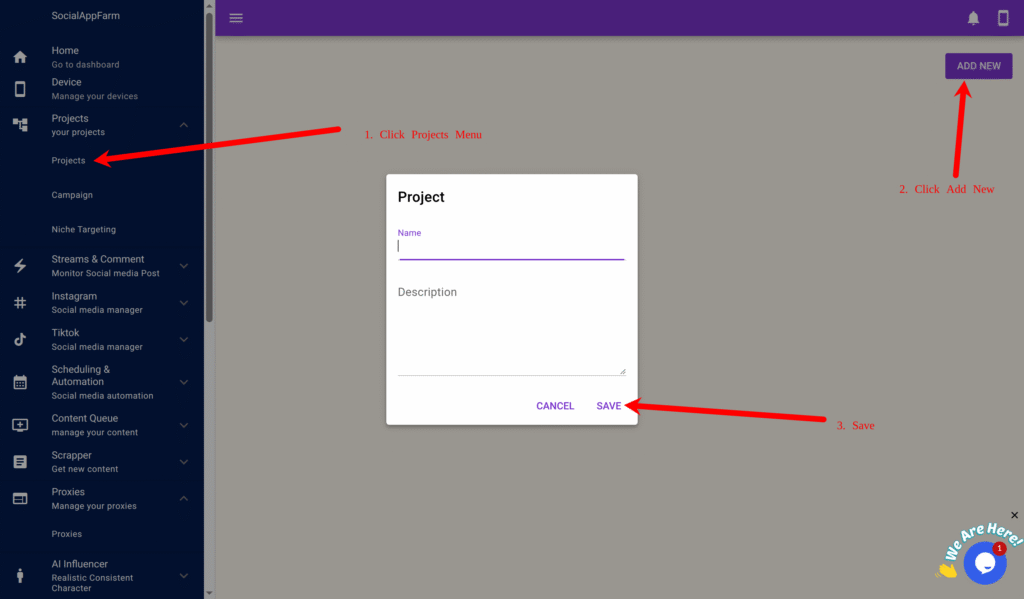
Go to Projects → Projects → Add New.
Example:
Name: Productivity Organic Social Media Growth
Description: Growing my social media accounts in the productivity niche.
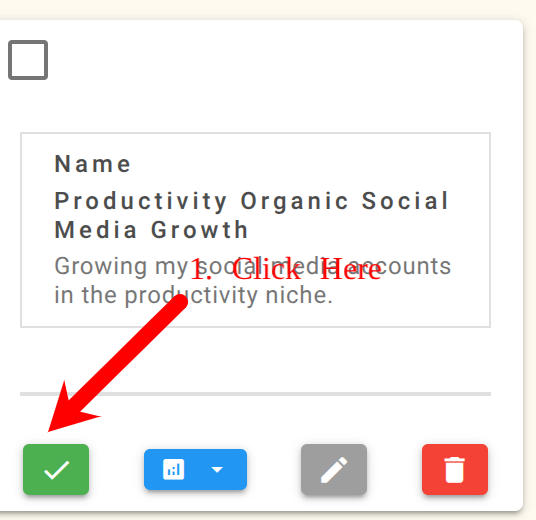
Click Save, then click the green checkmark to activate the project. All campaigns and accounts will automatically link to this active project.
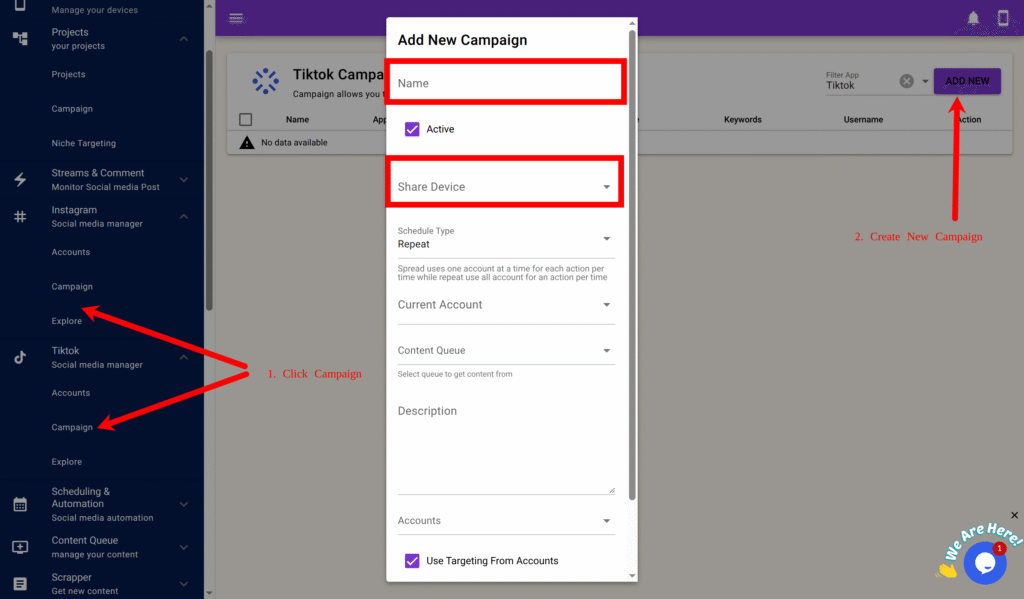
Step 3: Creating a Campaign
For TikTok
Go to TikTok → Campaign → Add New.
Example:
Name: Productivity TikTok Automation Share
Device: Select your TikTok device
Click Save.
For Instagram
Go to Instagram → Campaign → Add New.
Example:
Name: Productivity Instagram Automation Share
Device: Select your Instagram device
Click Save.
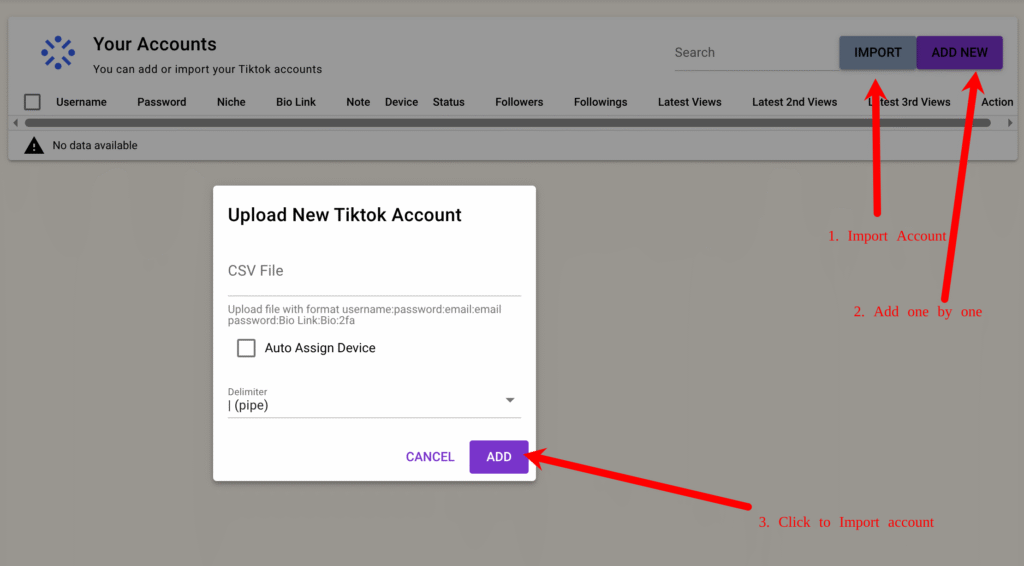
Step 4: Importing Accounts
For both TikTok and Instagram, repeat these steps:
Note: Only username is important when adding or Importing your account but socialappfarm can help you auto login if you include your password, it can also retrieve code from email if your email has imap access and also generate 2fa code if you include your 2fa key.
On the created campaign, click View Accounts → Import. (You can also add your account ony by one by clicking on Add New and fill in the account info)
Format your bulk import (CSV or TXT): username:password:email:emailpassword:biolink:bio:2fakey (Example below)
username1::::::
username2:pass2:::::2faKey2
Upload and import.
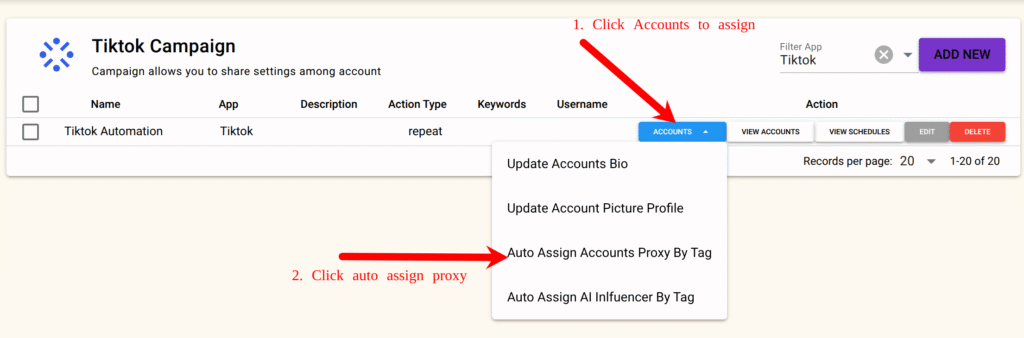
Then go to the Campaign again and click Accounts → Auto Assign by Proxy Tag, input your tag (e.g., automation), and confirm. Proxies will now be evenly distributed to all accounts.
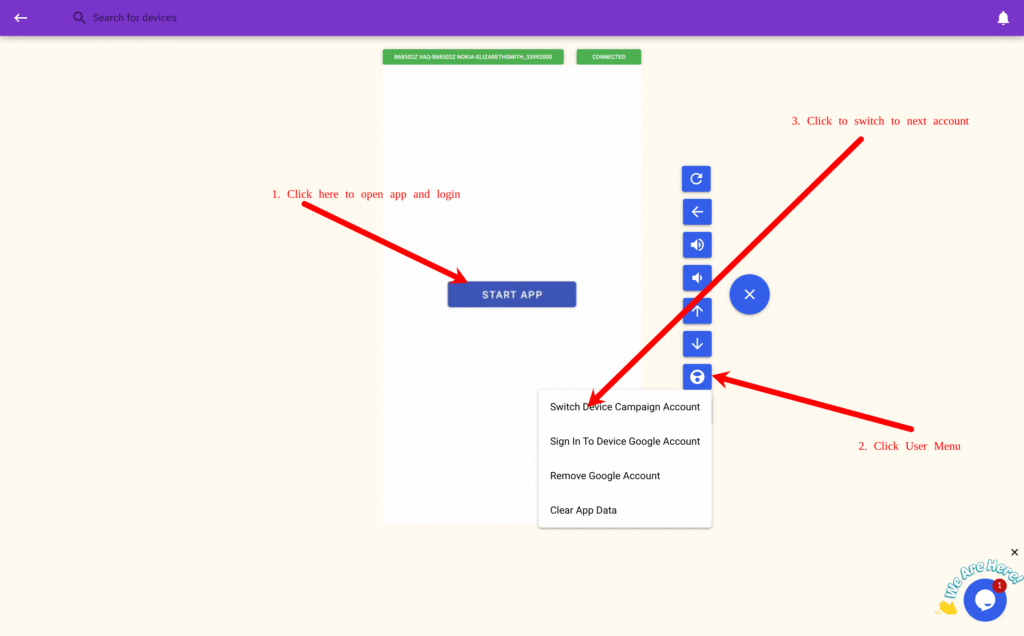
Step 5: Logging Into Accounts
Open your campaign and click Connect Device
(Important : Connect from the campaign page, not the device list).
On the device stream page, click Start App, then log in manually.
Click the “+” icon → User Menu → Switch Device Campaign Account, select the next account, and repeat the login.
💡 Note: If you import usernames and passwords, SocialAppFarm will attempt auto-login during automation. If 2FA keys are imported, it will automatically handle two-factor authentication as well and email codes for imap enabled email
Chapter 4: Configuring Content Queues, Niches, and Targeting
Step 1: Creating Content Queues
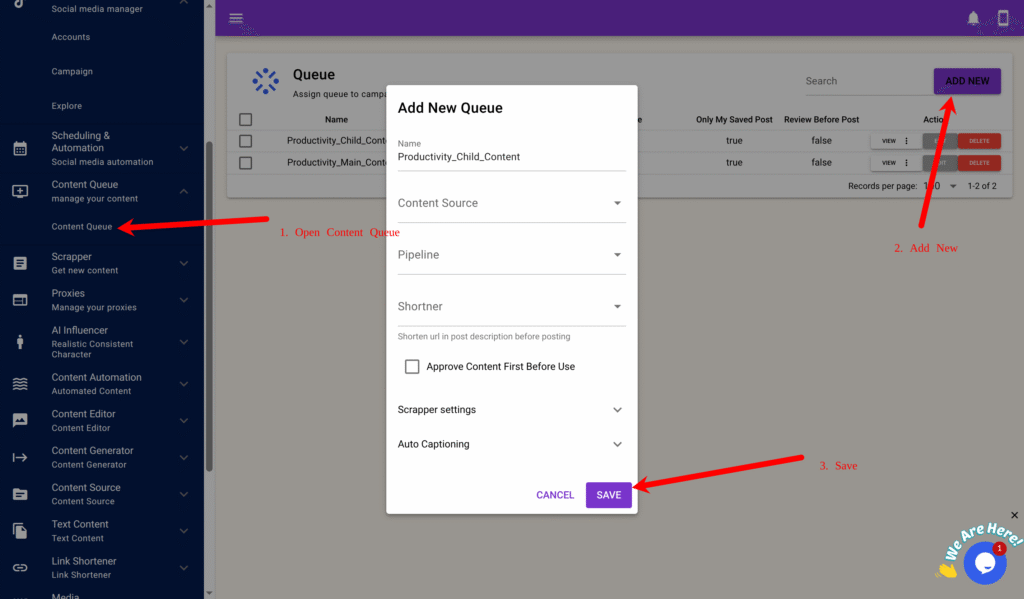
Go to Content Queue → Add New. Example: Name: Productivity_Main_Content
Optionally enable “Approve Content Before Use.” if you dont wanrt to auto-post content automatically without reviewing them
Create another queue and save:
Name: Productivity_Child_Content
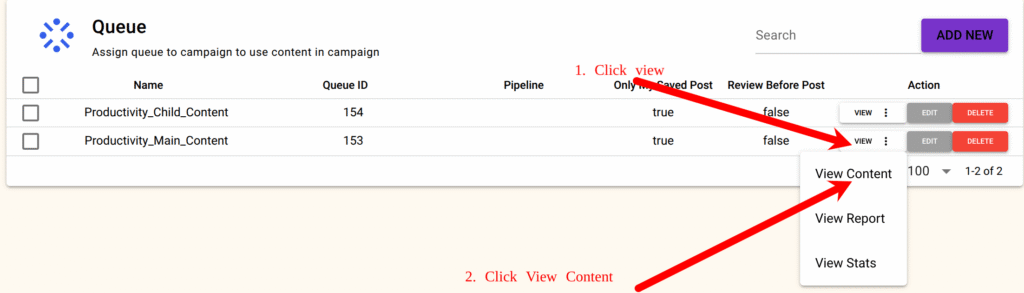
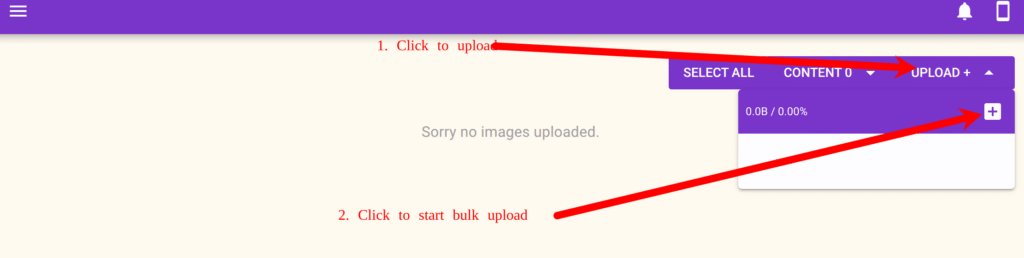
You can now Bulk upload your content to each queue regularly by clicking View → View Content → + Upload. on the queue
Step 2: Creating Niches
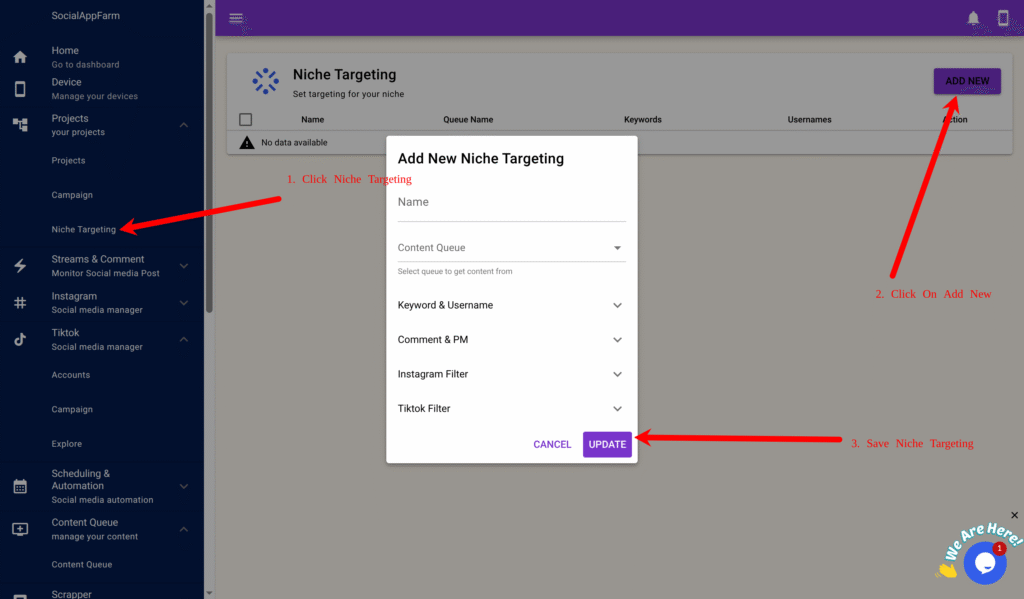
Create these niche and fill in the form using the details below and save
Niche 1: Productivity Child
Name: Productivity Child
Content Queue: Productivity_Child_Content
Keywords: personal growth, self-development, self-empowerment
Use AI to Determine Interaction: ✅
Interaction Prompt: Interact only with English posts in the productivity niche. Likes & comments > 10. Avoid spam or private accounts.
Use AI to Generate Comment: ✅
Comment Prompt: Helpful comments related to the post.
.
Niche 2: Productivity Child Second (For Mentioning Mother Accounts)
Name: Productivity Child Second
Content Queue: Productivity_Child_Content
Keywords: mentalhealth, mindfulness, stressmanagement, emotionalintelligence
Usernames: mother_account_username, mother_account_username_two
Use AI to Determine Interaction: ✅
Interaction Prompt: Interact with English posts about self-help or mental health. Likes & comments > 10. Avoid spam or private accounts.
Use AI to Generate Comment: ✅
Comment Prompt:
Write natural, helpful, or funny comments that tag @mother_account_username or @mother_account_username_two only when the post relates to self-help.
Example tone: “You should check @mother_account_username — they posted a great guide about this!”
Avoid spammy language or repetition.
Niche 3: Productivity Main (Mother Accounts)
Name: Productivity Main
Content Queue: Productivity_Main_Content
Keywords: personal growth, self-development, motivation
Use AI to Determine Interaction: ✅
Interaction Prompt: Interact only with relevant English posts about personal growth and motivation. Likes & comments > 10. Avoid spam or private accounts.
Use AI to Generate Comment: ✅
Comment Prompt: Write natural, helpful comments related to the post. Avoid spam or repetition.
Save.
✅ You now have three niches:
Productivity Main (mother accounts)
Productivity Child (general child accounts)
Productivity Child Second (child accounts referencing the mother accounts)
Step 3: Assigning Queues and Niches
Go back to your campaign and view accounts and do this
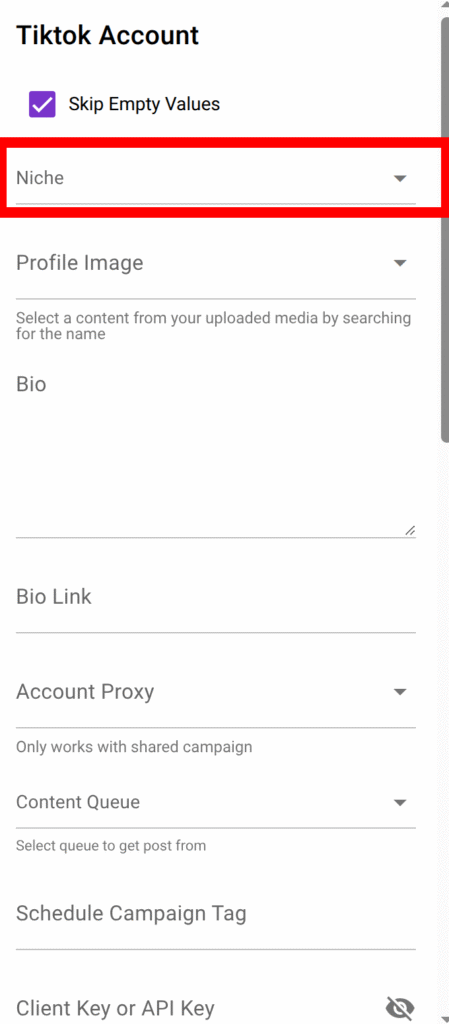
For main accounts: Select your mother accounts → Action → Update Account → Set Niche → Productivity Main
For child accounts (Group 1): Select half of them → Action → Update Account → Set Niche → Productivity Child
For child accounts (Group 2): Select the remaining half → Action → Update Account → Set Niche → Productivity Child Second
Chapter 5: Priming and Scheduling
Step 1: Priming New Accounts
Priming warms up new accounts (You can skip if you are using old account) by simulating human activity and helping the algorithm associate your accounts with your niche.
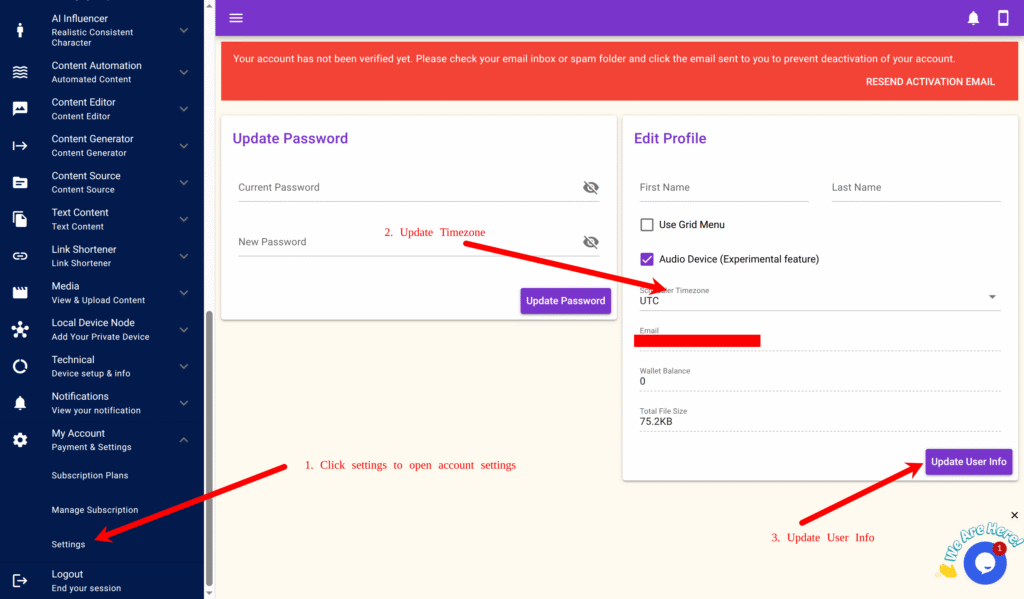
Make sure to update your timezone under your Account Settings (e.g., US/Eastern).
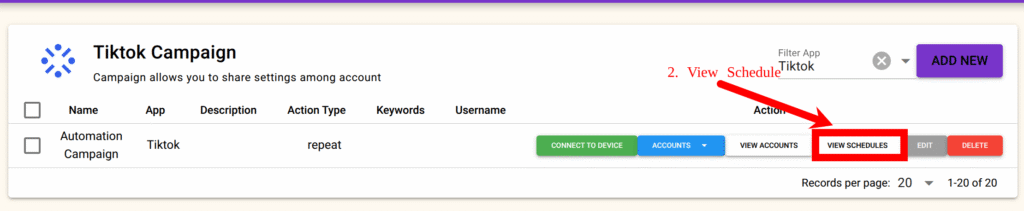
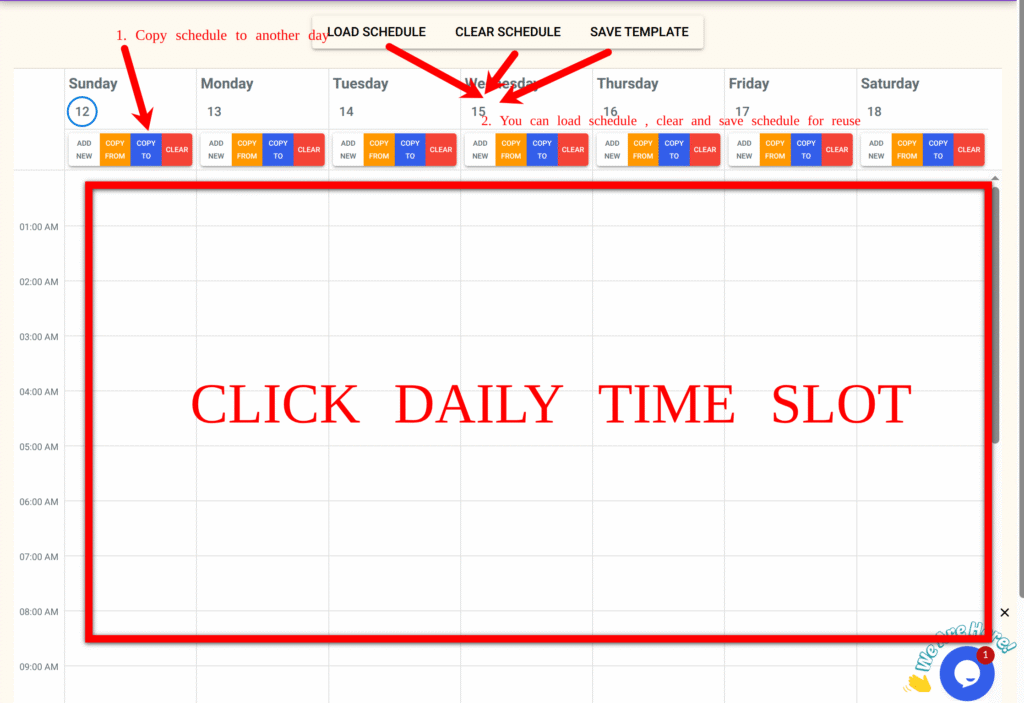
Creating schedules requires you going to your campaign and clicking on View Schedule then click on the time slot for each day using the information below then copy to other days
Example Priming Daily Schedule (TikTok & Instagram)
Time
Activity
Action
12 PM
Search Video
Like 5–10
4 PM
Search Tags
Like 5–10
8 PM
Search Tags
Like 5–10, Comment 2-5
1 AM
View FYP
Like 5–10, Comment 2-5
8 AM
View FYP
Like 5–10, Comment 2-5
Save this as “Priming Schedule.” by clicking on Save Template Clear this schedule and create your Normal Schedule.
Step 2: Creating Your Normal Schedule
Time
Activity
Action
8 AM
View FYP
Like 15–20, Follow 5–10
12 PM
Search Account
Like 1, Repost 1
4 PM
View Profile Stats
Sync profile data
8 PM
Create Post
Publish from content queue
1 AM
View FYP
Comment 5–10
Save this as “Normal Schedule.”
✅ Repeat the same scheduling steps for Instagram campaigns as well. Each Instagram campaign should have its own priming and normal schedules.
Step 3: Switching Schedules
Run the Priming Schedule for one week.
Then go to Clear Schedule → Load Normal Schedule.
Your full automation is now active 🎯.
💡 Tip: Always keep a delay of at least 10 × (your total number of accounts) minutes between each scheduled action. Example: If running 10 accounts, leave about 1 hour between each schedule block.
Chapter 6 : Aggressive Growth Schedule (Optional)
After your accounts have been primed and have run on the Normal Schedule for some week, you can activate the Aggressive Schedule to accelerate growth. This schedule makes your child accounts act like active fans that promote and interact with your mother accounts, while still behaving naturally.
🎯 Goal
Increase the reach of your mother accounts
Make child accounts tag, follow, and recommend the mother accounts in comments
Engage more frequently with the niche community
Automate follow/unfollow cycles safely
🧠 Core Behavior
Comment Tagging – Children mention or recommend the mother accounts using an AI comment prompt.
Follow/Unfollow – They follow new niche users and remove inactive ones to refresh visibility.
High-Frequency Interaction – Likes, comments, reposts, and bio visits at 3-4 × normal activity.
Niche-Scoped Scheduling – Runs only for accounts in a selected niche (e.g., Productivity Child Second).
⚙️ AI Comment Prompt (for Child Accounts)
Write natural, helpful, or funny comments that tag @mother_account_username or @mother_account_username_two
when the post is about productivity, motivation, or self-help.
Sound like a real follower recommending them.
Example tone: “You should check @mother_account_username  they explained this really well!”
Avoid repeating phrases or overusing emojis.
Update this prompt in Projects →Niche Targeting →Productivity Child Second→ Comment & PM → Comment Prompt for all child accounts in the selected niche.