After creating your AI influencer, SocialAppFarm can continuously generate new photos and videos for them — and even automatically post that content directly to your TikTok and Instagram accounts.
This automation turns your AI influencer into a self-sustaining content engine that never stops producing.
First thing is to make sure you have created an AI Influencer click below
Step 1: Attach Your AI Influencer to an Account
To allow SocialAppFarm to post as your AI influencer, you’ll first need to link the influencer to one or more of your social accounts.
Learn how to setup your accounts by clicking the link below
- Go to TikTok or Instagram on the main menu (depending on your platform).
- Click Accounts and find the account you want to attach the influencer to.

- Click Edit, scroll down to the AI Influencer field, and select your desired influencer.
- Click Save.
✅ Assign to Multiple Accounts at Once:
- Select multiple accounts using the checkboxes.
- Click the Action button at the top → Update Account.

- In the AI Influencer field, choose the influencer you want to assign.
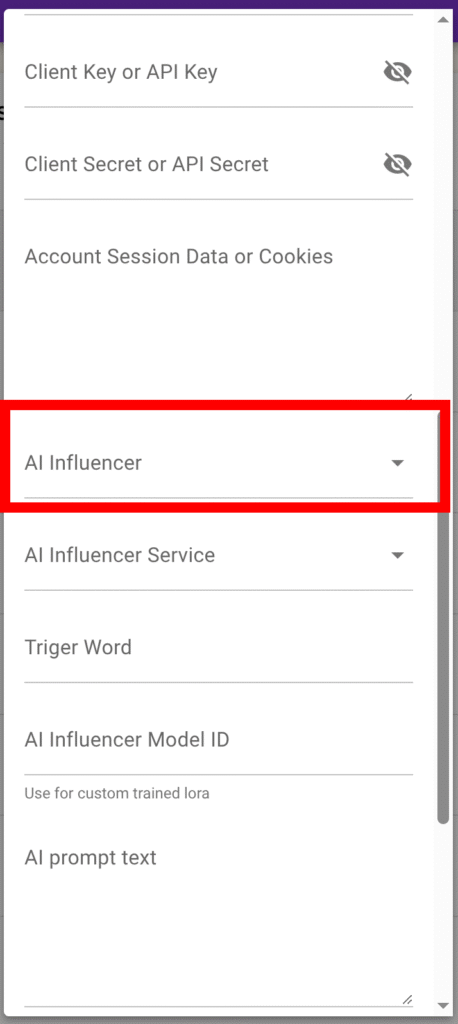
- Click Save.
All selected accounts will now be linked to that AI influencer.
💡 Alternative Method:
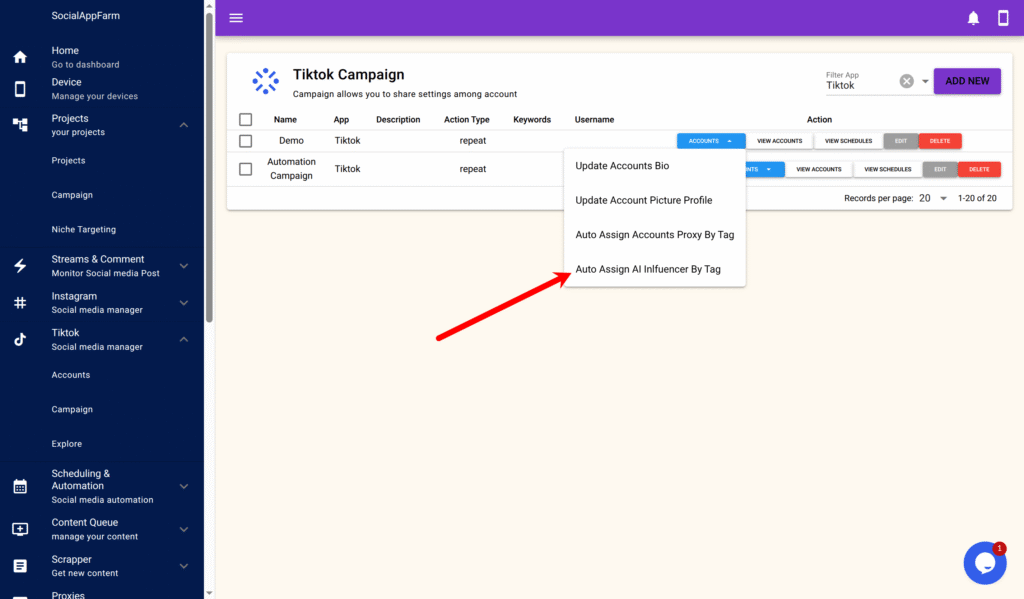
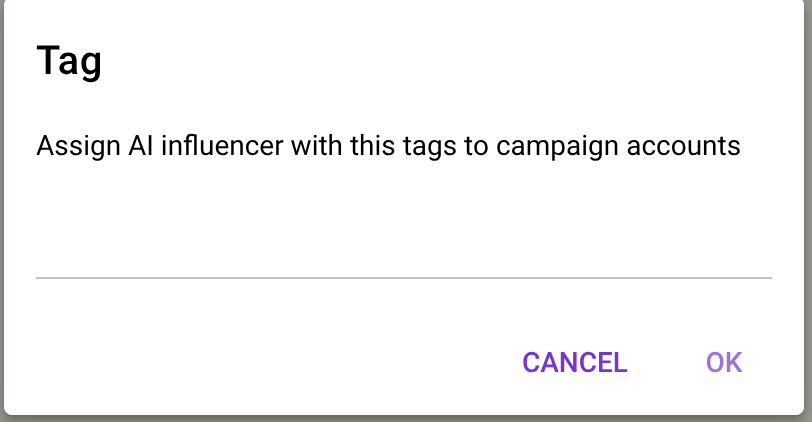
If you have many influencers to manage, you can mass-assign them to entire campaigns using AI Influencer Tags.
Go to your campaign → assign an AI Influencer Tag → all accounts in that campaign with the same tag will automatically receive the corresponding influencer.
Step 2: Create Content Queues
We’ll create two content queues:
- One for storing text prompts
- One for storing generated images
Create the Prompt Queue
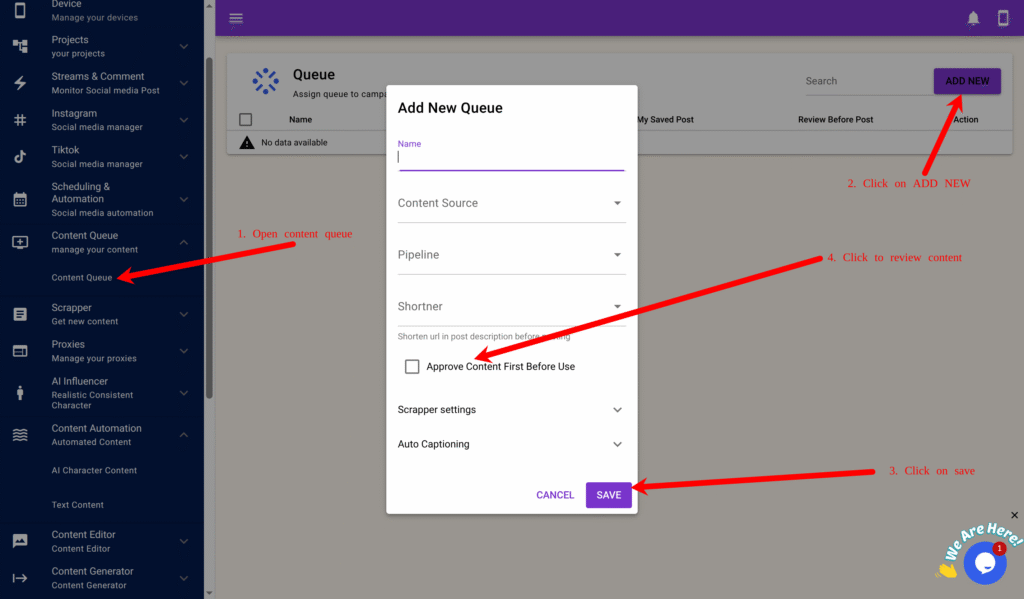
- Go to Content Queue → Content Queue.
- Click Add New.
- Enter a name like:
Prompts for My First Influencer - Click Save.
Create the Image Queue
- Click Add New again.
- Enter a name like:
Images for My First Influencer - Enable “Approve Content First Before Use.”
This allows you to review each generated image before it gets posted. - Click Save.
Step 3: Automate Prompt Generation
Now, we’ll create automation to generate prompts for your influencer’s photos.
- On the main menu, go to Content Automation → Text Content.
- Click New.
- Set Run Times Per Day to
4— this means it will run automatically four times daily. - In the Prompt box, enter instructions for generating your influencer’s scene prompts.
Example Prompt
You are a social media image prompter for an  influencer in the travel niche.
Generate a creative photo prompt as if she’s traveling around the world.
Include detailed clothing  and surroundings
Be dynamic and random. Return only the text prompt without any extra commentary or symbol or quotes or invisible characters .
- In the Output Queue field, select the Prompt for My First Influencer queue created earlier.
- Click Save.
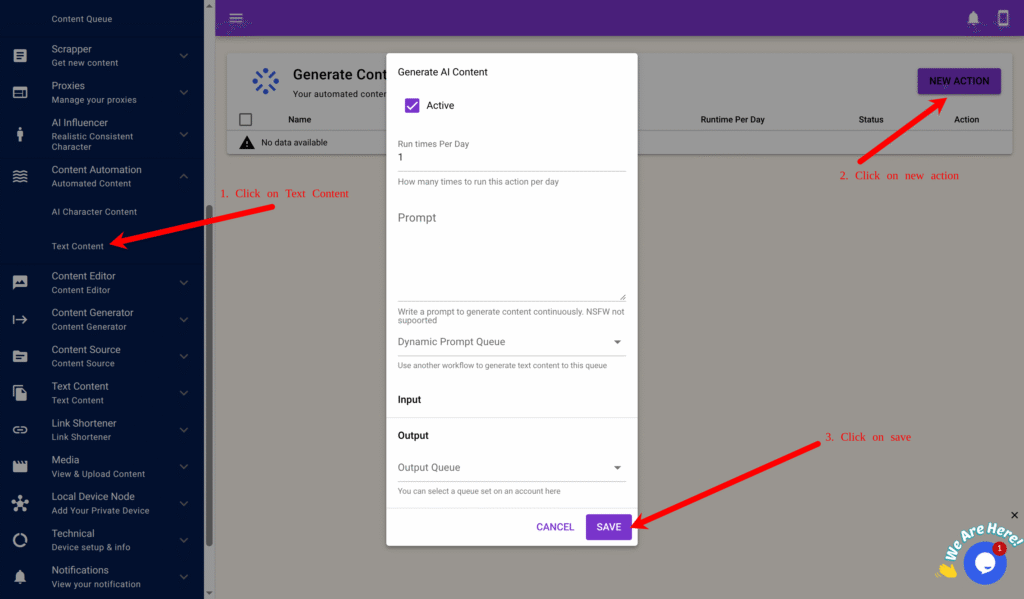
Now SocialAppFarm will automatically generate new scene ideas for your AI influencer several times a day.
Step 4: Automate AI Image Generation
Next, we’ll turn those prompts into actual AI-generated photos.
- Go to Content Automation → AI Character Content.
- Click New.
- Set Run Times to
2(this will generate images twice a day). - In the Dynamic Prompt Queue field, select the queue you created earlier:
Prompts for My First Influencer - In the Influencer Account field, select an account that already has your AI influencer assigned (the one you linked in Step 1).
- In the Output Queue field, select:
Images for My First Influencer - Click Save.
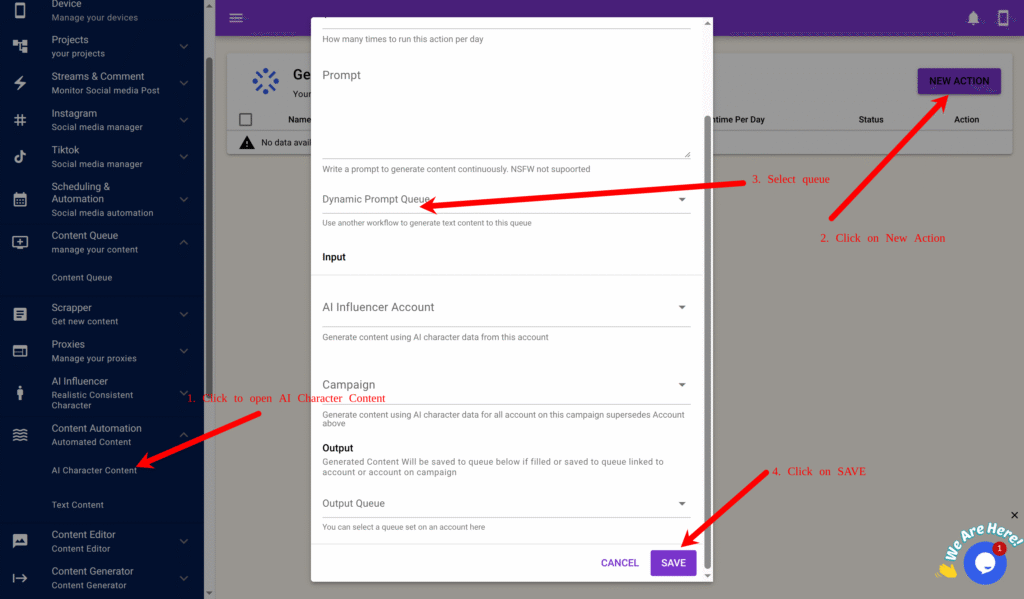
✅ Result: SocialAppFarm will now automatically generate realistic images for your AI influencer multiple times per day based on dynamic prompts.
Step 5: Review and Approve Generated Content
After a few hours, you’ll start seeing new content appear in your output queue.
- Go to Content Queue (
Images for My First Influencer)→ View → View Content.
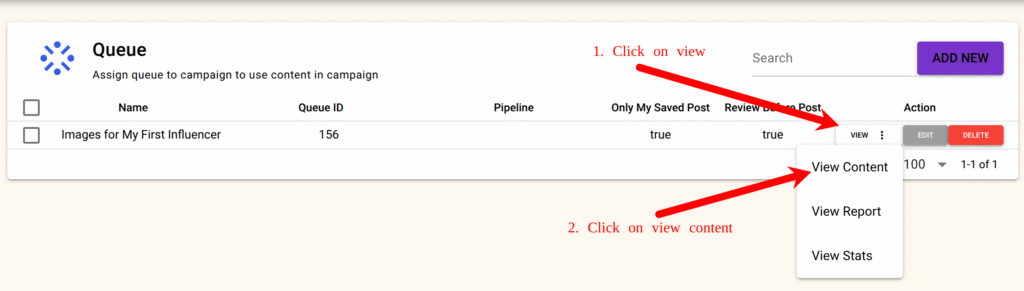
- You’ll see all generated images listed.
- Click any image to open the Crop/Preview tool and trim any unwanted parts.
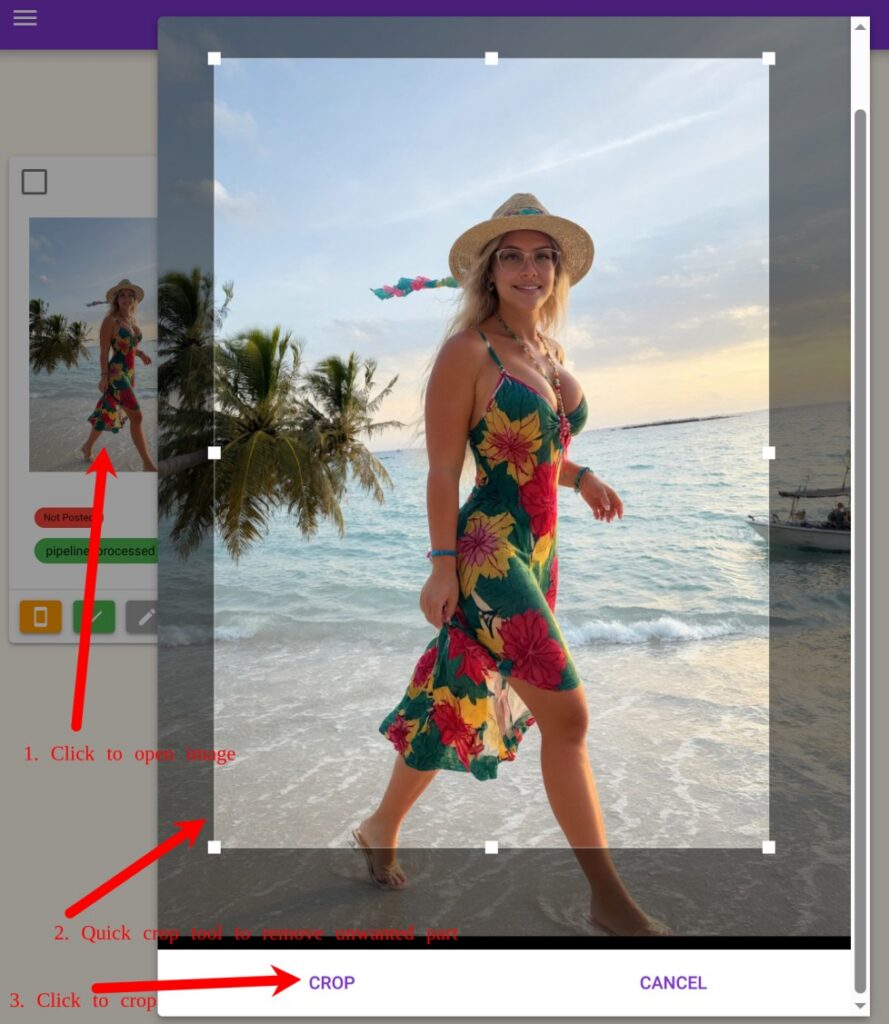
- Approve the images you want to post by clicking Approve next to them.
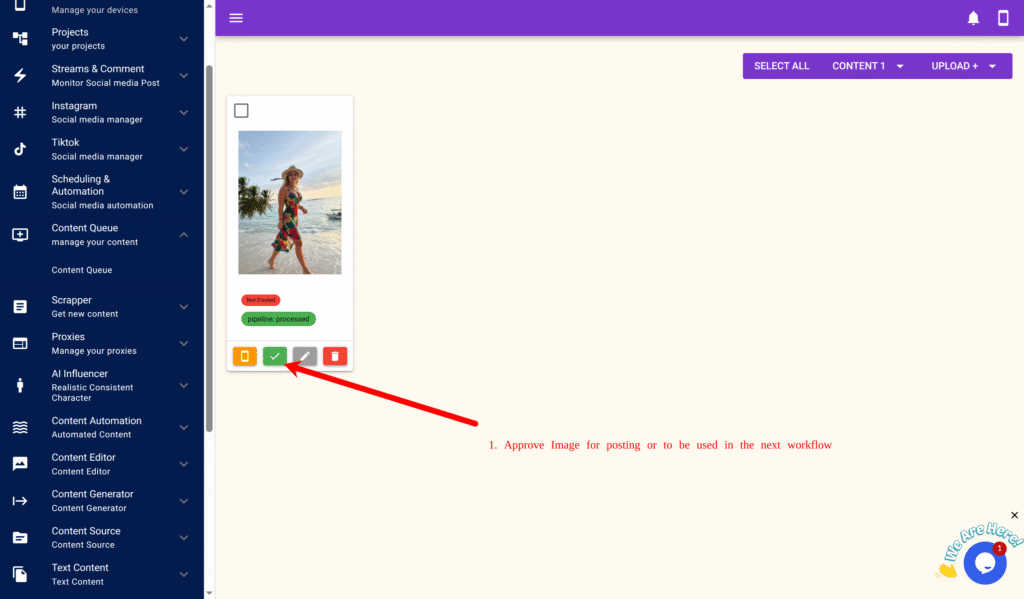
If you enable Approval on the queue.
Only approved content will be eligible for posting.
Step 6: Auto-Post to Social Media
Make sure the queue containing approved influencer images is properly linked:
- On your account form or campaign form, ensure the Content Queue is set to your image queue (e.g., Images for My First Influencer).
- Once connected, SocialAppFarm will automatically post approved content according to your campaign schedule (e.g., your Normal or Aggressive Schedule).

Leave a Reply