Tag: avatar lip sync

  • How to Build and Automate a An Influencer Brand Account with SocialAppFarm

    This guide shows how to create and automate an influencer account using SocialAppFarm in Productivity Niche.
    You can use the Extra Add-on Account feature to manage 1–25 influencer accounts for TikTok or Instagram.

    You can use AI Influencer content or your own content.


    You’ll Learn How To:

    • Optionally train or use your own AI Influencer
    • Automatically generate podcast-style influencer images
    • Set up your campaign, accounts, proxies, and niche targeting
    • Optionally generate talking videos using text or uploaded audio
    • Prime your account for growth
    • Schedule automatic daily posting

    📘 Overview

    This setup is ideal for personal creators and small influencer brands who want to post daily, build niche authority, and stay consistent — all automatically.
    Each account runs independently, with its own automation flow.

    You can use:

    • Your own photos, videos, and voice, or
    • A trained AI Influencer created directly inside SocialAppFarm.

    If you don’t plan on using an AI Influencer from SocialAppFarm but still want to create talking videos using your own images:

    Create a Content Queue called Influencer Podcast Images, upload your images, and skip to Step 3.

    If you already create your content outside SocialAppFarm:

    Create a Content Queue called My Influencer Videos, upload your videos, and skip to Step 4.


    ⚙️ Step 1: Create Your Influencer

    Option 1: Train an AI Influencer

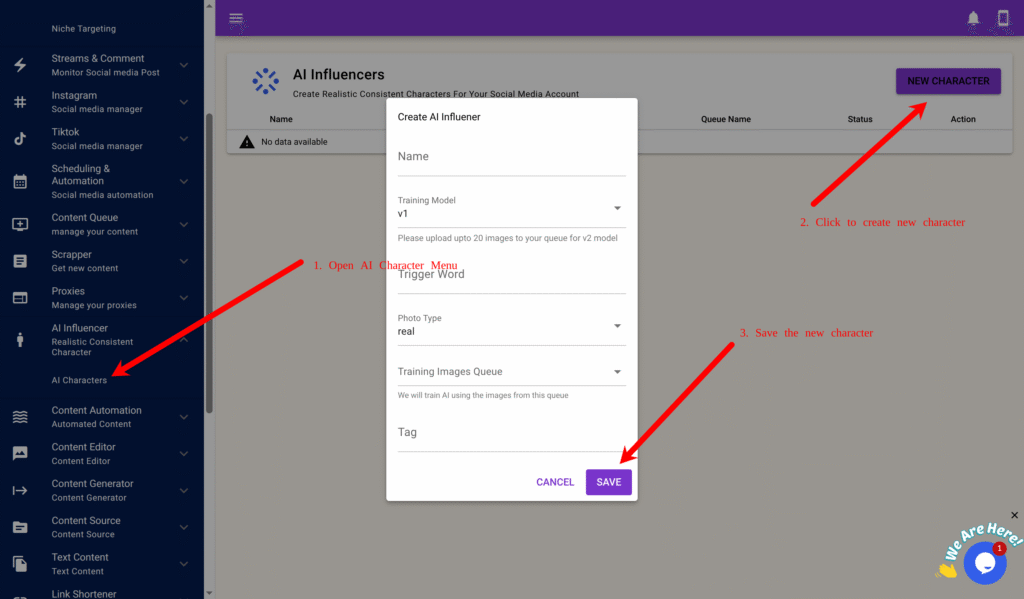
    1. Go to AI Influencer → AI Characters → New Character.
    2. Prepare 15–20 clear, high-quality images of your influencer in different poses and outfits.
    3. Create a Content Queue called My Influencer Training Images and upload your photos.
    4. Fill in the fields:
      • Name: e.g., Jane
      • Model: v1 or v2 (v2 offers higher realism)
      • Trigger Word: e.g., j1ne1
      • Training Images Queue: My Influencer Training Images
    5. Click Save → Train.

    Training takes about an hour. Once finished, your influencer is ready to generate content.

    🧠 Step 2: Automatically Generate Podcast-Style Images

    You can automate daily creation of influencer photos in podcast or lifestyle scenes.

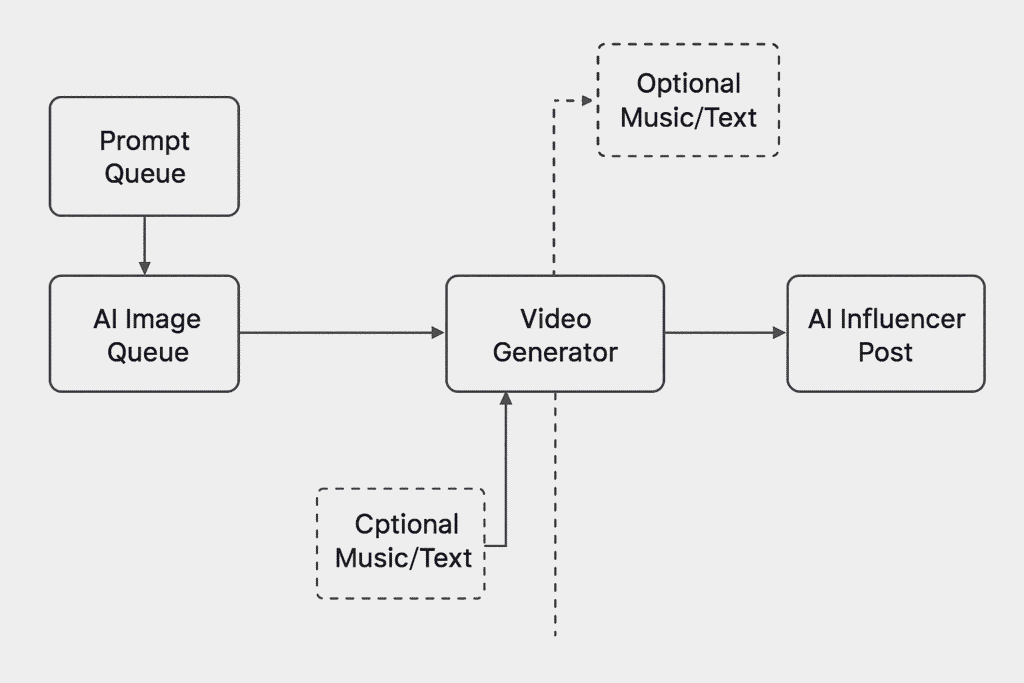
    Step 2A – Create a Dynamic Prompt Queue

    1. Go to Content Queue → Add New, name it Podcast Image Prompts. Create another one Influencer Podcast Images and tick Approve Content First Before Use.
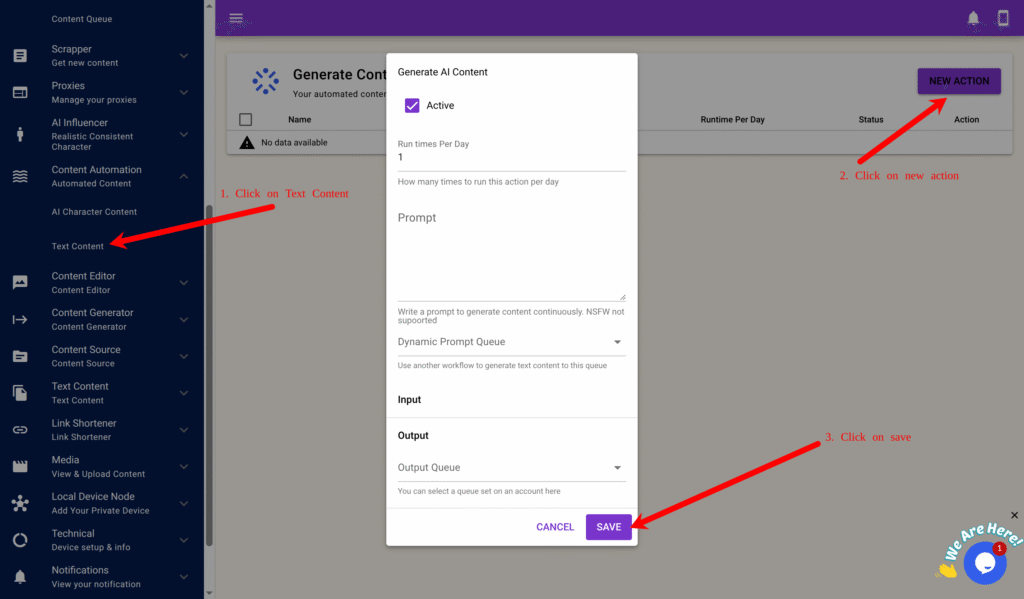
    2. Go to Content Automation → Text Content → New.
    3. Configure the form:
      • Run Times Per Day: 2
      • Prompt: You are a prompt engineer generating photo ideas for an AI influencer recording podcasts.
        Generate one short prompt describing her pose, outfit, and background.
        Example: “A realistic portrait of her speaking into a microphone in a studio, warm lighting, neutral background.”
      • Output Queue: Podcast Image Prompts
    4. Click Save.

    This queue will now generate new creative photo prompts daily.

    Step 2B – Create AI Character Content Automation

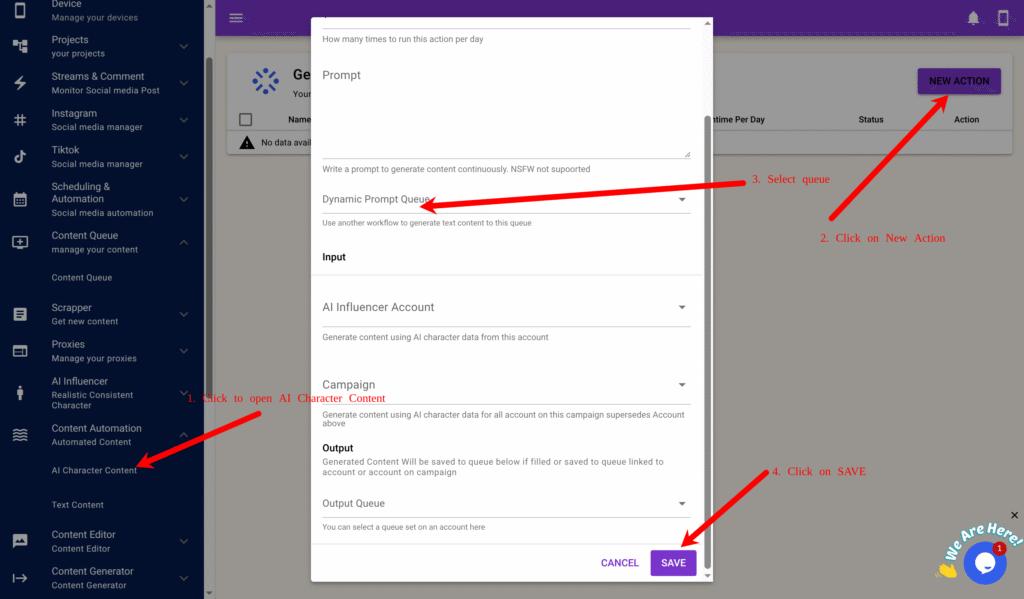
    1. Go to Content Automation → AI Character Content → New.
    2. Fill in:
      • Run Times Per Day: 2
      • Dynamic Prompt Queue: Podcast Image Prompts
      • AI Character: your trained influencer
      • Output Queue: Influencer Podcast Images
    3. Click Save.

    SocialAppFarm will now automatically generate influencer podcast-style images daily and store them in Influencer Podcast Images.

    Step 2C – Review and Approve

    Go to Content Queue → Influencer Podcast Images → View Content and approve the best images for posting.


    Step 2D – Use as Input for Video Generation

    Later (in Step 3), select Influencer Podcast Images as your Input Queue when generating talking videos.


    🎙️ Step 3: Prepare Your Audio or Script

    You can upload your own voice, generate AI voiceovers, or scrape trending audio.

    A. Upload Your Own Audio

    1. Go to Content Queue → Add New, name it My Audio Speech.
    2. Upload your recorded MP3 files.

    B. Generate Speech Using AI

    1. Go to Content Automation → Text Content → New.
    2. Example prompt: “Write a 30-second motivational podcast script about discipline and consistency.”
    3. Set Run Times Per Day: 3.
    4. Choose Output Queue: My Audio Speech.

    C. Scrape and Convert

    Use the Scraper Add-on to extract captions or speech from TikTok, Instagram, or YouTube videos.
    Rewrite or convert them into speech using the AI text tools.


    💬 Step 3B: Generate Talking Videos

    Step 3B-1: Create Text Style

    1. Go to Content Generator → Text Style → New Style.
    2. Example settings:
      • Name: White Caption Bottom Center
      • Position: Bottom Center
      • Text Color: White (#ffffff)
      • Font Size: 12
      • Background: Box or Full (optional)
      • Text Effect: Karaoke (for dynamic captions)
    3. Click Preview to check the design, then click Save.

    Step 3B-2: Create Video Automation

    1. Go to Content Generator → Faceless Content → New.
    2. Fill out the form:
      • Run Times Per Day: 1–3
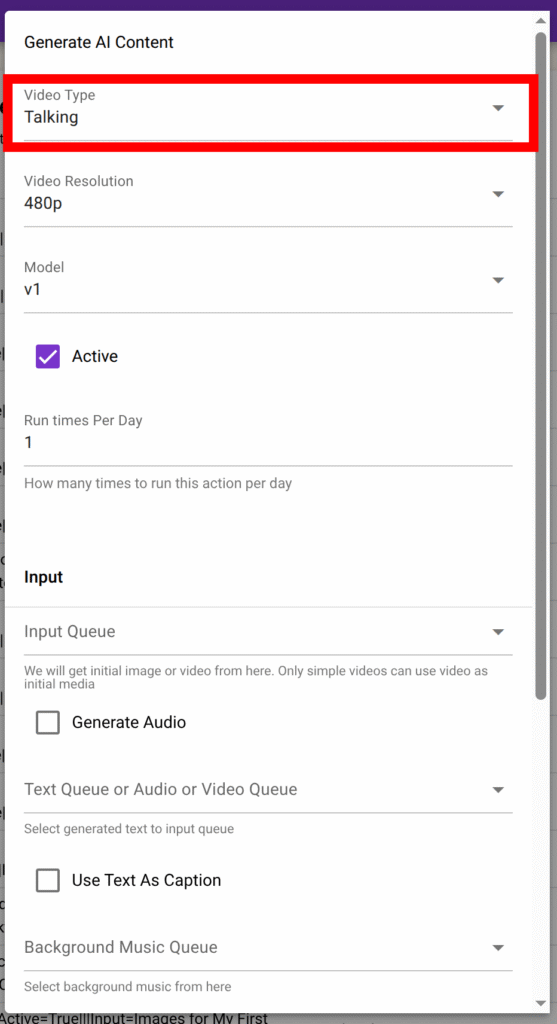
      • Video Type: Talking
      • Resolution: 480p or 720p
      • Model: v1 or v2
      • Input Queue: Influencer Podcast Images
      • Influencer: Select your trained influencer
      • Text/Audio Queue: My Audio Speech
      • Generate Audio: ✅ (if using text input)
      • Voice: Select your preferred voice
      • Generate Subtitles:
      • Background Music Queue: Optional
      • Style: Select your text overlay style (e.g., “White Caption Bottom Center”)
      • Output Queue: My Influencer Videos
    3. Click Save.

    SocialAppFarm will now generate daily talking videos for your influencer using your approved images and speech.


    🧩 Step 4: Create Your Campaign and Set Niche Targeting

    Step 4A – Create Niche Targeting

    1. Go to Project create a new project and activate it.
    2. Go to Project → Niche Targeting → Add New.
    3. Fill in the form:
      • Name: Productivity Niche
      • Content Queue: My Influencer Videos
      • Keywords: productivity, motivation, self-growth, focus, daily routine, mindset, success habits
      • Use AI To Determine Interaction Interaction Prompt:
        “Engage only with English posts related to productivity or motivation. Like posts with more than 10 likes and avoid spam or private profiles.”
      • Use AI To Generate Comment Comment Prompt:
        “Write helpful or funny comments that feel natural. Example: ‘Love this energy!’ or ‘Such a great reminder!’.”
    4. Click Save.


    Step 4B – Create a Campaign

    1. Go to TikTok → Campaign or Instagram → Campaign.
    2. Click Add New and fill in:
      • Name: My Influencer Campaign
      • Share Device: Select your active device
      • Content Queue: My Influencer Videos (You can also upload your own videos here if you prefer.)
    3. Click Save.

    Step 4C – Add Accounts

    1. On your campaign, click View Accounts → Add New.
    2. Fill in:
      • Username (required)
      • Password, Email, Email Password, or 2FA Key (optional)
    3. Click Save.

    Or bulk import using CSV format:

    username:password:email:emailpassword:biolink:bio:2fakey
    

    Select the newly created Niche for each account and assign your Influencer if you have one.


    Step 4D – Assign Proxies

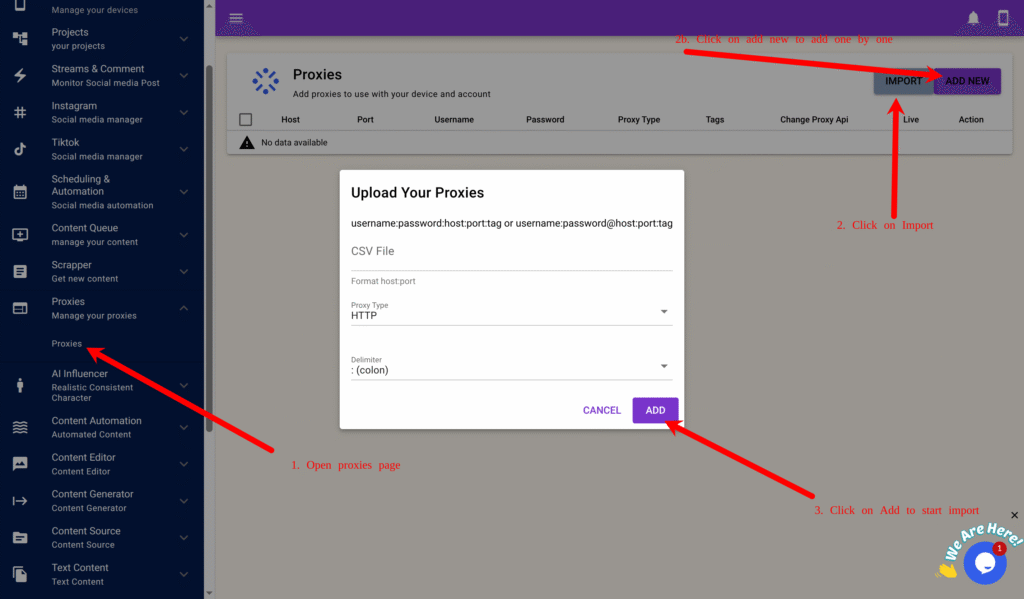
    1. Go to Proxy → Add New or Import.
    2. Add or import proxies in this format:
    username:password:1.1.1.1:8080:automation
    
    1. Return to your campaign → View Accounts → click Auto Assign by Proxy Tag, enter your tag (e.g., “automation”), and click OK.

    💡 Step 5: Prime Your Accounts

    Priming helps new accounts act naturally and establish trust with the algorithm.

    1. Go to TikTok → Campaign → View Schedule or Instagram → Campaign → View Schedule.
    2. Create a Priming Schedule:
    TimeActivityAction
    8 AMSearch TagsLike 5–10 posts
    12 PMSearch Video / FeedComment 1–3 posts
    4 PMView Profile Stats
    8 PMView Feed / FYPLike 5 posts
    11 PMView Feed / FYPComment 2 posts
    1. Save as “Priming Schedule.”
    2. Run it for 5–7 days before switching to your main posting schedule.

    📅 Step 6: Schedule Daily Posting

    Once priming is done, switch to consistent posting and engagement:

    TimeActivityAction
    9 AMView Feed / FYPLike 5–10 posts
    12 PMCreate PostPost from My Influencer Videos queue
    6 PMUpdate Profile Stats
    9 PMView FeedComment 1–3 posts
    1. Save as “Daily Posting Schedule.”
    2. Load it after priming — your influencer account will now post and engage automatically every day.

    Result

    You’ve successfully built a fully automated solo influencer system using SocialAppFarm.

    Your setup now:

    • Generates influencer images and talking videos automatically
    • Uses uploaded or AI-generated speech
    • Likes, comments, and interacts in relevant niches
    • Posts daily content — all from one dashboard

    Perfect for standalone influencer brands or small-scale content creators.
  • How to Automate Brand and Keyword Comment Marketing on Reddit With AI Support

    SocialAppFarm includes a powerful feature that lets you track new Reddit posts or comments containing your brand name or specific keywords — and automatically engage with them using AI-generated or manual comments.

    You can monitor multiple subreddits or keyword streams from your dashboard, review the posts, and decide whether to comment manually or let AI handle the responses automatically.

    Add-ons You’ll Need

    • Social Appfarm Main Device Subscription
    • Reddit Comment Marketing Addon

    Optional Addons

    You can also use multiple account for large projects and setups (Commenting is rotated among these account)

    • Manage up to 25 Extra Social Media Accounts per Device
    • Proxies (1-3) account per proxy
    • Google Drive account (for device backups)

    Chapter 1: Setting Up Your Proxy and Accounts

    If you plan on running many reddit accounts, a proxy is essential for stability and safety.

    Recommended Proxy Types

    • Best: 4G/5G Mobile Proxy
    • Good: ISP or Residential Proxy (cost-effective and reliable)

     Ratio: 1 proxy for every 1–3 accounts (max 4).
    For 25 accounts, buy around 8 proxies.


    Step 1: Adding or Importing Proxies

    1. Go to Proxy → Proxy in the main menu.
    2. Click Add New and fill in the following as an exmample:
      • Host: 1.1.1.1
      • Port: 8080
      • Username: user
      • Password: pass
      • Tag: automation
      • Proxy Type: HTTP or Socks5
      • Proxy Change URL: (if you only have one proxy and its supports automatica rotation through url input the url)
    3. For bulk import, create a proxy.txt file: 
      • username1:password1:1.1.1.1:8080:automation username2:password2:1.1.1.2:8080:automation
    4. Click Import, select the file, proxy type and click Add.

    Chapter 2: Creating Your Campaign, and Backup

    To support multiple accounts per device, we’ll back up data to Google Drive.


    Step 1: Connecting Google Drive

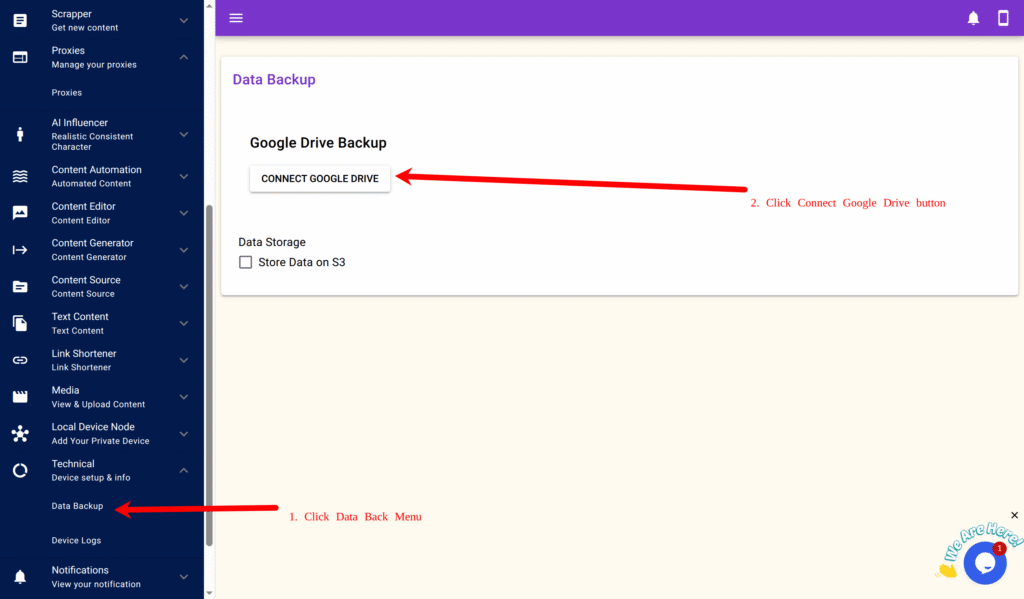
    1. Navigate to Technical → Data Backup → Connect Google Drive.
    2. Log in to your Google account and authorize SocialAppFarm.
    3. You’ll be redirected back automatically.

    For large-scale setups, you can alternatively use Cloudflare R2, Idrive E2, Amazon S3 or any S3-compatible storage.


    Step 2: Create a Reddit Automation Campaign

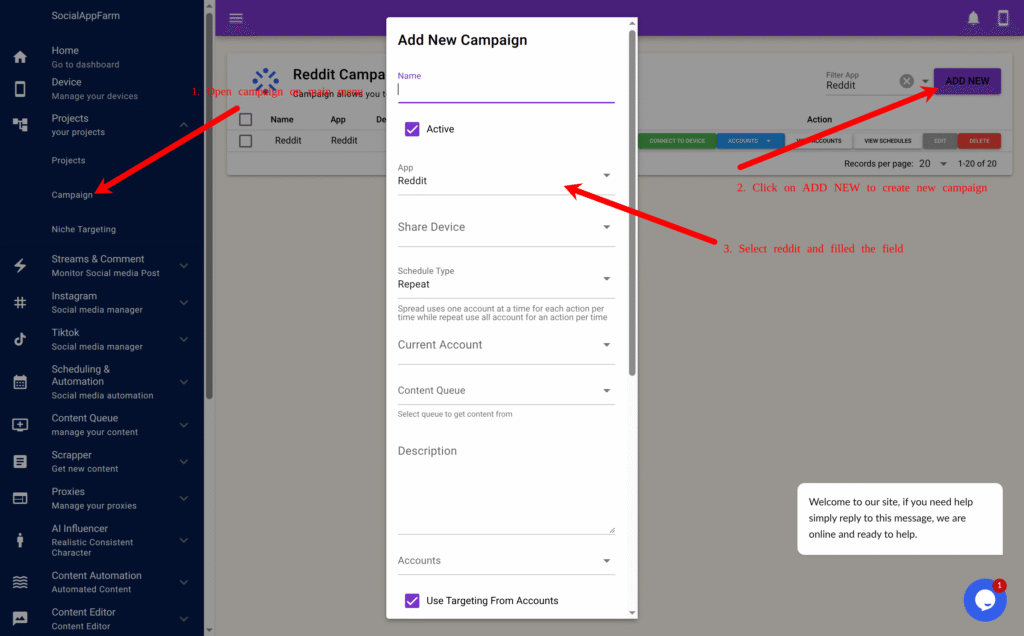
    1. From the main menu, go to Projects Campaign.
    2. Click Add New to create a new Reddit automation campaign.
      • Name: Enter a campaign name e.g Watch Campaign.
      • App: Select Reddit as your platform.
      • Share Device : Select your Reddit device
      • Use Comment & PM From Accounts: Untick field
      • Use AI To Generate Comment: Tick this (Requires credit)
      • Extra Comment Prompt: Input prompt for AI to generate comment for reddit post e.g Short Helpful comment that sounds human and natural. Mention my ebook about dog training “BOOK NAME” if post is about dog training
    3. Click Save.

    This campaign will handle the automatic commenting on tracked Reddit posts.

    Step 3: Import or Add Your Account

    Note: Only username is important when adding or Importing your account but socialappfarm can help you auto login if you include your password, it can also retrieve code from email if your email has imap access

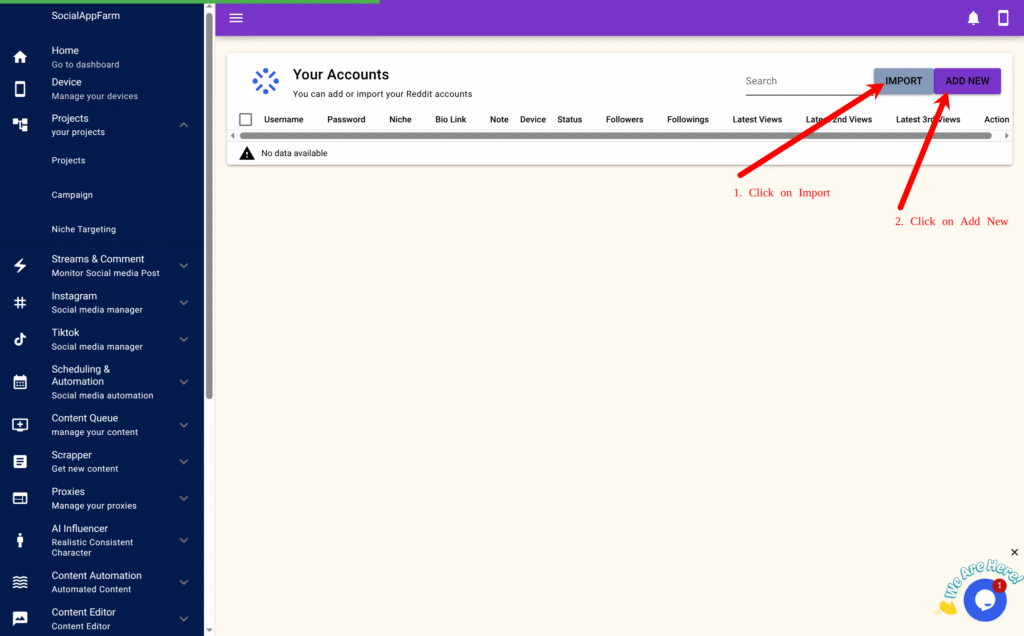
    1. On the created campaign, click View Accounts → Import. (You can also add your account ony by one by clicking on Add New and fill in the account info)
    1. Format your bulk import (CSV or TXT): username:password:email:emailpassword:biolink:bio:2fakey (Example below)
      • username1::::::
      • username2:pass2:::::2faKey2
    1. Upload and import.
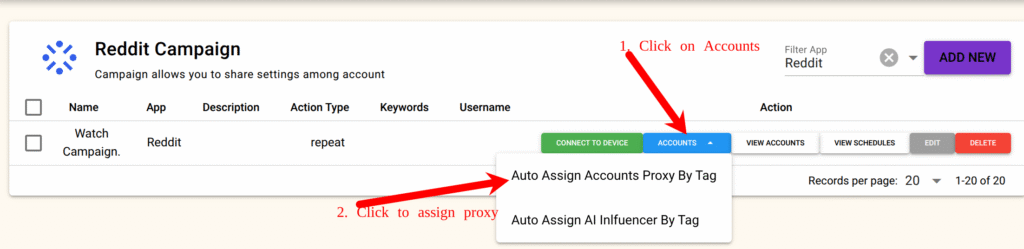
    2. Then go back to the Campaign page again and click Accounts → Auto Assign by Proxy Tag, input your tag (e.g., automation), and confirm.
    3. Proxies will now be evenly distributed to all accounts.

    Step 4: Logging Into Accounts

    1. Open your campaign and click Connect Device
      • (Important : Connect from the campaign page, not the device list).
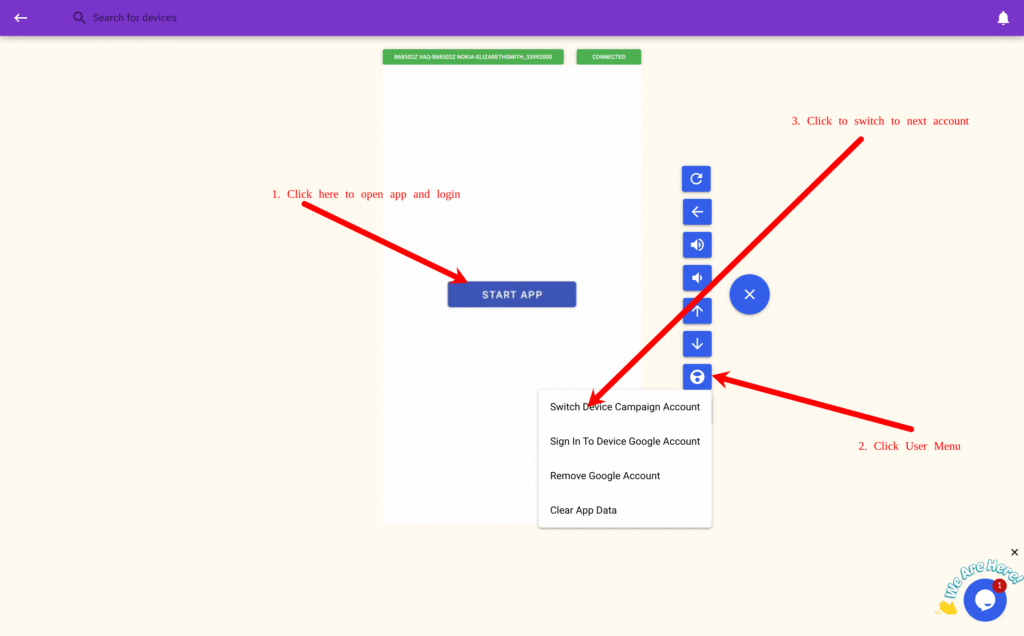
    1. On the device stream page, click Start App, then log in manually.
    2. Click the “+” icon → User Menu → Switch Device Campaign Account, select the next account, and repeat the login.

    Step 5: Schedule Comment Stream On Your Campaign

    You need to set up a schedule for automatically commenting on stream posts from your automation campaign.

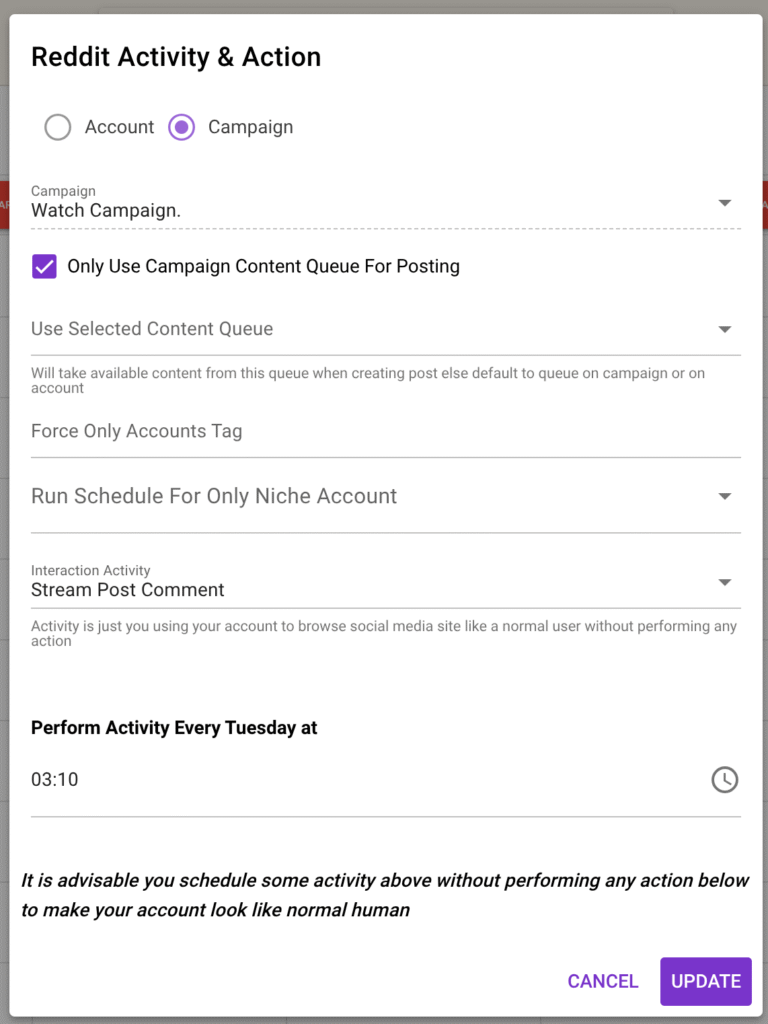
    • On the created campaign, click VIEW SCHEDULES

    Schedule the Stream Post Comment interaction activity for the days and hours you want comments to be posted.

    SocialAppFarm will automatically comment on all approved Reddit stream posts from your dashboard.

    You can:

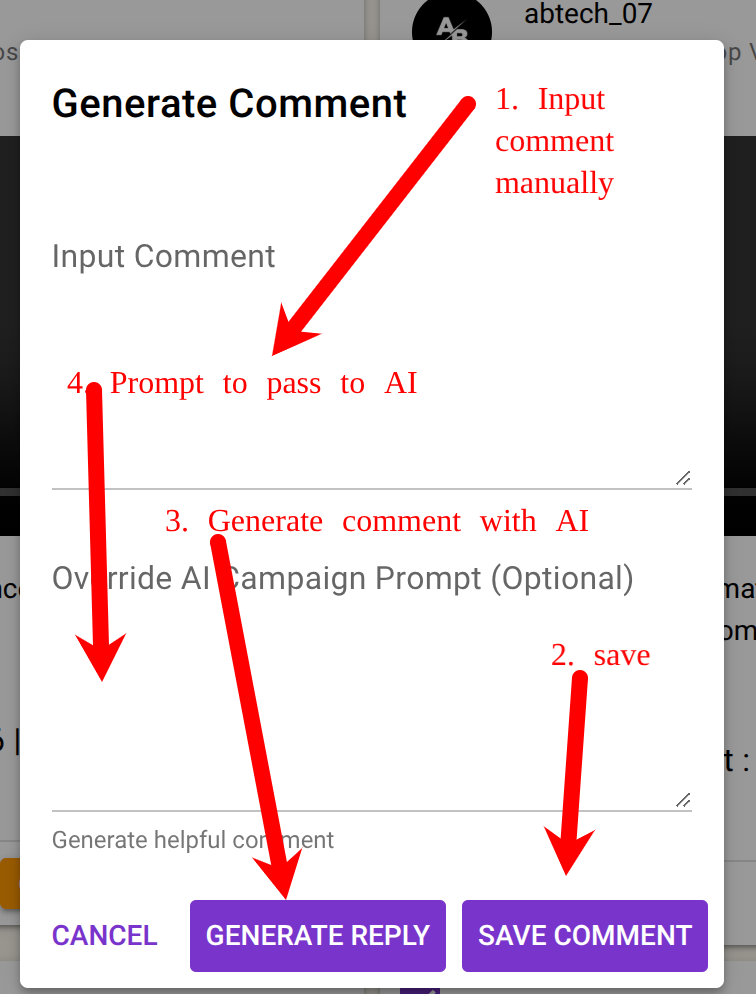
    • Write comments manually, or
    • Allow AI to auto-generate replies based on your campaign’s comment prompt.

    Chapter 3: Creating Your Stream Campaign

    Step 1: Set Up a Stream Campaign for Reddit

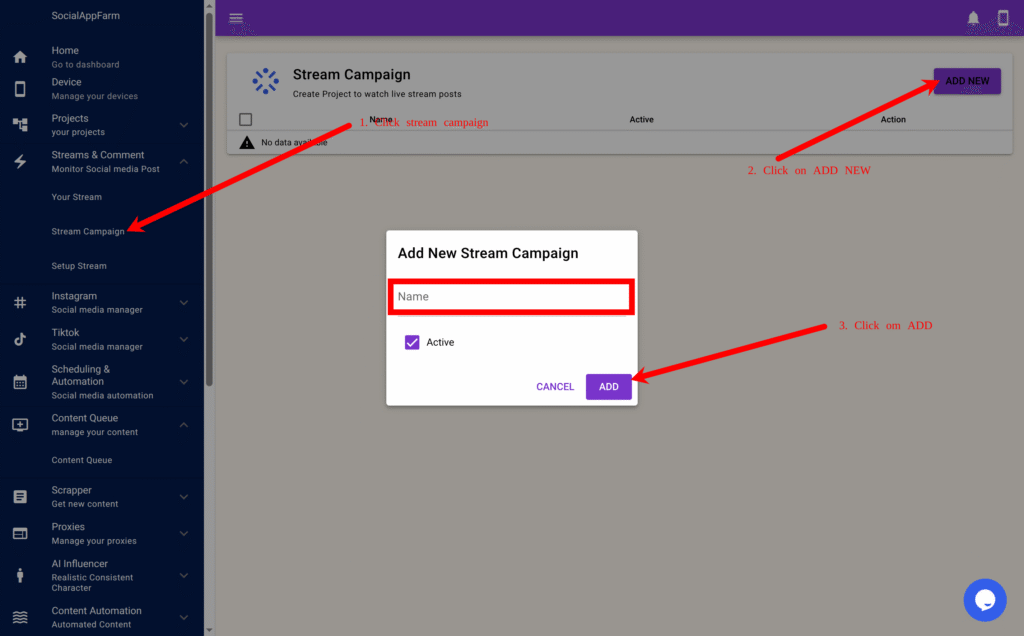
    1. On the main menu, go to Streams & Comments → Stream Campaign.
    2. Click Add New to create a new stream campaign.
    1. Enter a name — for example: Watch My Brand on Reddit.
    2. Click ADD.

    Step 2: Set Up a Stream for Reddit

    1. Click View Stream Setup on your newly created campaign.
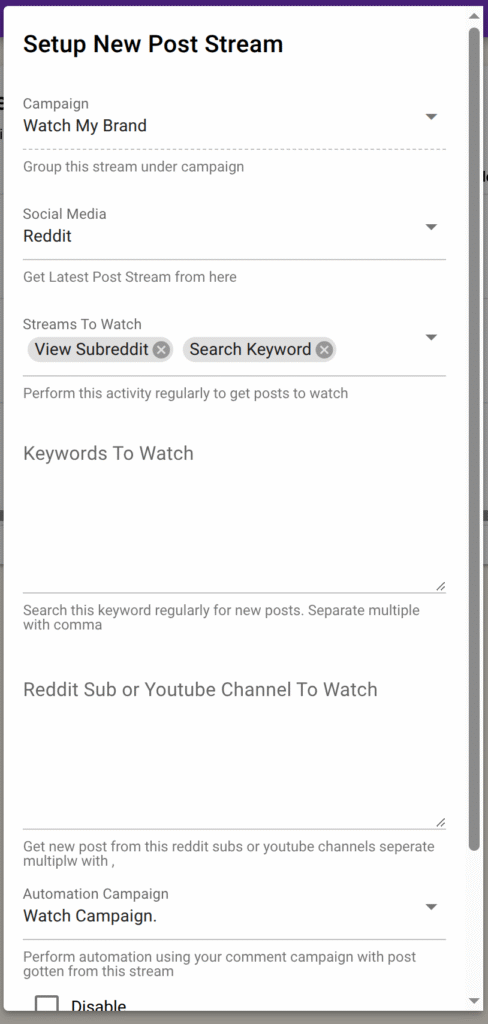
    1. Click Add New to create a stream setup.

    In the pop-up form:

    • Choose Reddit as the social media platform.

    You can choose between these stream types:

    • View Subreddit → Monitors specific subreddits for new posts or comments.
    • Search Keyword → Finds Reddit posts containing your chosen keywords across subreddits.

    In the Keywords field, enter the list of words or phrases you want to monitor — separated by commas.

    Example: shopify, dropshipping, ecommerce, viral product

    In the Subreddits field (for “View Subreddit” type), enter subreddit names separated by commas.

    Example: Entrepreneur, eCommerce, SmallBusiness, SideHustle

    In the Automation Campaign field, select the Reddit campaign you created under Project → Campaign. (Chapter 2 Step 2)
    ⚠️ Make sure “Stream Comment” is scheduled on that campaign so comments are posted regularly.


    Step 3: Additional Options

    • Approve Post Before Automated Action → ✅ Tick this to manually review Reddit posts before the system comments.
    • Disable → Temporarily stop fetching new posts for this specific stream.

    You can create multiple streams per Reddit campaign — for example:

    • One stream that watches keywords like Shopify or Dropshipping, and
    • Another stream that monitors subreddits like r/ecommerce or r/marketing.

    Click Add to save your stream setup.
    Repeat these steps to create multiple keyword or subreddit streams as needed.


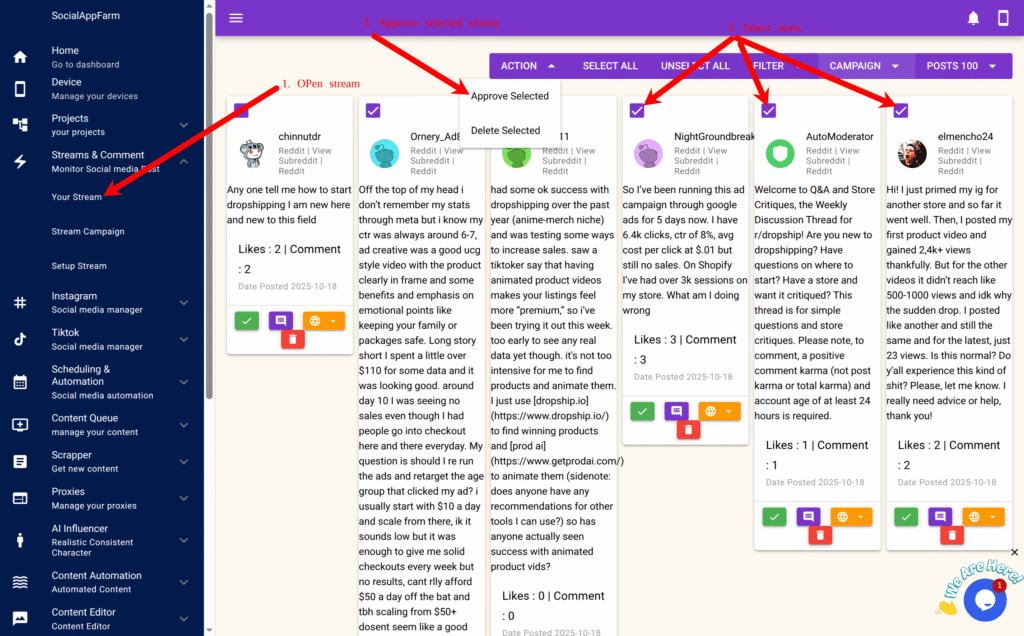
    Step 4: Monitor and Manage Your Reddit Streams

    From the main menu, go to Your Stream to:

    • View all new Reddit posts matching your keywords or subreddit streams.
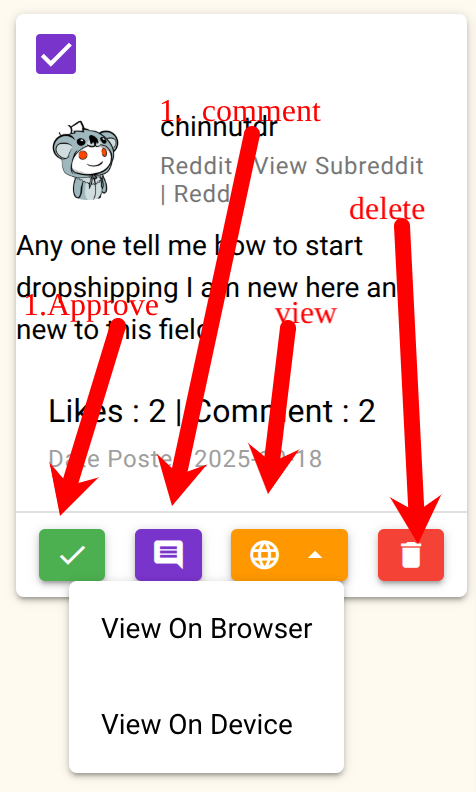
    • Open the posts directly in your browser or device for quick engagement.
    • Filter or hide posts that don’t match your brand or niche.
    • Use the AI Comment Generator to automatically create contextual comments.
    • Manually input or edit comments if needed.
    • Approve posts to enable automatic commenting by your selected automation campaign.

    Result

    You can now:

    • Monitor Reddit for new discussions mentioning your brand or keywords.
    • Automatically comment or reply using AI-powered responses.
    • Stay active in relevant communities without manual effort.
    • Manage everything directly from your SocialAppFarm dashboard.


    Example Use Cases

    • Track mentions of your product or brand across multiple subreddits (e.g., r/shopify, r/Entrepreneur).
    • Auto-comment on trending Reddit posts in your niche using AI-generated helpful or witty replies.
    • Drive organic traffic by engaging consistently in subreddit conversations — all on autopilot.
  • Influencer Automation: Generating Realistic Talking Videos for Your AI Influencer Using Audio or Text

    You can now create realistic talking videos for your AI influencer’s images using SocialAppFarm’s Faceless Content Generator.
    This feature allows your influencer to speak from text or audio, creating dynamic and engaging videos for platforms like TikTok and Instagram.

    If you haven’t yet created your AI influencer images, first check the previous article on Generating AI Influencer Images.
    For this workflow, we recommend generating images in talking or podcast-style poses — e.g., prompts like:

    “A podcaster sitting in front of a microphone, medium shot.”

    This ensures your AI influencer looks natural when converted into talking videos.


    Step 1: Create Content Queues

    We’ll set up three queues for this workflow.

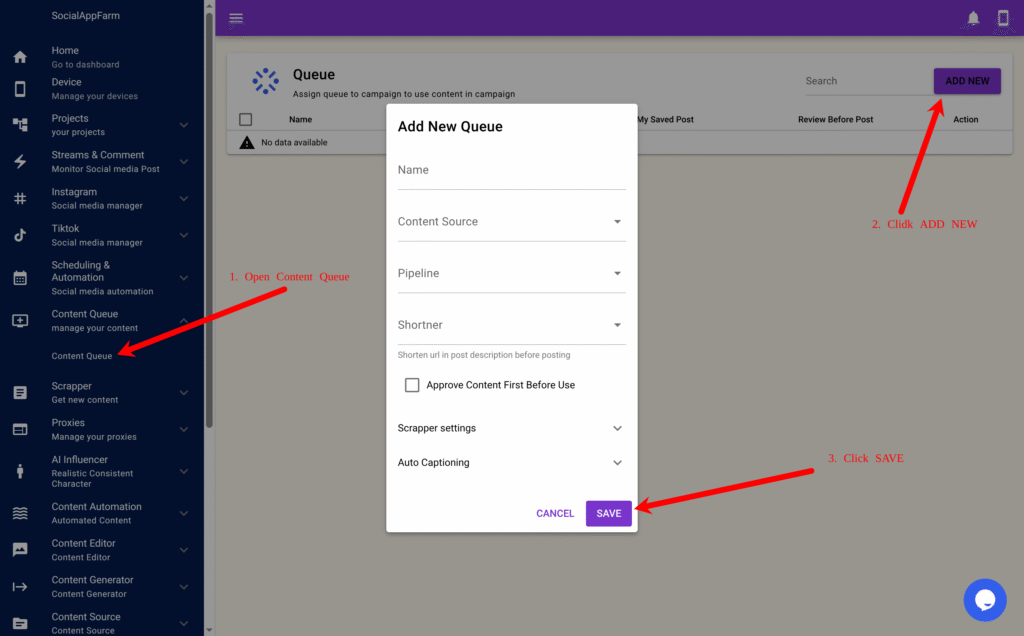
    1. Talking Video Queue
      • Go to Content Queue → Content Queue.
      • Click Add New.
      • Name it: My Talking Video Queue
      • Click Save.
    2. Audio Speech Queue
      • Click Add New again.
      • Name it: My Audio Speech
      • Click Save.
    3. (Optional)Background Music Queue
      • Create another queue called: Background Music
      • Upload background tracks (MP3 ) to this queue and Save.

    Step 2: Add Audio or Text to Your Audio Speech Queue

    Your have 3 options to fill the Audio Speech Queue with the words your AI influencer will say.

    Option 1: Upload Recorded Audio

    • Upload your recorded .mp3 or .wav files directly to the My Audio Speech queue.

    Option 2: Use Text-to-Speech (TTS) or Generate Text Using AI

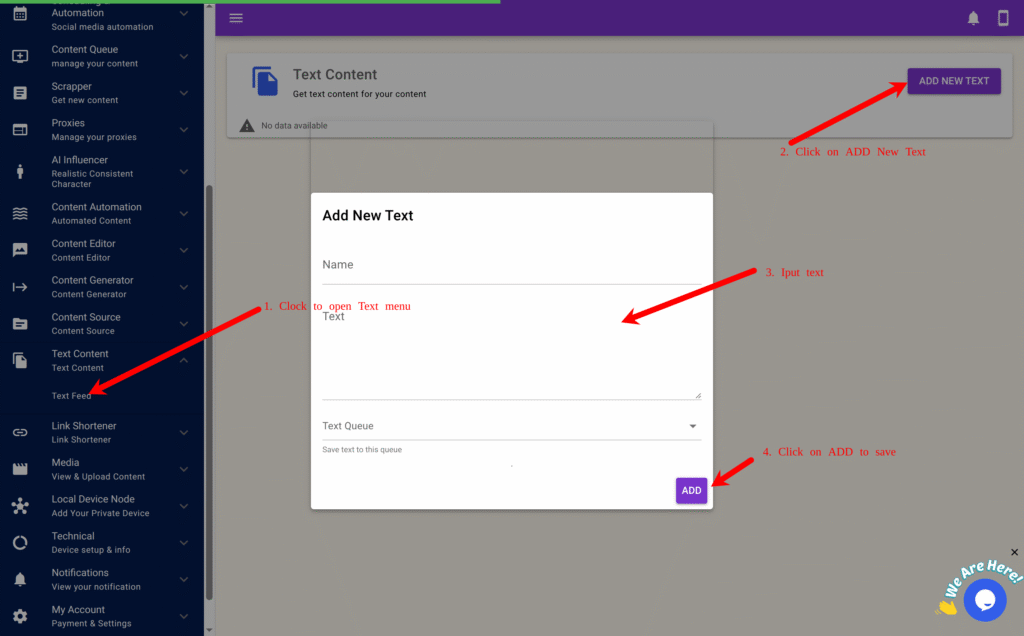
    • Go to Text Content → Text Feed.
    • Click Add NEW Text.
    • Enter the text you want your influencer to say.
    • In the Audio Queue field, select My Audio Speech.
    • Click Save.
      This text will be converted into speech automatically during generation.

    Option 3: Use the Scraper Add-on

    If you have the SocialAppFarm Scraper Add-on, you can:

    • Scrape viral speeches or quotes from TikTok, Instagram, or YouTube.
    • Automatically rewrite them before saving into your Audio Speech Queue.

    Step 3: Create the Faceless Content Automation

    Now we’ll create the automation that combines your influencer’s images, speech, and optional background music into talking videos.

    1. Go to Content Generator → Faceless Content.
    2. Click New to create a new automation form.
    3. Fill in the fields as follows:
    FieldDescription
    Run TimesNumber of times per day to generate new talking videos (e.g., 2–4).
    Video TypeSelect Talking.
    ResolutionChoose 480p or 720p (720p is higher quality but more expensive).
    ModelSelect v1 or v2 (v2 gives more realistic lip-sync and lighting).
    Input QueueChoose the queue where your AI Influencer images are stored. These images will be used to create the talking videos.
    Generate Audio✅ Tick this if using text input instead of pre-recorded audio.
    VoiceChoose your preferred voice for text-to-speech output if using text input instead of pre-recorded audio.
    Text Queue / Audio QueueSelect your My Audio Speech queue where your audios or text are saved.
    Background Music QueueSelect Background Music (optional).
    Generate Subtitles✅ Tick this to display captions that match the spoken audio.
    Display subtitle one word at a time✅ Tick this to display captions One word at a time
    Text StyleSelect your previously created text style (e.g., My First Text Style).
    Output QueueSelect My Talking Video Queue.

    Step 4: Save and Start Generating

    Once all fields are filled:

    1. Click Save.
    2. SocialAppFarm will now automatically:
      • Take influencer images from the input queue
      • Use text or audio from the audio queue
      • Generate realistic lip-syncing and talking animations
      • Apply background music and subtitles (if enabled)
      • Save the finished videos into the output queue

    Step 5: Auto-Post to Social Media

    To automatically post your generated talking videos:

    1. Go to your TikTok or Instagram campaign.
    2. Set the Content Queue to your My Talking Video Queue.
    3. SocialAppFarm will automatically post these talking videos based on your active schedule
    4. Just keep uploading your speech or text to the audio queue. Socialappfarm will create new talking video for you and auto-post to your account

    ✅ Final Workflow Summary

    StepTaskPurpose
    1Create queuesOrganize images, audio, and output videos
    2Add text or audioProvide speech for your influencer
    3Configure Faceless ContentCombine voice, image, and effects
    4Save & generateAutomate realistic talking videos
    5Auto-postInstantly publish to TikTok & Instagram

    ✨ Result

    Your AI influencer now talks naturally, delivering dynamic videos created from either text or audio — fully automated.
    You can continuously feed new text or speech into the Audio Queue, and SocialAppFarm will keep generating new talking videos daily.